by Diego Ramirez
Last spring, a neighbor asked me to look at his SUV — he couldn't figure out why every fresh coat of wax turned out dull and patchy no matter what he tried. One swipe of a damp microfiber across the hood told the whole story: layers of oxidized old wax caked into every panel crease and seam. It's one of the most common detailing problems out there. Knowing how to remove old wax buildup from car paint is the foundation every good detail job is built on. Skip this step and every new coat you add just traps the old mess underneath, dimming the very shine you're working toward. Before you reach for fresh wax, brush up on our complete guide to waxing a car by hand — it'll make a lot more sense once the surface is clean.
Contents
Here's the blunt truth: new wax on top of old wax doesn't double your protection — it cuts your performance in half. Fresh wax is designed to bond directly to clearcoat (the transparent protective layer over your color coat). When it bonds to a chalky, degraded layer of old product instead, adhesion fails and the new coat wears off in weeks.
Strip first and you get real, measurable benefits:
Old wax doesn't just stop protecting — it starts causing harm. Oxidized (broken-down) wax traps moisture, road grime, and contaminants like road salt deposits directly against your paint surface. Over time, those trapped materials accelerate micro-etching of the clearcoat and, on older vehicles without modern multi-layer paint systems, can even allow surface rust to develop.
Watch for these warning signs that your car needs a full wax strip:
Pro tip: Do the IPA wipe test — rub a small hidden area with 70% isopropyl alcohol on a clean white cloth. If the cloth picks up a yellowish or brownish residue, old wax is still present and needs to come off before you apply anything new.
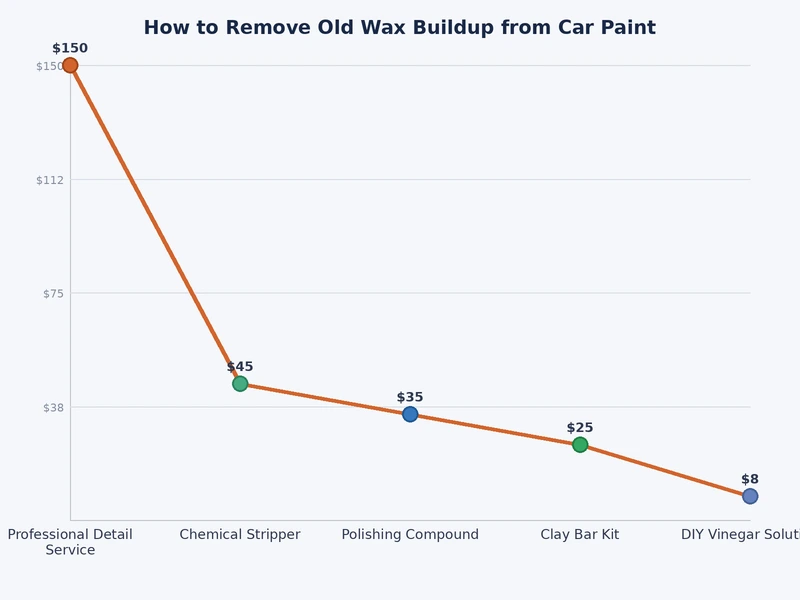
You don't need a garage full of gear. The right product for your level of buildup does the heavy lifting.
| Product Type | Best For | Effort Level | Safe on All Paint? |
|---|---|---|---|
| Isopropyl alcohol (IPA) wipe-down | Light buildup, pre-wax prep | Low | Yes — dilute to 50–70% |
| Dedicated wax remover / pre-wax cleaner | Moderate buildup | Low–Medium | Yes |
| Paint cleaner (mild abrasive polish) | Heavy buildup + light oxidation | Medium | Yes — test on hidden panel first |
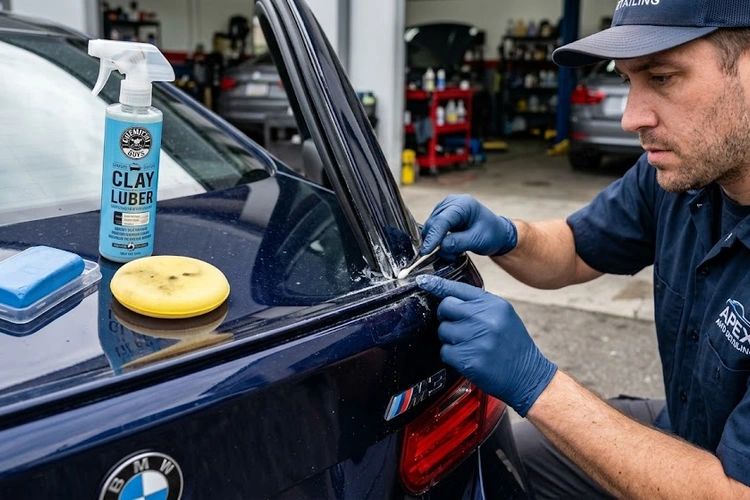
| Clay bar + lubricant | Bonded contaminants and residual wax | Medium | Yes — never use without lubricant |
| DA orbital polisher + polish | Severe buildup, oxidation, swirl marks | High | Caution on thin or single-stage paint |
Gather these before you start. Stopping mid-job to find a missing tool is how you end up with half-stripped panels and dried product baking in the sun.
According to Wikipedia's overview of car wax chemistry, automotive wax has been in use for over a century — and the myths have had just as long to pile up. Here are the ones causing the most damage.
This is the single most common detailing mistake. The logic sounds reasonable — "more wax equals more protection." In reality, stacking coats without stripping first accelerates the problem. Older layers oxidize and go chalky. New wax can't penetrate through dead, degraded material to bond with the clearcoat below.
The reality: One properly bonded coat on a clean, stripped surface beats five stacked coats on a contaminated one. Every single time. You're not building up protection — you're building up problems.
Expensive wax removers and paint cleaners help, but none of them eliminate the need for a clean pre-wash and proper technique. A $5 bottle of isopropyl alcohol and a fresh microfiber will outperform a $60 "miracle" paint prep product if your technique is right and your starting surface is clean.
A few more myths worth clearing up fast:
Warning: Never use dish soap as a regular wash product. If you use it for a one-time strip wash, follow it immediately with a fresh coat of wax or paint sealant — dish soap removes all wax and leaves your paint completely unprotected.
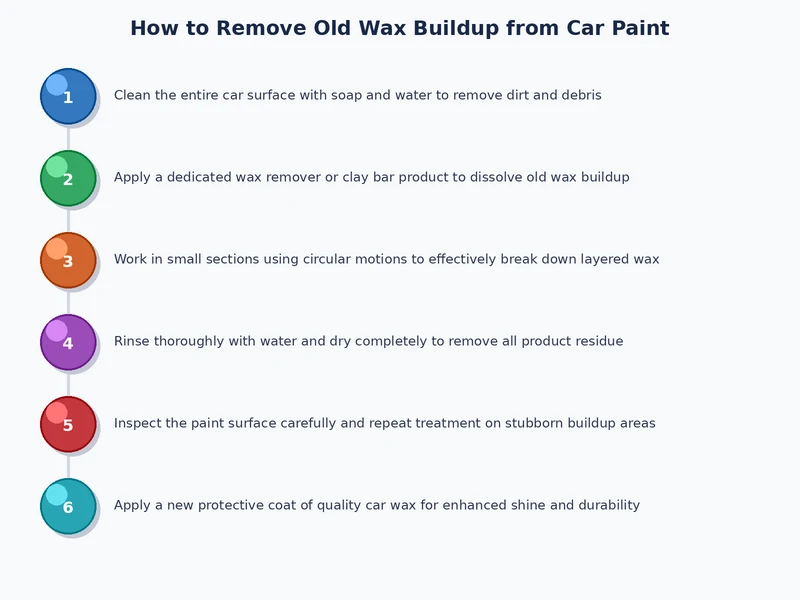
There are two solid approaches depending on how heavy your buildup is. Always start with the hand method. Only escalate to machine polishing if the surface is still hazy or if you're dealing with significant oxidation on top of the wax.
If the hand method leaves a hazy or uneven surface — or if you're dealing with heavy oxidation layered on top of old wax — a dual-action (DA) orbital polisher with a light polish is the right next step.
If you catch an unusual chemical smell while the polisher is running — stop immediately and check your pad and paint surface. Unexplained burning or melting odors in any car context are worth investigating; our guide on cars that smell like burning plastic can help you rule out other issues while you're working in the driveway.
This is the fastest way to turn a straightforward job into a painful one. Wax removers and clay bars are designed to act on wax — not on embedded road grit. Drag a clay bar over a dusty panel and that grit becomes sandpaper against your clearcoat. You'll spend more time polishing out the scratches than you saved by skipping the wash.
Non-negotiable pre-wash rules:
The same wash-first principle applies to removing any surface contaminant. If you're also battling salt stains on the paint and body panels, those need to come off before you start stripping wax — otherwise you're working product over active corrosion. And if you're making a full detail day of it, pairing exterior work with interior cleaning tasks like removing pet odors from the cabin while you already have everything set up saves time.
Not all paint responds the same way to the same products. Single-stage paint (common on older vehicles and some commercial trucks — it has no separate clearcoat layer) is far more sensitive to abrasives. Matte and satin finishes require completely different chemistry — any abrasive or gloss-enhancing product will ruin the finish permanently and the damage isn't reversible.
Quick reference guide before you buy anything:
When in doubt, test any new product on a hidden panel — inside a door jamb or the underside of the trunk lid — before committing to the full car. Five minutes of testing saves hours of correction work.
Strip your paint down to bare clearcoat every 6–12 months, depending on how often you wax and what conditions your car is exposed to. If you wax every 3 months, a full strip once or twice a year is enough. If you're seeing white residue in panel gaps, blotchy new wax application, or a surface that no longer beads water, strip it regardless of your schedule.
A one-time dish soap wash will strip wax, but it also strips protective oils from rubber seals and trim, and repeated use can dull clearcoat over time. Use a dedicated wax remover or 50/50 isopropyl alcohol and distilled water for better results without the side effects on your trim and seals.
A clay bar removes bonded surface contaminants including wax residue, but it works best as a final step after an IPA wipe-down and a dedicated wax remover — not as a standalone method for heavy buildup. Always use a detailing spray lubricant with the clay bar. Never use a clay bar on a dry or dusty surface.
The most reliable method is the IPA wipe test: wipe a small section with 70% isopropyl alcohol on a clean white cloth. If the cloth picks up yellowish or brownish residue, old wax is still present. A clean, fully stripped surface will also feel slightly grabby to a clean rubber-gloved fingertip rather than slick or waxy.
A dual-action (DA) orbital polisher is safe for most paint types when used correctly. Keep the machine moving at all times, use the correct pad aggressiveness for your paint condition, start at low speed, and work in small sections. Avoid machine polishing on matte finishes and exercise extra caution on very old single-stage paint with unknown clearcoat thickness.
Yes. Oxidized old wax traps moisture and contaminants — including road salt and industrial fallout — directly against the paint surface. Over time, this accelerates micro-etching of the clearcoat and can contribute to surface rust on older vehicles. Old wax is not neutral; it actively works against the paint once it begins to break down.
A wax remover is a chemical product that dissolves and lifts wax without any abrasive action — it's a pure stripping agent. A paint cleaner contains mild abrasives that remove light oxidation and surface defects in addition to stripping wax. For heavy buildup with visible oxidation, a paint cleaner is the better choice. For light buildup as a pre-wax prep step, a wax remover or IPA wipe is sufficient.
Absolutely — this step is not optional. Ceramic coatings bond chemically to bare clearcoat, not to wax or any other surface layer. Any wax, oil, or contamination left on the surface blocks that bond and results in premature delamination and poor protection. A full strip sequence — IPA wipe, wax remover, clay bar, final IPA wipe — is required before any ceramic coating application.
A clean surface isn't the boring part of detailing — it's the whole job; get that right and every coat of protection you apply after it will actually do what it promises.
 |
 |
 |
 |

About Diego Ramirez
Diego Ramirez is a maintenance and care specialist who has been wrenching on cars since he was sixteen. He focuses on fluid changes, preventive care routines, paint protection, and the small habits that turn a five-year-old car into a fifteen-year-old car.
Get some FREE car parts & gear.. Or check out the latest free automotive manuals and build guides here.
Disable your ad blocker to unlock all the hidden deals. Hit the button below 🚗
| | | |