by Diego Ramirez
Rubber scuff marks on car paint come off without a body shop visit in the vast majority of cases. If you need to know how to remove rubber scuff marks from car paint, start with WD-40 or a clay bar and escalate to compound only if those fail. Most scuffs sit on the clear coat surface rather than cutting through it — meaning you're dealing with rubber residue, not actual paint damage.
Rubber transfers onto your paint from parking lot barriers, tire sidewalls, bumper-to-bumper contact, and rubber-coated shopping carts. The material bonds lightly to the clear coat through friction and static. That's why chemical approaches outperform abrasive ones for light scuffs. Understanding the mechanism shapes every decision you make during removal. If you're also dealing with streaks of another vehicle's color, you're looking at paint transfer layered on top — a related but distinct problem that requires its own approach.
Contents
Before pulling out the DA polisher, try the fast-track options. Most rubber scuffs respond to chemistry before they respond to abrasion. Working in order of gentleness protects your clear coat from unnecessary wear — each pass of compound removes a thin layer you can never put back.
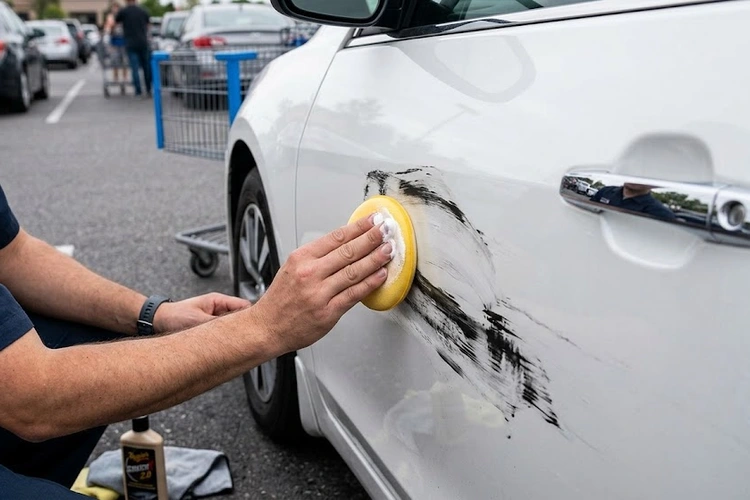
WD-40 is the first thing to reach for on a fresh rubber scuff. Spray a small amount directly on the mark, let it dwell for 30 seconds, then wipe with a clean microfiber in circular motions. The petroleum-distillate base dissolves the rubber's bonding to the clear coat without scratching. Work in small sections. Rinse and dry the area immediately after — WD-40 leaves an oily film that attracts dirt if left on the surface.
For stubborn spots, a rubber eraser designed for automotive use — often called a scuff eraser or tire mark eraser — physically lifts the rubber transfer. Rub at low pressure perpendicular to the scuff. Don't press hard. Let the eraser do the work over multiple passes rather than driving it into the surface with force.
Pro tip: Work on a cool panel in the shade. WD-40 evaporates faster on hot paint, cutting dwell time and reducing its effectiveness against bonded rubber deposits.
If the scuff covers a wider area or the WD-40 pass leaves a slight haze, a clay bar is your next move. Lubricate the surface with a dedicated clay lubricant or quick detailer spray, then glide the clay bar across the affected area using straight, overlapping passes. Clay mechanically shears rubber particles off the clear coat without cutting into the surface. You'll feel the clay grab on the first few passes and glide smoothly once the contamination clears.
Fold the clay bar after each section to expose a clean face. Never let it touch the ground — a dropped clay bar picks up grit that will scratch your paint on the next pass. That bar is done the moment it hits concrete.
Identifying the source tells you how deep the transfer sits. Shallow rubber deposits respond to chemical lifters. Scuffs that involve impact — like a hard parking barrier hit — may hide underlying paint damage beneath the rubber layer. Treating the rubber without inspecting for that secondary damage is a mistake.
According to Wikipedia's overview of automotive paint, modern clear coat layers run between 35 and 75 microns thick. Most rubber scuffs don't penetrate this layer — they sit on top. But aggressive scrubbing without chemical pre-treatment wastes clear coat thickness for no reason.
Rubber parking bumpers, loading dock strips, shopping cart wheels, and rubber-tipped door stops are the most common urban scuff sources. These marks typically run along the lower bumper and rocker panels — areas already in the strike zone. The rubber compound in these products is soft and transfers easily under contact pressure.
This category almost always responds to WD-40 or clay bar alone. The contact is low-velocity and leaves rubber residue rather than removing paint. If you notice white or silver streaks alongside the scuff, you're dealing with paint transfer layered on top — handle the rubber first, then address the transfer separately.
Tire rubber baked onto paint from curb contact or wheel-well overspray is a denser, more resistant deposit. The heat generated during friction partially vulcanizes the rubber to the clear coat, making it more resistant to chemical lifters alone. These marks typically appear on lower body panels and require longer dwell time with a degreaser or a light compound pass to fully clear. Inspect after each step — don't compound what chemistry already solved.
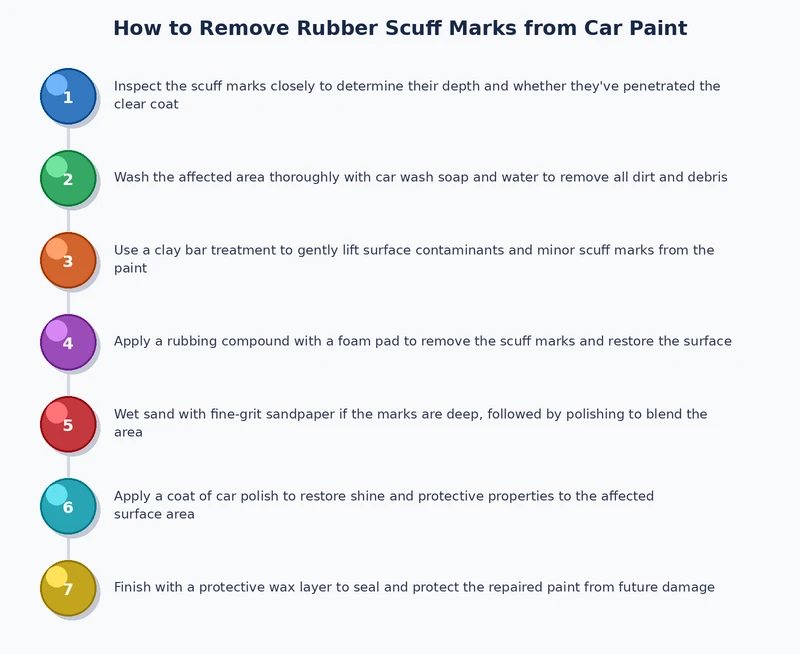
Work through this sequence every time. Skipping steps — especially the wash — drives grit into your applicator and causes secondary scratches that cost more to fix than the original scuff.
Start with a thorough wash of the affected panel. Don't skip this even on a seemingly clean car. Follow the two-bucket car wash method to avoid dragging contaminants across the surface during washing. After washing, dry the panel completely with a clean waffle-weave towel. Inspect the scuff under direct or raking light to assess depth before applying any product.
After washing, clay the entire panel — not just the scuffed area. Spot-claying leaves a different surface texture at the treatment boundary, which shows up under certain lighting conditions after you apply polish. Doing the full panel takes an extra five minutes and saves you the headache of inconsistent results.
If clay removes the rubber but leaves a dull haze, finishing polish restores the gloss. Apply a finishing polish — not a cutting compound — with a foam applicator pad. Work in 2×2-foot sections using overlapping circular passes at low pressure. Buff residue off with a clean microfiber before it dries hard into the surface.
Reserve cutting compound for cases where the rubber scuff sits over a surface scratch. Compound removes a thin layer of clear coat to level the scratch, but it's the most aggressive option in this toolkit. If you're dealing with paint bubbling from impact damage underneath the scuff, read up on how to fix paint bubbling on a car before proceeding — compounding over active bubbling accelerates the damage.
Warning: Never hold a rotary polisher stationary at high speed. Heat buildup burns through clear coat in seconds on thin panels like hood edges and door corners.
The dividing line is simple. Run your fingernail across the mark — if it catches, you have a scratch that has broken the clear coat. That's a different repair category. If your nail glides over it, the damage is surface-level and stays firmly in DIY territory. Don't overcomplicate this assessment.
The full WD-40 → clay bar → finish polish sequence requires roughly 90 minutes of actual work on a single panel. Your supply list: two buckets, wash soap, clay bar kit, WD-40 or a rubber-specific remover, finishing polish, foam applicator pad, and six clean microfibers. That's a $40–$60 one-time investment covering multiple future uses.
Call a detailer when the scuff area spans multiple panels, when the underlying paint shows raw primer or metal, or when the vehicle carries a vinyl wrap or factory PPF. Detailers have machine polishers and spot-treatment compounds that remove deep scratches without repainting. Attempting a multi-panel correction with a hand applicator produces uneven results that are immediately obvious in direct light.
If the scuff came from a significant impact — a parking garage column or a slow-speed collision — have a body shop assess the panel before you start removing surface rubber. Underlying dents or buckles need to be addressed before any surface treatment makes sense.
Most rubber scuff cases cost under $25 to fix at home. The cost escalates only when the damage involves scratch correction or professional respray. Here's the full picture across DIY supplies and professional service options.
| Product | Approx. Cost | Best Use Case | Reusable? |
|---|---|---|---|
| WD-40 (11 oz spray) | $6–$8 | Light, fresh rubber deposits | Yes — many uses per can |
| Automotive clay bar kit | $12–$25 | Wider surface contamination | Yes — until contaminated |
| Rubber scuff eraser | $8–$15 | Localized, stubborn marks | Yes — limited uses |
| Finishing polish (8 oz) | $15–$30 | Post-clay haze removal | Yes — many panel applications |
| Cutting compound | $15–$35 | Scuffs over surface scratches | Yes — use sparingly |
| Microfiber towels (6-pack) | $10–$18 | All stages of the process | Yes — wash and reuse |
Professional detailing prices vary by region and shop caliber, but these ranges hold across most markets:
Not every product marketed as a scuff remover earns its place on your shelf. Product selection has real consequences for your clear coat's long-term thickness — and some common household items will cause more damage than the original scuff.
The most reliable rubber scuff removers use either a petroleum-distillate base (WD-40, Meguiar's Quik Detailer) or a light abrasive compound (Meguiar's Ultimate Compound, 3M Scratch Remover). Both categories work — the difference is mechanism. Chemical removers dissolve the rubber bond. Abrasive compounds remove the outermost layer of clear coat to level the surface.
For light scuffs, always start chemical. Apply abrasive only when chemical pre-treatment leaves residual discoloration. Layering the sequence in the wrong order — compound first, then chemical — wastes clear coat depth and adds no benefit. Similar logic applies when petroleum-based contamination overlaps the scuff zone. If you're also dealing with grease spots nearby, consult the guide on how to remove grease from car paint to handle both contamination types in the right sequence without over-treating the surface.
Removing a rubber scuff cleans the damage. Preventing recurrence requires a surface layer hard enough to absorb contact without transferring rubber to the underlying paint. Your options range from seasonal wax to permanent film installation — and the right choice depends on where your vehicle operates and how often it sees contact zones.
A fresh coat of carnauba wax or synthetic paint sealant creates a sacrificial layer between rubber contaminants and your clear coat. Rubber deposits stick to the wax rather than the paint, and they release more easily during the next wash. Apply sealant every four to six months on the panels that take the most contact — front bumper, rocker panels, rear bumper.
The maintenance wash routine reinforces this strategy. Consistent washing after every few uses removes rubber transfer before it fully bonds. Following the two-bucket wash method after every wax or sealant application extends protection and reduces how often you need to reach for compound. The goal is to make each detailing session lighter than the last.
Paint protection film is the definitive answer to recurring rubber scuffs on high-contact zones. A 10-mil urethane film on the front bumper and rocker panels absorbs impact without transferring damage to the paint beneath. Premium PPF products also carry self-healing properties — minor rubber marks disappear with heat exposure from direct sunlight or a brief pass with a heat gun. It's a physical barrier, not just a chemical resistance layer.
Ceramic coating takes a different approach. It doesn't provide a physical barrier but creates a chemically resistant hydrophobic surface that makes rubber contamination far easier to remove. On a ceramic-coated car, rubber scuffs that would normally require full clay bar treatment often wipe away with a damp microfiber. The tradeoff: professional ceramic application costs $500–$1,500 and requires a full paint correction first. You're locking in the paint's corrected condition — not covering existing damage.
Yes. WD-40 is safe on clear coat when used correctly — apply, let it dwell for 30 seconds, wipe with a clean microfiber, and wash the residue off immediately. Extended dwell time or leaving the product on the surface attracts dirt and leaves an oily film, but it does not damage automotive clear coat chemistry at normal application amounts.
Pure rubber transfer sitting on the clear coat surface does not chemically damage the paint underneath. However, leaving it long-term allows the rubber to harden and bond more deeply, making removal harder over time. It also traps moisture against the surface, which can accelerate oxidation on older or previously damaged paint.
No. Toothpaste — especially gel and baking soda formulas — contains micro-abrasives sized for tooth enamel, which is far harder than automotive clear coat. On paint, those abrasives introduce fine swirl marks visible in direct sunlight. Use a clay bar or purpose-formulated finishing polish instead.
A single panel takes 60 to 90 minutes using the full wash, clay bar, and polish sequence. The WD-40 spot treatment alone takes under 10 minutes on a fresh, localized mark. Time increases significantly if you're working multiple panels or if the scuff requires a compound pass before finishing polish.
A rubber scuff is foreign material deposited on your paint surface — it's additive. A scratch is damage to the paint itself — it's subtractive. Run your fingernail across the mark. If it glides over smoothly, you have a surface scuff that responds to chemical or clay treatment. If your nail catches in a groove, the clear coat is broken and you're dealing with a scratch.
Clay bar is safe on factory paint, repaint, and single-stage finishes as long as you use generous lubrication and never clay dry. It is not recommended on matte or satin finishes — clay alters the surface texture of non-gloss paints in ways that create visible shiny patches. On vinyl-wrapped vehicles, confirm compatibility with your wrap installer before using any clay product.
 |
 |
 |
 |

About Diego Ramirez
Diego Ramirez is a maintenance and care specialist who has been wrenching on cars since he was sixteen. He focuses on fluid changes, preventive care routines, paint protection, and the small habits that turn a five-year-old car into a fifteen-year-old car.
Get some FREE car parts & gear.. Or check out the latest free automotive manuals and build guides here.
Disable your ad blocker to unlock all the hidden deals. Hit the button below 🚗
| | | |