by Joshua Thomas
Road salt accelerates metal corrosion up to 100 times faster than standard oxidation — a figure cited in research compiled by the road salt literature and widely referenced in automotive corrosion studies. For vehicle owners, that number has a direct consequence: paint etching, rust streaks, and clear coat degradation when salt deposits are left unaddressed. Knowing how to remove salt stains from car paint correctly is not optional maintenance — it is urgent, time-sensitive protection that determines whether winter driving causes cosmetic inconvenience or permanent structural damage.
Salt stains form when road brine splashes onto body panels and evaporates, leaving a crystalline residue behind. That residue does not merely look bad. It continues reacting with the metal beneath the paint. Left for days or weeks, even a light salt film can work through clear coat and primer, reaching bare metal where rust begins in earnest.
Drivers who want to protect their vehicles through cold months — and maintain the condition that allows paint to resist damage during warmer seasons as well, including the kind of stress covered in guides on maintaining a car in hot weather — need a repeatable, correct approach to salt removal. This guide provides one.
Contents
The right equipment separates a clean result from scratched paint. Using improvised materials — rough towels, dish soap, standard garden hose pressure — introduces abrasion and leaves paint more vulnerable to the next salt exposure. The investment is modest. The alternative is body shop work.
Pro tip: Keep a spray bottle of diluted vinegar solution in the garage during winter — applying it to fresh salt deposits before they fully dry cuts removal effort in half at the next full wash.
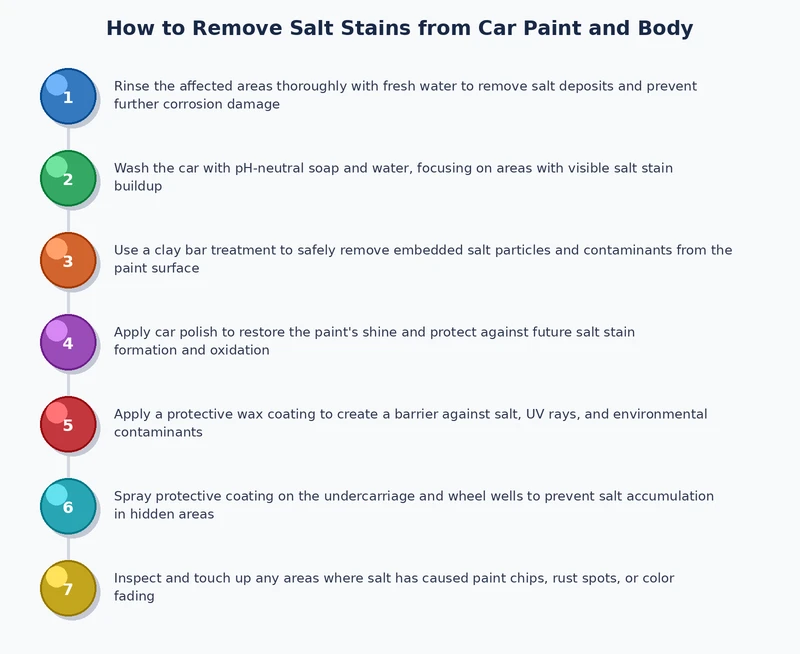
The removal process follows a fixed sequence. Each step serves a distinct purpose. Skipping any of them — especially the pre-rinse — is the primary source of paint scratch damage during winter washing.
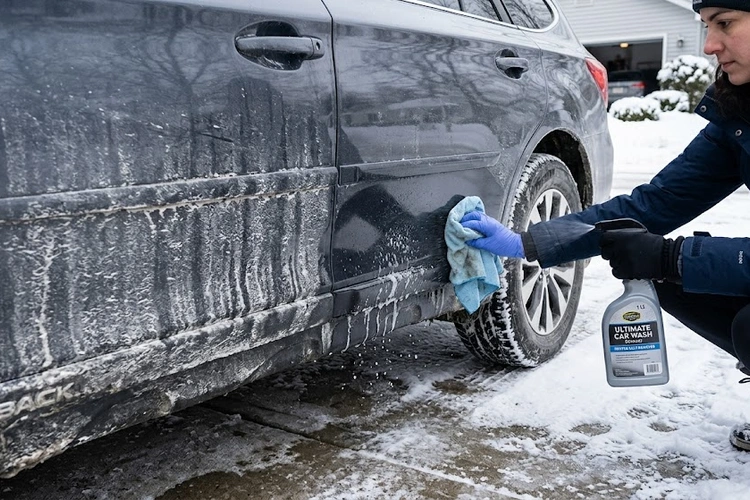
Rinse the entire vehicle thoroughly with water before any contact washing. This is non-negotiable. Dry or semi-dried salt crystals are abrasive. Dragging a wash mitt across unrinsed salt is equivalent to rubbing fine-grit sandpaper across the finish.
For heavy deposits, allow the water to soak for two to three minutes before a second rinse pass. Lower rocker panels, wheel arches, and the rear bumper apron — where salt accumulates most densely — benefit from a concentrated stream held close to the surface before contact begins.
After the pre-rinse, apply pH-neutral soap using the two-bucket method. Work from the roof downward, rinsing the mitt in the clean-water bucket after every panel. Salt concentrates on lower body panels and door sills — these areas typically require a second wash pass.
For stains that persist after standard washing, apply the diluted vinegar solution with a microfiber cloth. Let it dwell for 60 seconds, then rinse completely. Vinegar left on paint for extended periods dulls the finish — precision timing matters here.
Salt exposure also reaches mechanical systems. Drivers who notice unusual brake symptoms after winter driving should be aware that road salt accelerates the corrosion linked to warped brake rotor symptoms and rotor pitting. The same salt that reaches body panels also penetrates door hinge areas, contributing to the corrosion behind problems like a squeaky car door hinge.
Freshly washed, bare paint has no barrier against the next salt exposure. After drying with a microfiber towel, apply paste wax or a spray sealant immediately. This step is routinely skipped and routinely regretted. A proper wax layer reduces salt adhesion during subsequent drives and makes the next removal session measurably easier.
Professional detailers who work in northern states during peak season have refined their approach through repetition. Several of their standard practices are directly applicable to home washing routines.
Wash within 10 days of any significant salt exposure. If the vehicle was driven during a road-treatment event, the target is 48 to 72 hours. Salt left on paint for two weeks or more begins penetrating micro-scratches in the clear coat and reaches primer.
Weekly washing is the professional standard during peak salt season — in most northern U.S. states, that runs from November through March. This is more frequent than most vehicle owners practice. The cumulative benefit of consistent removal outperforms periodic deep cleaning by a wide margin.
Warning: Automated car washes that use recycled water can redeposit dissolved minerals and salts from previously washed vehicles — during salt season, hand washing or touchless pressure washing is the more reliable option.
Salt accumulates most aggressively in areas that are rarely cleaned: behind bumper trim, inside wheel arches, along door jambs, and across the entire undercarriage. These are precisely the locations where rust originates in high-salt climates.
Moisture penetration worsened by salt-related seal corrosion contributes directly to interior condensation — the same conditions that produce the fogging problems covered in this guide on how to stop car windows from fogging up inside.
Several common shortcuts cause more damage than the salt itself. These errors appear consistently across online forums and deserve direct correction.
Paper towels, old bath towels, and standard household sponges all introduce micro-scratches to painted surfaces. Paper products contain wood fiber structures that are abrasive at the microscopic level. Old towels trap embedded grit from previous uses. Neither should come into contact with automotive paint.
Scrubbing stuck-on salt crystals with force — rather than soaking and loosening them first — drags the crystals laterally across the clear coat. The micro-scratches that result accumulate over seasons and eventually become visible as haze or dullness in direct sunlight. At that point, machine polishing is required to restore the finish.
This single error causes more paint damage during winter washing than any other. Applying a wash mitt to a salt-covered surface without rinsing first concentrates abrasive particles in the mitt's fibers, which then grind across the paint during every wash stroke. The pre-rinse adds two minutes to the process. The scratches it prevents can add hours of correction work to fix.
Drivers who notice brake odors after extended winter exposure should not dismiss them — salt-related corrosion on brake components is a recognized cause of the symptoms described in guides covering a burning smell from brakes.
The cost of managing salt stains depends on whether the work is done at home or delegated to a professional. The numbers favor DIY prevention decisively over professional repair.
| Item | One-Time Cost | Per-Season Recurring |
|---|---|---|
| Microfiber wash mitts (2-pack) | $12–$18 | $12–$18 (replace annually) |
| pH-neutral car wash soap (32 oz) | — | $10–$16 |
| Microfiber drying towels (3-pack) | $18–$25 | — |
| Paste wax or spray sealant | $15–$30 | $15–$30 |
| White vinegar (neutralizing solution) | — | $3–$5 |
| Rust inhibitor spray | $8–$14 | $8–$14 |
| First-season total | $66–$113 | |
A professional exterior detail with salt removal and paint protection runs $80–$180 depending on vehicle size and regional labor rates. Full paint decontamination — iron remover, clay bar treatment, and sealant application — costs $150–$350.
Ceramic coating, the strongest long-term barrier against salt adhesion, runs $500–$1,500 professionally installed and lasts two to five years. Paint correction to address existing salt-related swirl marks and clear coat haze costs $200–$600 for a full vehicle. This is repair cost, not prevention — which underscores why the DIY prevention investment of under $115 per season is the clear financial decision.
Understanding how damage develops helps vehicle owners assess their situation accurately — neither panicking over surface staining that washes off easily, nor dismissing accumulation that has already begun corroding metal.
A vehicle driven once through treated roads and washed within five days will typically show no lasting effects. The white haze visible on lower panels is surface salt sitting on top of the clear coat. Standard washing with pH-neutral soap removes it completely. A wax application after washing closes the session correctly.
This is the scenario most drivers encounter after a single winter storm. No special products or professional intervention are needed — just the correct process, executed promptly.
A vehicle driven on treated roads daily for two to three months without regular washing presents a fundamentally different situation. Salt has had time to work into paint chips, penetrate micro-scratches, and begin oxidizing the metal beneath. Lower rocker panels may show surface rust. Wheel arches and door sills are typically the first areas to exhibit visible corrosion bubbling under the paint.
Key insight: Once salt-driven corrosion causes paint bubbling from beneath the surface, no amount of washing reverses it — professional bodywork becomes the only option, at costs that dwarf a season's worth of preventive washing.
Vehicles that sit during winter months and are restarted in spring often show compounding issues — the same conditions that produce salt paint damage frequently affect starting systems, as documented in guides covering why a car won't start after sitting. A thorough spring detailing session that addresses both salt removal and interior freshness — including issues like removing pet odor from the car interior — restores the vehicle comprehensively after winter.
Salt can begin penetrating micro-scratches in clear coat within 48 to 72 hours of exposure, particularly when the vehicle is in wet conditions or fluctuating temperatures. Washing within 10 days is considered the outer limit for preventing lasting damage under normal exposure conditions.
Light surface deposits can be addressed with a diluted vinegar spray and microfiber wipe as a temporary measure, but a full two-bucket wash with pH-neutral soap is the only method that removes salt thoroughly from all surfaces including door jambs, wheel arches, and body seams.
Diluted white vinegar — at a ratio of one part vinegar to three parts water — is safe for automotive paint when used for short dwell times of under two minutes and rinsed completely afterward. Undiluted vinegar or prolonged contact can dull clear coat and should be avoided.
Weekly washing is the professional standard during peak salt season. Drivers who cannot wash weekly should prioritize washing within 48 to 72 hours after any significant road-treatment event, such as a snowstorm that triggers heavy brine application on highways.
Wax creates a sacrificial barrier between road salt and the clear coat, reducing adhesion and making removal easier. It does not make a vehicle immune to salt damage, but consistent wax application — reapplied every four to six weeks during salt season — measurably slows the rate of paint degradation.
Water spots are mineral deposits left by evaporated tap or rainwater, typically appearing as small circular rings. Salt stains are alkaline crystalline deposits from road brine and appear as a broader white haze or streaking, often concentrated on lower body panels. Both respond to mild acid treatment, but salt stains carry a higher corrosion risk and require more urgent attention.
 |
 |
 |
 |
About Joshua Thomas
Joshua Thomas just simply loves cars and willing to work on them whenever there's chance... sometimes for free.
He started CarCareTotal back in 2017 from the advices of total strangers who witnessed his amazing skills in car repairs here and there.
His goal with this creation is to help car owners better learn how to maintain and repair their cars; as such, the site would cover alot of areas: troubleshooting, product recommendations, tips & tricks.
Joshua received Bachelor of Science in Mechanical Engineering at San Diego State University.
Get some FREE car parts & gear.. Or check out the latest free automotive manuals and build guides here.
Disable your ad blocker to unlock all the hidden deals. Hit the button below 🚗
| | | |