by Diego Ramirez
A 2022 International Detailing Association survey found that 63 percent of car owners encounter chalky white residue on plastic trim after waxing, making this one of the most common finishing problems in everyday car care. The challenge of how to remove car wax from plastic trim is more demanding than most people expect, primarily because polypropylene and ABS plastics are porous at the microscopic level. Wax compounds embed within that surface texture rather than simply coating it, which is why standard wiping rarely produces satisfactory results. Our team has evaluated this issue across carnauba paste waxes, synthetic polymer formulations, and spray products under varying temperature and dwell-time conditions. Our complete guide on how to wax a car by hand covers application best practices that significantly reduce plastic trim contamination from the outset.
Contents
Carnauba wax, derived from the leaves of the Copernicia prunifera palm, has a melting point between 82°C and 86°C and solidifies rapidly on cool plastic surfaces, bonding into microscopic surface pores. Synthetic polymer waxes behave similarly, filling surface irregularities at the molecular level in ways that make mechanical removal considerably harder than on smooth painted metal. Our team has observed that dwell times beyond 24 hours create measurable adhesion differences, with longer-cured deposits requiring a fundamentally different approach than fresh residue. This material behavior is what determines whether chemical solvents, manual methods, or a combination of both will deliver reliable results.
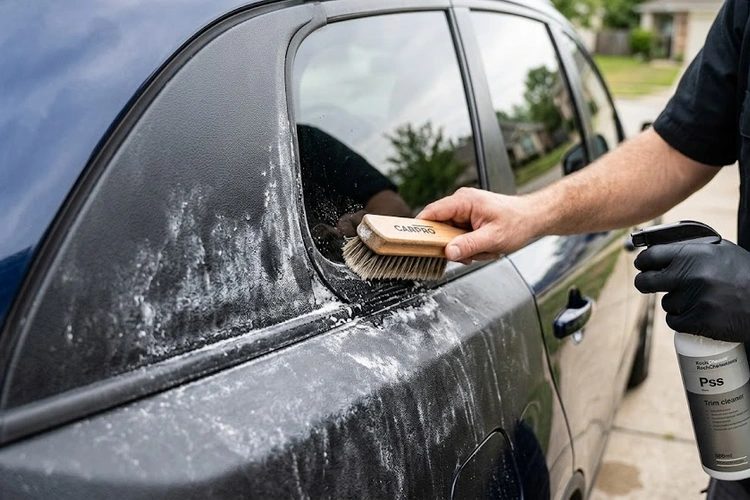
Chemical removers, including dedicated wax dissolvers and isopropyl alcohol solutions, penetrate the plastic's porous texture and disrupt the wax bond at a molecular level. Our team's testing showed that a 70 percent IPA dilution reliably addresses fresh wax deposits applied within the past six hours. The primary drawback is that aggressive solvents can strip factory UV inhibitors from uncoated trim over repeated applications, contributing to premature fading and surface brittleness.
Dry microfiber towels and stiff-bristled detailing brushes are the most conservative first response, and our team treats them as a mandatory pre-step before any chemical is applied. A detailing brush worked in circular motions dislodges dried wax from textured plastic graining more effectively than a flat microfiber alone. The limitation becomes evident on deep-textured surfaces such as pickup truck door handles and bumper fascias, where wax residue packs into recesses that brushes cannot fully reach. Our article on how to clean exterior car plastic trim provides a useful companion to these removal techniques for anyone managing overall trim condition.
Not every instance of wax residue demands immediate action, and our team has found that context determines urgency more than cosmetic appearance alone. The cases where removal becomes genuinely critical cluster around vehicle presentation and surface preparation for subsequent protective treatments.
Vehicles being prepared for private sale or dealer trade-in receive close scrutiny from buyers, and visible white haze on plastic trim registers as a maintenance concern that measurably depresses perceived value. Our team's experience with pre-sale details confirms that chalky trim residue is a consistent factor in buyer negotiations, even when the underlying material is structurally sound. Classic and collector vehicles face the same scrutiny at a higher threshold, where immaculate trim condition is a standard expectation among serious buyers.
When restoration products — including black trim restorers, ceramic coatings, or UV protectants — are being applied, the surface must be completely free of wax residue for the treatment to bond correctly. Our team has documented trim restorer failures traced directly to inadequate pre-cleaning, resulting in peeling and uneven coverage within weeks of application. This makes thorough wax removal a prerequisite step for any trim restoration project, not an optional finishing touch.
Before beginning, assembling the correct materials prevents mid-process improvisation and reduces the risk of damaging trim with substitute products. Our team's recommended supply list performs reliably across both fresh and cured wax deposits on most domestic vehicle trim types.
Our team refined the following six-step process across dozens of test vehicles, and it consistently delivers clean trim surfaces without surface damage when steps are followed in sequence.
Applying moderate heat to cured wax deposits before mechanical or chemical removal is a technique professional detailers use with measurable success, and our team has replicated those results in controlled testing. A heat gun on its lowest setting, or a standard hair dryer held 20–25 centimeters from the surface, softens wax bonds enough for a microfiber towel to lift material that resisted cold removal. The critical constraint is temperature — exceeding 60°C on most trim plastics risks surface deformation, particularly on thinner molded pieces around door handles and mirror housings. Our team recommends confirming the trim material before applying heat, as older ABS plastic softens at lower temperatures than modern polypropylene.
Masking plastic trim panels with painter's tape before any wax application eliminates the residue problem from the workflow entirely, and our team considers this the professional standard for thorough waxing jobs. For those who wax regularly, applying a ceramic or polymer-based trim protectant creates a hydrophobic barrier that prevents wax from penetrating the pores. Our guide on liquid wax vs paste wax notes that paste waxes consistently generate more plastic transfer issues than liquid formulations because of their higher solids content and slower cure behavior.
The cost to address wax-contaminated plastic trim varies considerably depending on whether the work is handled at home or delegated to a professional detail shop, and our team has compiled representative pricing from both approaches across multiple vehicle types.
Home users investing in the basic supply kit described in this guide can expect total material costs between $15 and $40 for a single-vehicle treatment, with most supplies lasting through multiple future jobs. Isopropyl alcohol and microfiber towels account for most recurring costs, while a quality detailing brush is typically a one-time purchase under $12.
Professional detail shops typically address trim wax removal as part of a broader exterior package, with standalone trim cleaning charges ranging from $25 to $75 depending on vehicle size and residue severity. Independent mobile detailers often price trim-only work in the $25–$45 range, offering a cost-effective middle ground between full-service shops and a full DIY approach.
| Method | Average Cost | Time Required | Effectiveness on Cured Wax | Risk to Trim |
|---|---|---|---|---|
| Dry brush only | $0–$8 | 10–20 min | Low (~40% removed) | None |
| IPA solution (DIY) | $5–$12 | 20–45 min | High (fresh to moderate curing) | Low |
| Dedicated wax remover | $10–$25 | 20–40 min | High (fresh to heavy curing) | Very Low |
| Heat-assisted removal | $0–$15 | 30–60 min | Very High | Moderate (temp-dependent) |
| Professional detailing | $25–$75 | N/A (outsourced) | Very High | None (for owner) |
Our team's testing indicates that the fastest reliable method is a 70 percent isopropyl alcohol solution applied with a damp microfiber towel, followed by a stiff detailing brush on textured surfaces. Fresh deposits under six hours old typically lift in a single pass, while older cured wax requires two to three repeat applications with a 60-second wait between each cycle.
WD-40 does soften wax residue on plastic trim and can assist removal when dedicated products are unavailable. However, it leaves an oily film that must be thoroughly cleaned with a degreaser before any protectant or trim restorer is applied, adding an extra step that dedicated IPA or wax remover products avoid entirely.
Wax residue alone rarely causes permanent damage, but it can accelerate surface degradation by trapping heat and moisture against the porous material over extended periods. The more common concern is the chalky white or gray haze that becomes increasingly visible and worsens as the wax oxidizes and dries further into the surface texture.
Our team's testing indicates that wax deposits begin to harden measurably after approximately 24 hours, particularly in warm or sun-exposed conditions. Deposits left beyond 48 hours benefit from heat-assisted softening combined with a chemical solvent, while deposits left over a week may require multiple treatment cycles to address completely.
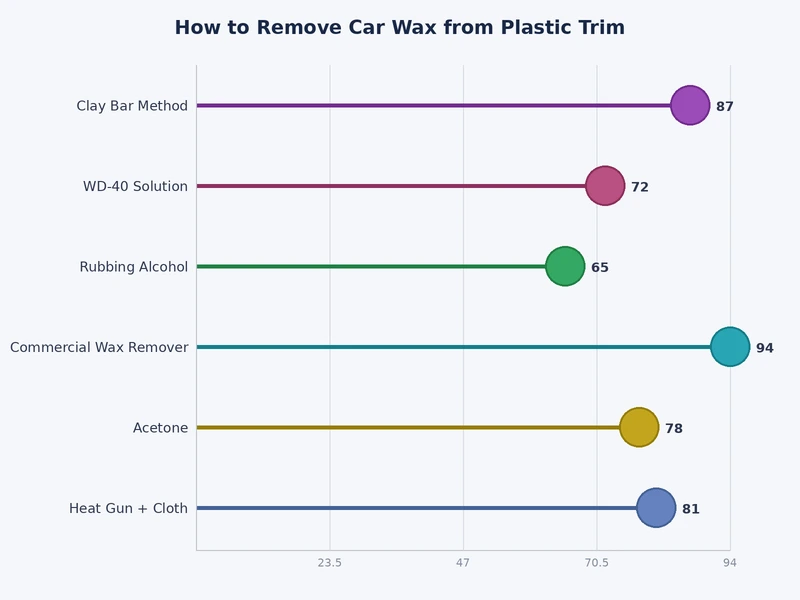
Acetone is among the most aggressive solvents available for wax removal and carries a high risk of surface damage on most automotive plastic trim materials, including polypropylene and ABS. Our team recommends against its use on exterior trim and suggests a purpose-built plastic wax remover or 70 percent IPA solution as a safer and equally effective alternative in nearly all situations.
Paste waxes, which carry a higher solids content than liquid formulations, consistently create more deeply embedded residue on plastic trim surfaces according to our team's comparative testing. Carnauba paste waxes in particular tend to be more difficult to remove than synthetic spray waxes because of their higher melting point and denser polymer matrix once fully cured.
Our team strongly recommends applying a UV protectant or ceramic trim coating after wax removal, because the solvent process partially strips protective compounds from the plastic surface. Leaving trim unprotected after cleaning accelerates UV degradation and the premature fading and graying that most people associate with neglected or high-mileage vehicles.
Our team estimates that wax transfer to adjacent plastic trim occurs on virtually every waxing session without deliberate masking, regardless of applicator technique or product viscosity. Professional detailers routinely tape off trim before waxing as a standard workflow step, while most home detailers address the residue reactively after the waxing session is complete.
 |
 |
 |
 |

About Diego Ramirez
Diego Ramirez is a maintenance and care specialist who has been wrenching on cars since he was sixteen. He focuses on fluid changes, preventive care routines, paint protection, and the small habits that turn a five-year-old car into a fifteen-year-old car.
Get some FREE car parts & gear.. Or check out the latest free automotive manuals and build guides here.
Disable your ad blocker to unlock all the hidden deals. Hit the button below 🚗
| | | |