by Joshua Thomas
A small chip in your windshield can turn into a major crack faster than you expect. Learning how to repair a windshield chip yourself is one of the most practical skills a car owner can have — it saves money, takes less than an hour, and can prevent a costly full replacement. Most chips smaller than a quarter can be fixed at home with an inexpensive resin kit. This guide walks you through the entire process, from assessing the damage to finishing the repair.
Before reaching out to a professional, check out our detailed guide on how to fix a cracked windshield to understand the full spectrum of windshield damage and when DIY is appropriate versus when you need expert help.
Contents
Not every chip is the same. Before buying a kit, examine the damage carefully. Run a fingernail across the chip — if your nail catches in a groove, it is a true chip with depth. Surface scratches do not require resin injection.
DIY windshield chip repair works best when:
If the chip is directly in front of the driver, professional repair is advisable even if the damage is small — optical clarity after a DIY fix may not meet safety standards. According to the National Highway Traffic Safety Administration (NHTSA), windshield integrity is a critical structural element in modern vehicles.
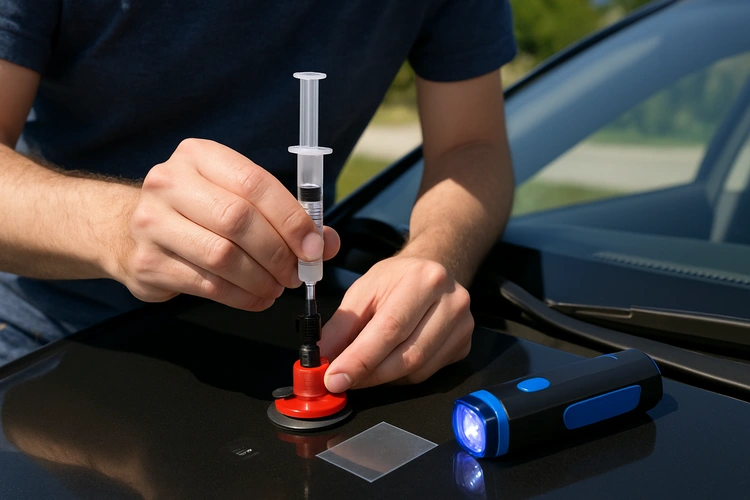
You do not need special training or expensive equipment. A standard windshield chip repair kit contains everything required for the job.
What you need:
| Kit | Price Range | Chip Types Covered | UV Lamp Included | Uses Per Kit |
|---|---|---|---|---|
| Rain-X Windshield Repair Kit | $8–$12 | Bullseye, star, half-moon | No | 1–2 |
| Permatex Windshield Repair Kit | $10–$15 | Bullseye, combination | No | 1 |
| Mookis 2-Pack Kit | $14–$18 | All common types | No | 2 |
| Delta Kits Entry Pro | $35–$50 | All types including combination | Yes | 10+ |
| Blue-Star Windshield Repair Kit | $12–$16 | Bullseye, star, half-moon | No | 1–2 |
For a one-time repair, any kit in the $10–$18 range is sufficient. If you plan to repair chips regularly or professionally, the Delta Kits system offers far more control and durability.
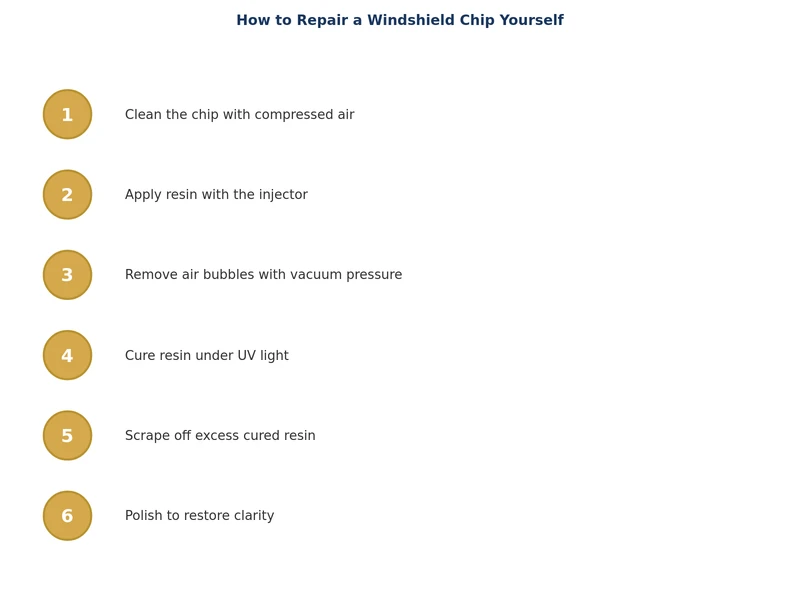
Follow these steps in order. Rushing any stage — especially curing — leads to poor clarity and weak adhesion. Work in a shaded area out of direct wind, ideally when temperatures are between 50°F and 85°F.
A properly done repair holds for years, but it needs a short recovery period:
Windshield care is part of a broader vehicle maintenance routine. If you're building good habits, our complete car maintenance schedule covers everything from fluid checks to tire care in one comprehensive checklist.
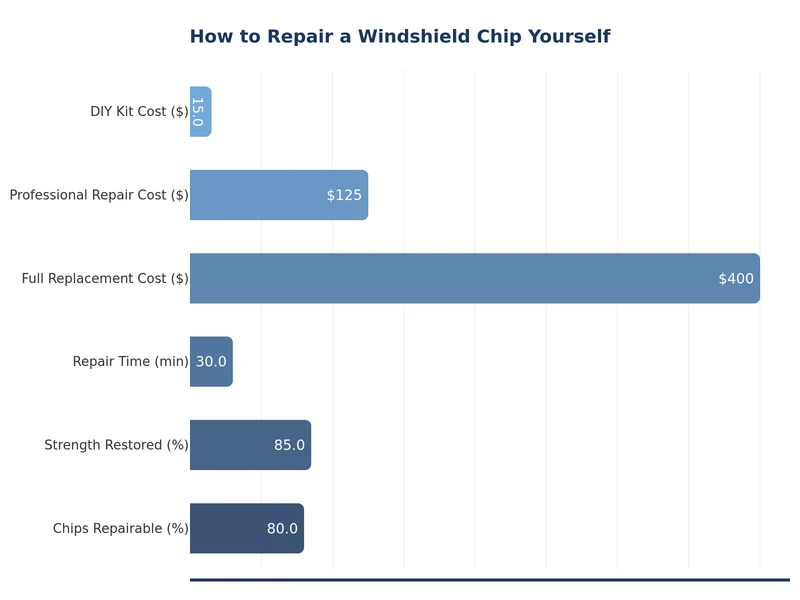
One of the biggest reasons to learn how to repair a windshield chip yourself is the cost savings. Professional chip repair ranges from $50 to $150 per chip. A DIY kit costs under $20 and takes less than an hour.
| Repair Method | Average Cost | Time Required | Result Quality | Best For |
|---|---|---|---|---|
| DIY Kit (basic) | $8–$18 | 30–60 min | Good (minor optical distortion possible) | Small chips, budget-conscious owners |
| Mobile repair service | $50–$100 | 30–45 min (tech does it) | Very good | Chips in or near driver's sightline |
| Auto glass shop | $60–$150 | 1–2 hours (drive + wait) | Excellent | Complex or multiple chips |
| Insurance claim (with coverage) | $0 (deductible waived in many states) | Varies | Excellent | Owners with comprehensive coverage |
If you have comprehensive auto insurance, chip repairs are often covered at no cost to you. Call your provider before reaching for a kit — it may be the smartest financial move.
You cannot control road debris, but you can reduce your risk significantly:
Windshield chips are a fact of driving life, but catching them early and repairing them promptly stops minor damage from becoming a full crack. Once a crack extends more than a few inches, no DIY kit can fix it — replacement becomes the only option, often costing $300 to $600 or more.
Most chips smaller than one inch — including bullseye, star, and half-moon breaks — can be repaired at home using a resin kit. If the chip is in the driver's direct line of sight, has cracks longer than three inches, or sits within two inches of the windshield edge, a professional repair is the safer choice.
A properly done repair can last the life of the vehicle. The resin bonds permanently with the glass, preventing the chip from spreading. The repair may show a slight optical distortion under certain light angles, but the structural bond is permanent when curing is done correctly.
The ideal temperature range is 50°F to 85°F (10°C to 30°C). Cold temperatures slow resin flow and curing; extreme heat can cause premature curing before the resin fully penetrates the chip. Work in shade within this temperature range for best results.
No DIY kit — and no professional repair — makes a chip invisible. The goal is to fill the void with resin that bonds the glass together, stopping the crack from spreading and improving clarity. The chip site will still be faintly visible under certain lighting but will look significantly better than before.
If you carry comprehensive auto insurance, many insurers cover windshield chip repair at no cost to you, sometimes without applying your deductible. This varies by state and policy. Contact your insurance provider before paying out of pocket — repair is almost always preferred over replacement from an insurance cost standpoint.
Use a coin test: if a quarter covers the entire chip and any cracks radiating from it, the damage is likely repairable with a DIY kit. If the damage extends beyond the coin, or if you feel multiple layers of glass have separated, professional assessment is required. Edge cracks and cracks in the driver's sightline always require professional attention.
 |
 |
 |
 |
About Joshua Thomas
Joshua Thomas just simply loves cars and willing to work on them whenever there's chance... sometimes for free.
He started CarCareTotal back in 2017 from the advices of total strangers who witnessed his amazing skills in car repairs here and there.
His goal with this creation is to help car owners better learn how to maintain and repair their cars; as such, the site would cover alot of areas: troubleshooting, product recommendations, tips & tricks.
Joshua received Bachelor of Science in Mechanical Engineering at San Diego State University.
Get some FREE car parts & gear.. Or check out the latest free automotive manuals and build guides here.
Disable your ad blocker to unlock all the hidden deals. Hit the button below 🚗
| | | |