by Joshua Thomas
Learning how to use a dual action polisher is one of the best investments you can make in your car care routine. Unlike rotary polishers that spin in a single direction, a dual action (DA) polisher moves in two simultaneous motions — spinning and orbiting — which dramatically reduces the risk of burning your paint. That makes it the ideal starting point for beginners. If you've been struggling with swirl marks and dull paint, this guide walks you through everything you need to get professional results at home.
Before you dive in, it helps to understand what you're working toward. A DA polisher removes light scratches, oxidation, and swirl marks by abrading the clear coat with a foam or microfiber pad loaded with compound or polish. The result is a smooth, reflective finish. If your car already has deep swirl marks you want to tackle by hand first, check out our guide on how to remove swirl marks by hand before stepping up to a machine polisher.
Contents
A dual action polisher — sometimes called a random orbital polisher — uses a backing plate that both rotates on its own axis and orbits around a central point. This randomized motion prevents the tool from concentrating heat in one spot, which is the main cause of paint burns or holograms when using a rotary.
Rotary polishers spin in a single, fixed direction. In experienced hands they remove defects faster, but one slow pass or too much pressure can cut through the clear coat. A DA polisher is far more forgiving. The random orbit means if you stop moving the tool, the pad slows itself down naturally — a built-in safety mechanism that makes it perfect for beginners.
Use a DA polisher when your paint has light-to-moderate swirl marks, water spots, minor oxidation, or a dull haze. It won't fix deep scratches that catch your fingernail, but it handles the vast majority of paint defects most cars accumulate over time. For more context on paint types and how they respond to correction, see our overview of single stage vs two stage car paint.
You don't need a full detailing kit to get started. Below is what a beginner needs for a first polishing session.
| Item | Purpose | Beginner Pick |
|---|---|---|
| DA Polisher (5–6 inch) | Machine polishing action | Harbor Freight Bauer or DEWALT DVP-20VSB |
| Foam Cutting Pad | Removes moderate defects | Orange or yellow foam pad |
| Foam Finishing Pad | Applies finishing polish or wax | White or black soft foam |
| Compound / Polish | Abrasive that removes defects | Meguiar's Ultimate Compound |
| Finishing Polish | Refines surface after compounding | Meguiar's M205 or similar |
| Microfiber Towels (×6+) | Wipe residue without scratching | 350+ GSM, edgeless preferred |
| IPA Wipe-Down Spray | Remove polish oils before inspection | 10–15% isopropyl in water |
| Masking Tape | Protect rubber and plastic trim | Standard painter's tape |
According to the Wikipedia article on polishing, abrasive polishing works by progressively removing microscopic peaks from a surface until it becomes uniformly flat and reflective — the same principle applies to automotive clear coat correction.
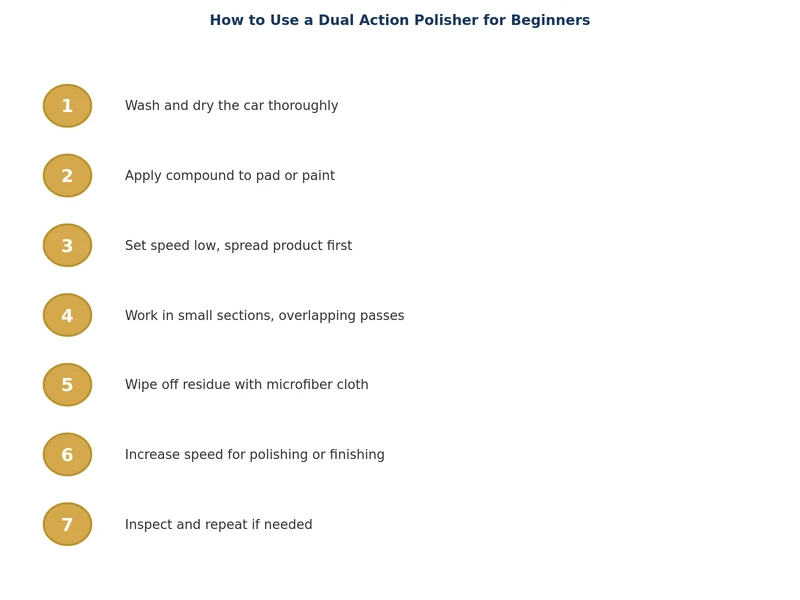
Wash and dry the car thoroughly. Any dirt left on the paint will act as an abrasive under the pad and create new scratches. Clay bar the paint if you feel any roughness or contamination when you run your fingers across it. Work in the shade or indoors — direct sunlight heats the panel and makes polish dry too fast to work correctly. Dark-colored cars are especially vulnerable; our guide on how to wash a black car without swirl marks covers the best washing technique before you start polishing.
Tape off rubber seals, plastic trim, and badges. Polish residue gets into porous materials and is hard to remove. A strip of painter's tape along the door seams takes two minutes and saves a lot of cleanup.
Apply 4–5 pea-sized drops of compound around the face of a clean, dry cutting pad. Spread the product across the panel surface by hand before turning the polisher on — this prevents fling and ensures even coverage from the first pass.
Set your speed dial to 2 or 3 (out of 6) for your first attempt. Lower speeds spread the product; higher speeds do the cutting. You will increase speed once the product is worked in.
Place the pad flat on the panel before switching the polisher on. With the machine running at speed 2, spread the product slowly across a 2-by-2-foot section. Increase to speed 4–5 and make four to five overlapping passes in a crosshatch pattern — horizontal rows first, then vertical columns. Keep the pad flat and move at roughly one inch per second. Let the machine do the work; pressing down hard does not increase correction and risks uneven results.
Watch for the product becoming nearly transparent — that is the sign it has worked through its abrasive cycle. When the residue looks like a fine haze, the pass is complete. Turn the machine off before lifting it from the paint.
Buff the residue away with a clean microfiber towel using light pressure. Wipe with the grain of the panel, not in circles. Spray a light mist of IPA solution and wipe again to strip any polish oils — this gives you a true inspection of the paint surface. Use a detailing light or a phone flashlight held at a low angle to check your progress. If swirls remain, repeat the section at a higher speed or switch to a more aggressive compound.
Once you are satisfied with correction, follow up with a finishing polish on a soft white pad at speed 4 to refine the surface and remove any micro-marring left by the cutting stage. Finish with a coat of wax or sealant to protect your work.
Pad and product selection is where most beginners get confused. Think of it as a dial: the more aggressive the pad and the more abrasive the compound, the faster defects are removed — but the more follow-up refining you need. Match your combination to the severity of the defects:
If your paint is faded beyond what polishing alone can fix, our guide on how to restore faded car paint without repainting covers additional options including paint sealers and glazes.
Always test in a small hidden area first — inside the door jamb or a lower corner of the trunk lid — before working a full panel. This confirms your combo cuts well without removing too much clear coat.
A DA polisher is very unlikely to damage paint when used correctly. Its random orbital motion naturally dissipates heat and slows down if you stop moving, which prevents the burn-through risk associated with rotary polishers. Keep the pad flat, maintain steady movement, and use light pressure to stay safe.
Start at speed 2–3 to spread the product across the panel, then increase to speed 4–5 for the working passes. Avoid running at maximum speed (6) until you have a feel for the machine. Most paint correction work happens effectively between speeds 4 and 5.
Four to five overlapping passes in a crosshatch pattern is a good baseline. Make horizontal rows first, then vertical columns over the same area. You can repeat the section if defects remain, but inspect with an IPA wipe before deciding whether another pass is needed.
Yes. Polishing removes defects but also strips any existing wax or sealant. Always finish with a coat of carnauba wax, paint sealant, or ceramic coating to protect the corrected paint. Without protection, the surface is exposed to UV and environmental contaminants.
Once or twice a year is typical for most daily drivers. Polishing removes a thin layer of clear coat each session, and the average car only has 100–150 microns of clear coat. Regular washing, proper drying technique, and a good wax or sealant between sessions reduce how often polishing is needed.
Yes, but darker colors show defects more clearly and require more care during inspection. Swirl marks that are invisible on white paint will be obvious on black or dark blue. Work in sections and use a detailing light at a low angle to check your progress on dark paint before moving on.
 |
 |
 |
 |
About Joshua Thomas
Joshua Thomas just simply loves cars and willing to work on them whenever there's chance... sometimes for free.
He started CarCareTotal back in 2017 from the advices of total strangers who witnessed his amazing skills in car repairs here and there.
His goal with this creation is to help car owners better learn how to maintain and repair their cars; as such, the site would cover alot of areas: troubleshooting, product recommendations, tips & tricks.
Joshua received Bachelor of Science in Mechanical Engineering at San Diego State University.
Get some FREE car parts & gear.. Or check out the latest free automotive manuals and build guides here.
Disable your ad blocker to unlock all the hidden deals. Hit the button below 🚗
| | | |