by Diego Ramirez
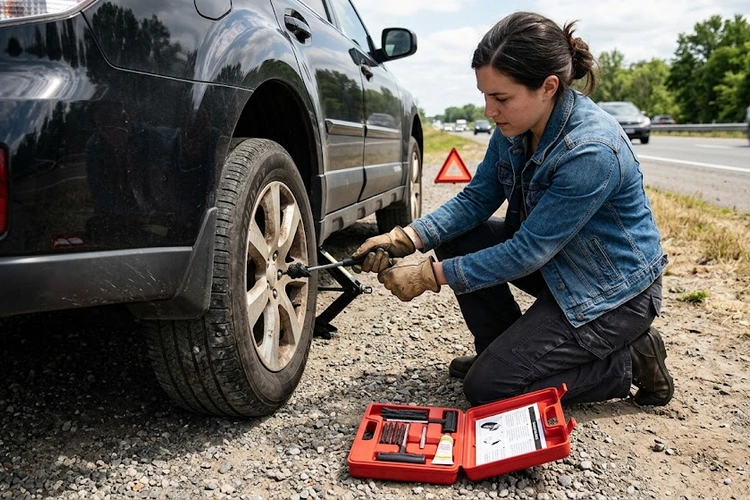
A nail in the tread. A slow hiss on a quiet highway. The scenario is familiar to most drivers — a flat tire arriving at the worst possible moment, miles from the nearest service station. Knowing how to use a tire plug kit transforms that stressful situation into a manageable roadside repair that takes less than fifteen minutes. This guide walks through every stage of the process, from confirming the puncture is pluggable to verifying the seal before returning to the road.
Learning how to use a tire plug kit is a practical skill that belongs in every driver's toolkit. The repair addresses punctures in the tread area caused by nails, screws, or similar debris — the most common type of tire failure on the road. According to the National Highway Traffic Safety Administration, tire-related crashes account for thousands of incidents annually, many of which begin with a slow leak that a simple plug could have resolved.
Contents
Not every flat tire qualifies for a plug repair. The condition of the tire and the location and size of the puncture determine whether a plug is a safe, viable solution.
A plug is appropriate when:
Before beginning any repair, also check for issues unrelated to the puncture. If the vehicle has been showing symptoms of worn shocks and struts, the tire may show uneven wear patterns that complicate the assessment.
Several conditions make a plug repair unsafe. In these cases, the tire requires professional inspection or outright replacement:
Most tire plug kits sold at automotive retailers include the following components. Verify all items are present before beginning:
| Item | Purpose | Notes |
|---|---|---|
| Reamer / rasp tool | Cleans and widens the puncture channel | Serrated or spiral tip |
| Insertion / plug tool | Drives the plug strip into the hole | Has an eye or slot at the tip |
| Plug strips | Rubber rope that seals the hole | Usually 4–6 strips per kit |
| Rubber cement | Bonds the plug strip to the tire rubber | Some kits omit this — dry plug method exists |
| Utility knife or scissors | Trims excess plug flush with tread | Sometimes included |
| Tire pressure gauge | Verifies inflation after repair | Separate purchase if not included |
Additional supplies that improve the repair process: safety gloves, needle-nose pliers for extracting the offending object, and a can of compressed air or a portable inflator to restore pressure after plugging.
Follow these steps in sequence. Skipping or reordering steps — particularly the reaming stage — is the most common cause of plug failure.
After a successful repair, drive at moderate speeds for the first few miles and re-check pressure after the tire has warmed to operating temperature. This is also a good moment to review other vehicle basics — for instance, confirming that the car's fuse system and electrical components are functioning correctly before a longer journey.
Tire plug kits have remained a roadside staple for decades because they offer a combination of benefits that no other emergency repair method matches:
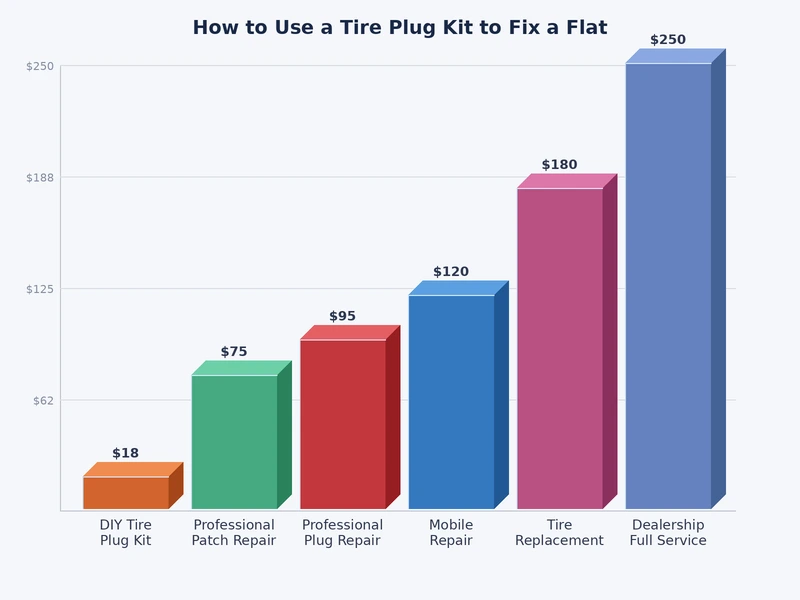
A plug is a temporary-to-medium-term fix, not a permanent solution in every professional context. Industry guidance from tire manufacturers generally recommends a combination plug-and-patch repair performed from the inside as the definitive repair. Standalone plugs, however, have a strong safety record when applied correctly to eligible punctures.
Drivers who regularly experience flat tires may want to investigate whether uneven tread wear — sometimes linked to loose lug nut symptoms or suspension wear — is making the tire more vulnerable to road debris.
Even experienced drivers make avoidable mistakes when using a tire plug kit under pressure. The most consequential errors include:
Several misconceptions continue to circulate about plug repairs. A clear-eyed understanding of the evidence helps drivers make better decisions:
Understanding how a tire plug interacts with the tire's structure is also useful context for interpreting other handling symptoms. If the vehicle develops a popping noise when turning after a flat tire incident, the cause may be unrelated suspension damage from the event rather than the plug itself.
A correctly installed string plug in an eligible tread-area puncture can last the remaining service life of the tire — often 20,000 to 50,000 miles or more. The key variables are puncture size and location, reaming quality, rubber cement adhesion, and whether the tire was driven flat before the repair. Plugs that fail typically do so within the first 48 hours due to improper installation rather than material degradation.
Yes, provided the plug was installed correctly in the tread area, the puncture diameter did not exceed 6 mm, and the tire was not driven flat prior to repair. After plugging, drivers should verify the seal with the soapy water test, restore the tire to the recommended inflation pressure, and drive at moderate speeds for the first several miles before resuming highway travel.
A tire can receive more than one plug, with restrictions. No two plugs should be within 16 inches of each other, and the total number of plug repairs on a single tire is generally limited to two by most tire industry standards. Multiple punctures in close proximity, or any damage to the sidewall or shoulder, require professional evaluation and likely tire replacement.
 |
 |
 |
 |

About Diego Ramirez
Diego Ramirez is a maintenance and care specialist who has been wrenching on cars since he was sixteen. He focuses on fluid changes, preventive care routines, paint protection, and the small habits that turn a five-year-old car into a fifteen-year-old car.
Get some FREE car parts & gear.. Or check out the latest free automotive manuals and build guides here.
Disable your ad blocker to unlock all the hidden deals. Hit the button below 🚗
| | | |