by Joshua Thomas
Knowing how to wet sand a car gives you the ability to fix deep scratches, orange peel texture, and heavy oxidation that polishing alone cannot touch. Before you start, it pays to decontaminate your car paint — any embedded grit left on the surface will cause new damage under the sandpaper. When done carefully and followed by a proper polish, wet sanding restores a mirror-like clarity to the clear coat that looks better than new. This step-by-step guide covers every stage from prep to protection.
Contents
Wet sanding is the process of using water-lubricated sandpaper to abrade the top layer of automotive clear coat or paint. Water reduces friction, keeps the surface cool, and flushes away the paint slurry so the paper doesn't clog. The result is a controlled, uniform cut that removes surface defects without burning or gouging.
Dry sanding cuts faster and is used on body filler or primer. Wet sanding is reserved for clear coat and finished paint because it produces a finer surface with far less risk of heat damage. On any painted panel, always wet sand.
If a scratch has reached bare metal or primer, that area needs touch-up paint first. Wet sanding can only correct defects within the clear coat itself.
Having everything ready before you start prevents interruptions that can cause the surface to dry out mid-session.
Follow these stages in order. Skipping any step — especially grit progression — creates scratches that are harder to remove than the original defect.
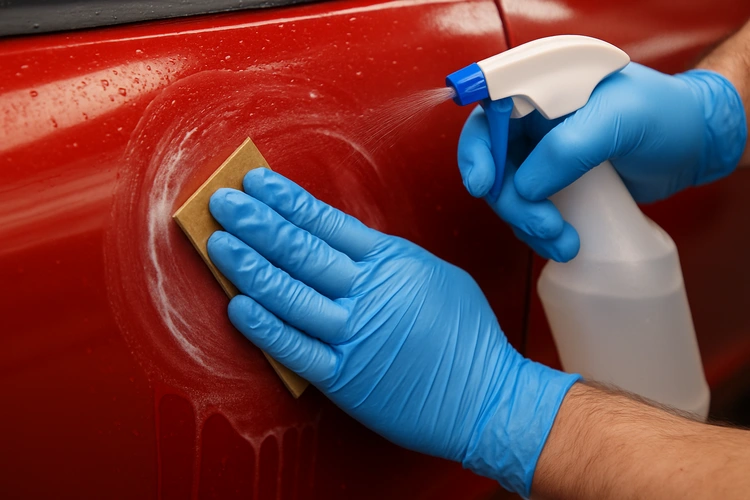
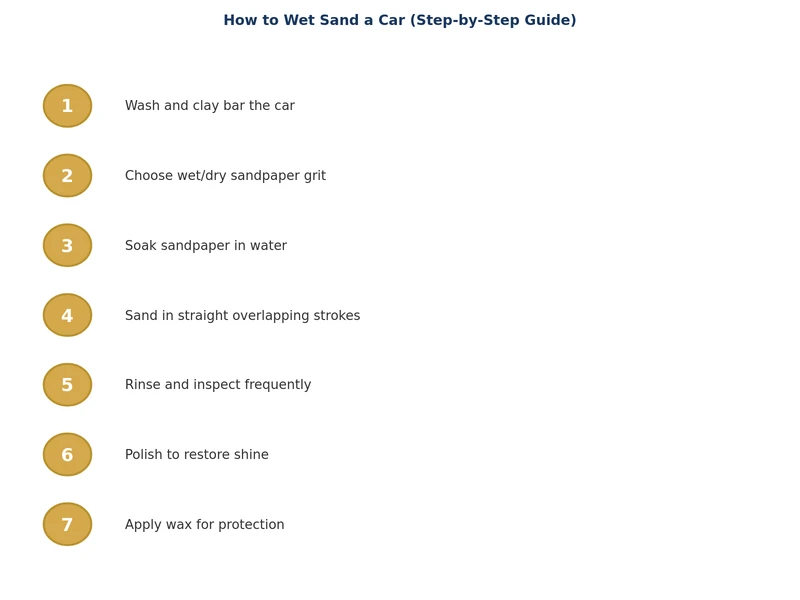
Wash the car thoroughly to remove loose dirt, then clay bar the entire panel. Any particle left on the surface acts as a random abrasive under the sandpaper. Work in a shaded area — direct sunlight dries the lubricant too fast and increases the risk of burning the clear coat.
Apply masking tape along all plastic trim, rubber moldings, badges, and panel edges. Edges are the most vulnerable areas — the clear coat is thinnest there. Double up the tape on sharp corners and body lines where it's easy to accidentally sand through.
Place your sandpaper sheets in clean water for at least 15 minutes before use — some detailers soak overnight. Well-soaked paper is more flexible, cuts more consistently, and causes fewer deep sanding marks. Always wrap a sheet around your sanding block. Never sand with bare fingertips; the uneven pressure creates low spots.
Keep both the sandpaper and the panel wet at all times using your spray bottle. Use straight, overlapping strokes — horizontal or vertical, pick one direction and maintain it. Apply light, steady pressure and let the abrasive do the work. Every 8–10 strokes, wipe away the slurry with a damp microfiber cloth and inspect the surface under a bright light. A uniform haze means you're cutting evenly. Shiny spots mean those areas still need work. Any primer color means stop immediately.
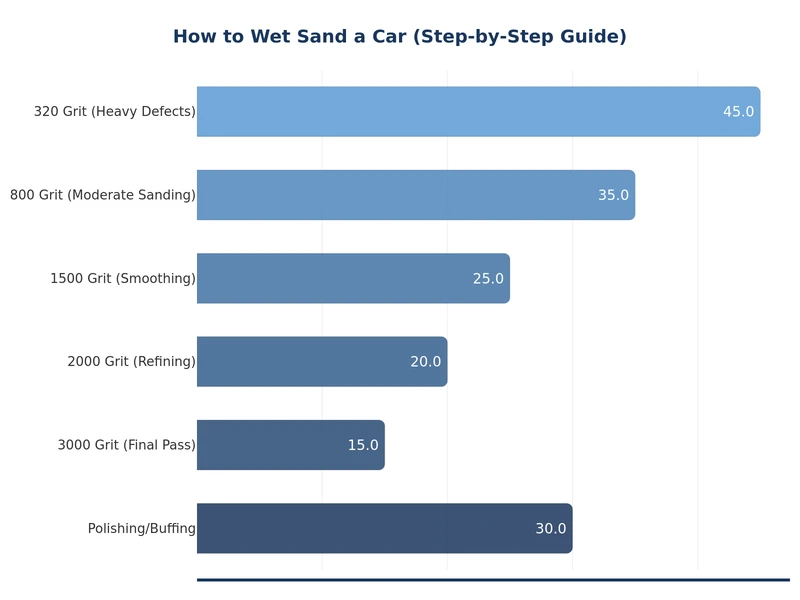
Once the target defects are gone at your starting grit, move to the next finer grit. Each stage removes the scratches left by the previous one. After 3000 grit, the surface should show a fine, even haze with no visible sanding lines — ready for compound.
The right starting grit depends on defect severity. Starting too coarse removes too much clear coat; too fine won't cut deep enough to solve the problem. When in doubt, start finer and step down only if necessary.
| Grit | Best Use Case | Approx. Clear Coat Removal | Follow With |
|---|---|---|---|
| 800–1000 | Heavy orange peel, paint runs, deep scratches | High (~10–15 microns) | 1500 grit |
| 1500 | Moderate scratches, pronounced orange peel | Medium (~5–8 microns) | 2000 grit |
| 2000 | Light scratches, mild orange peel, follow-up after 1500 | Low (~2–4 microns) | 3000 grit |
| 3000 | Final sanding stage before polish | Minimal (~1 micron) | Medium-cut compound |
Most light correction jobs start at 2000 grit. Factory clear coats typically measure 40–60 microns, so you have more headroom than you might expect — but a paint depth gauge removes the guesswork entirely.
Wet sanding leaves thousands of microscopic scratches across the surface. The uniform haze you see is light scattering off those scratches. Polishing removes them and restores full gloss — this stage is just as critical as the sanding itself.
Apply a medium-cut compound on a foam cutting pad, working in a 2×2-foot section at a time. Use a dual-action polisher if you have one, or work by hand. Once the haze clears, switch to a finishing polish to refine the surface and remove any remaining compound marks. For detailed hand technique, our guide on how to buff a car by hand covers pad selection, product choice, and stroke method.
Even careful work can leave fine swirl marks visible in direct sunlight. These are normal at this stage and are eliminated during polishing. If light swirling persists after your finishing polish, our guide on how to remove swirl marks by hand covers targeted correction with minimal further abrasion.
Freshly polished paint has no protection. Within 24 hours, apply a quality carnauba wax, paint sealant, or ceramic coating to lock in the gloss and shield the clear coat from UV exposure and environmental contamination.
Most wet sanding failures come down to a handful of avoidable errors:
Yes. The sanding itself is done entirely by hand with a sanding block — no machine needed. A dual-action polisher is only used during the polishing stage to remove the sanding haze faster. If you don't own one, a hand applicator pad with medium-cut compound works, though it takes more effort and time.
Roughly 1–15 microns per stage depending on grit and number of passes. Most factory clear coats are 40–60 microns thick, so you have a reasonable margin. A paint depth gauge lets you measure before and after each stage so you never sand past safe limits.
Mild orange peel typically responds to 2000 grit. Heavy, pronounced orange peel may need 1500 or even 1000 grit to cut it flat. Always start finer than you think you need — you can step down to coarser paper, but you can't undo excessive material removal.
At minimum 15 minutes; overnight is better. Fully soaked paper is more pliable, cuts more evenly across the surface, and is less likely to leave irregular deep scratches compared to paper used straight from the packaging.
No. Wet sanding only corrects defects within the clear coat layer. If a scratch has reached the base coat or primer, that spot needs touch-up paint or a professional respray first. Sanding over bare metal or exposed primer will worsen the damage.
Wet sanding should be done sparingly — at most once every few years on any given panel. Each session removes a measurable amount of clear coat, and factory clear coats have a finite thickness. Always check paint depth before starting and stop if the gauge shows you're approaching thin readings.
 |
 |
 |
 |
About Joshua Thomas
Joshua Thomas just simply loves cars and willing to work on them whenever there's chance... sometimes for free.
He started CarCareTotal back in 2017 from the advices of total strangers who witnessed his amazing skills in car repairs here and there.
His goal with this creation is to help car owners better learn how to maintain and repair their cars; as such, the site would cover alot of areas: troubleshooting, product recommendations, tips & tricks.
Joshua received Bachelor of Science in Mechanical Engineering at San Diego State University.
Get some FREE car parts & gear.. Or check out the latest free automotive manuals and build guides here.
Disable your ad blocker to unlock all the hidden deals. Hit the button below 🚗
| | | |