by Sarah Whitfield
Why does an engine stall, stumble, or refuse to fire even when the fuel tank shows plenty of gas? The answer, in a surprising number of cases, comes down to low fuel pressure symptoms — a cluster of performance failures that many drivers and even some shops misread as ignition faults, sensor problems, or worn spark plugs.
Low fuel pressure means the delivery system is not supplying gasoline to the injectors at the pressure the engine requires. The result is a lean-running condition — too much air relative to fuel — and the effects range from rough idling to complete no-start situations. Our team has documented these failures across a wide range of domestic and import vehicles, and the symptom patterns are consistent enough to point a technician toward the faulty component quickly when tested with the right approach.
For anyone troubleshooting the fuel system, knowing whether the pump, filter, or pressure regulator is at fault changes the entire repair strategy. This guide covers every major symptom, the root causes, step-by-step testing, real repair costs, and the diagnostic mistakes that consistently waste time and money.
Contents
Low fuel pressure rarely announces itself with a single dramatic failure. It typically surfaces as a collection of performance issues that worsen gradually over weeks or months. The engine control unit (ECU — the car's main computer) compensates for early-stage pressure drops by adjusting fuel trim, which masks the root problem until the system can no longer keep up.
The symptoms our team most consistently documents on vehicles with confirmed low fuel pressure include:
Hard starting is frequently the first symptom most people notice. When system pressure is low, injectors cannot atomize fuel into a fine mist. Instead, they produce larger droplets that do not ignite as reliably. The engine cranks for several seconds before catching — or may not start at all on cold mornings.
A no-start condition accompanied by good spark and a full fuel tank is a textbook presentation of low fuel pressure. Our team treats unexplained no-start situations on fuel-injected engines as a fuel delivery problem until pressure testing rules it out.
Stalling at idle or just after coming to a stop is another consistent pattern. The engine holds together at cruise speeds but dies when RPM drops at a traffic light — because at lower engine speeds, even small fuel delivery deficits eliminate the performance margin entirely.
According to the fuel injection overview on Wikipedia, modern port and direct-injection systems operate at highly specific pressure ranges — often 35–60 PSI for port injection and over 2,000 PSI for gasoline direct injection (GDI). Any component failure that reduces pressure below specification produces the symptoms described above.
The most common causes our team identifies in diagnosis records:
Warning: Running a vehicle with confirmed low fuel pressure for extended periods risks catalytic converter damage from unburned fuel passing through the exhaust — adding significantly to the total repair cost beyond the fuel system itself.
The decision to handle fuel pressure diagnosis and repair at home or delegate it to a professional involves real trade-offs. Testing fuel pressure is a relatively accessible task for most mechanically inclined people. Replacing a fuel pump, however, requires draining the tank or removing interior panels — tasks that demand more preparation and safety awareness than a filter swap.
Below is a breakdown of typical repair costs based on the most commonly identified causes of low fuel pressure:
| Repair | DIY Cost (Parts Only) | Professional Cost (Parts + Labor) | Difficulty |
|---|---|---|---|
| In-tank fuel pump replacement | $80–$260 | $420–$950 | Moderate–High |
| Inline fuel filter replacement | $15–$60 | $80–$220 | Low–Moderate |
| Fuel pressure regulator | $30–$130 | $160–$470 | Moderate |
| Fuel injector cleaning | $20–$60 (additive) | $50–$150 per injector (bench service) | Low (additive) / High (bench) |
| Fuel pump relay or fuse | $5–$25 | $50–$130 | Low |
The DIY cost advantage is significant on straightforward repairs like filter replacement and relay swaps. Fuel pump jobs on vehicles requiring full tank removal, however, often cost more in time, tools, and safety equipment at home than the labor rate differential suggests — particularly for first-timers working in confined spaces with flammable vapors.
Our team recommends honest self-assessment before committing to the job at home. Anyone without prior experience working around fuel systems should default to professional service on pump replacements, regardless of the parts-cost difference.
Accurate diagnosis of low fuel pressure symptoms requires minimal equipment, but using the correct tools prevents both inaccurate readings and safety incidents. Improvising with mismatched adapters is a leading cause of contaminated results and fuel leaks during testing.
Essential tools for the job:
Optional but valuable additions:
Our team consistently observes that technicians who skip the gauge kit and rely solely on fuel trim data miss intermittent pressure drops that only occur under load — conditions that never materialize during a stationary idle scan.
A systematic approach eliminates guesswork and produces results the evidence supports. The following procedure applies to port-injected gasoline engines with a Schrader valve test port on the fuel rail — the most common configuration on vehicles from the mid-1990s onward.
Pro insight: A fuel pressure reading that is perfectly normal at idle but drops below specification under wide-open throttle is the clearest indicator of a pump that has lost output capacity — even if every other test passes.
Not every fuel pressure situation calls for DIY intervention. The scope of the job, available equipment, and vehicle type all factor into whether a home diagnosis is a practical use of time and resources.
Situations where home testing makes sense:
Situations where professional diagnosis is the wiser call:
Our team's consistent recommendation: testing is always worth attempting at home. Repairs requiring fuel system disassembly should be evaluated case by case based on the individual's experience level and available tools. There is no shame in drawing a firm line at the test result and handing the repair to a professional from that point forward.
Several persistent misconceptions about fuel pressure problems circulate widely in online forums and even among some independent repair shops. Acting on them adds cost without solving the problem.
Myth 1: "If the engine runs at all, fuel pressure must be fine."
False. A failing pump commonly maintains adequate pressure at idle while losing delivery capacity under load. Most vehicles continue running — poorly — on significantly reduced pressure. By the time pressure drops enough to cause a no-start at idle, the problem has usually been present and worsening for months.
Myth 2: "Low fuel pressure always triggers a check engine light."
Not reliably. A lean condition caused by low pressure will eventually set codes like P0171 (System Too Lean, Bank 1) or P0174, but only after the ECU's adaptive fuel trim tables reach their correction limits. Early-stage pressure drops frequently produce no codes at all, which is why scan tools alone are insufficient for fuel system diagnosis.
Myth 3: "Misfires always point to ignition components."
Misfires have a wide range of causes. Before replacing coils, wires, or plugs, confirming fuel pressure rules out one of the most common triggers. Our team has documented multiple vehicles where ignition components were replaced unnecessarily because pressure was never checked. For similar diagnostic confusion, our piece on bad piston ring symptoms shows how engine problems with overlapping presentations consistently reward systematic testing over parts-based guessing.
Myth 4: "A full tank prevents fuel pump failure."
Fuel helps cool and lubricate the in-tank pump motor, and running consistently near empty does accelerate wear. However, an aging pump with worn brushes or a degraded commutator will eventually fail regardless of fuel level management. Keeping the tank full is sound preventive practice but not a protection against eventual mechanical wear-out.
Myth 5: "Fuel system additives restore pump performance."
Over-the-counter fuel system cleaners can reduce injector deposits and improve filter flow in mild cases. They cannot restore worn pump internals or repair a ruptured pressure regulator diaphragm. Our team treats these products as preventive maintenance tools — useful before problems develop, not as diagnostic or corrective solutions after symptoms appear.
The diagnostic path for low fuel pressure symptoms is straightforward in theory but frequently derailed by predictable errors that extend the repair process and inflate costs.
Replacing the pump without testing first. Many technicians jump directly to a pump replacement based on symptom descriptions alone. Without a gauge reading, there is no confirmation that pressure is actually low. The root cause might be a $15 relay, a serviceable inline filter, or a wiring fault. The gauge test takes under 20 minutes and eliminates most variables before a single part is ordered.
Testing only at idle and calling it done. A fuel pump that produces 48 PSI at idle may drop to 22 PSI at wide-open throttle — well below the threshold for adequate fueling under load. An idle-only test generates a false pass result. Including a loaded test is non-negotiable for an accurate assessment.
Skipping the leak-down portion of the test. Rail pressure that drops to near-zero within 60 seconds of engine shutdown points to leaking injectors or a failed pump check valve. Ignoring this finding and replacing the pressure regulator — a common shortcut — leaves the actual cause in place and the problem unresolved.
Overlooking the electrical circuit. A pump drawing 12 amps when the spec is 4–6 amps is mechanically failing even if it still produces adequate pressure today. Measuring current draw before condemning the pump catches underlying wiring, ground, or voltage-drop issues that cause repeat pump failures when they go unaddressed.
Not verifying pressure after the repair. Final pressure should be confirmed with the same gauge used at the start of the job. A new pump paired with a restrictive filter, for example, will produce substandard results and fail prematurely. Our team treats the post-repair gauge reading as a required sign-off step, not an optional confirmation.
Experienced technicians apply a set of practical methods that make fuel pressure diagnosis faster and more reliable. These observations come from pattern recognition across many vehicles and failure types.
Our team also notes that vehicles showing consistent lean trim codes alongside normal idle and moderate-load pressure readings should be evaluated for intake vacuum leaks, mass airflow sensor contamination, or oxygen sensor degradation before the fuel pump is targeted. Pressure is only one variable in a lean condition diagnosis.
A failing in-tank electric fuel pump is the most frequently identified cause in our diagnostic records. Pump degradation is gradual — the pump may produce adequate pressure at idle for months while losing output capacity under load, which explains why symptoms often appear first during highway passing or sustained hard acceleration before progressing to idle issues.
Yes, but not always right away. Early-stage pressure drops often produce no stored fault codes. As the condition worsens and the ECU's fuel trim corrections reach their limits, lean-condition codes such as P0171 or P0174 typically appear. In more severe cases, random misfire codes in the P0300 series may set simultaneously.
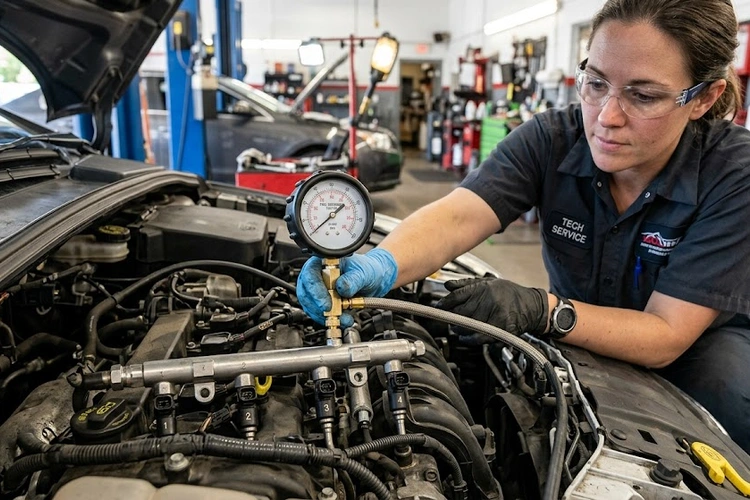
Without a gauge, the assessment is indirect. Listening for the fuel pump prime hum during key-on, noting long cranking times, and pulling live fuel trim data via an OBD-II scanner can suggest a delivery problem. None of these methods confirm actual rail pressure — a fuel pressure gauge connected to the test port is the only way to get a definitive reading.
The specification varies by injection system type. Most port-injected gasoline engines operate between 35 and 65 PSI at idle. Returnless systems typically hold a fixed pressure around 58–62 PSI, while return-style systems vary slightly with engine load. The factory service manual for the specific vehicle and engine is always the authoritative reference for pressure specifications.
Yes, particularly on vehicles with serviceable inline filters. A severely clogged filter restricts volume flow enough to reduce rail pressure under high-demand conditions — even when idle pressure reads normal. On applicable vehicles, replacing the filter before testing the pump is logical: it is inexpensive, eliminates a variable, and may resolve the problem entirely without further disassembly.
A full test — including key-on prime pressure, idle pressure, a loaded pressure reading, and a 10-minute leak-down check — takes approximately 25 to 35 minutes on a vehicle with an accessible Schrader valve test port. Vehicles without a factory test port require a fuel line adapter fitting, which adds preparation time but does not change the test procedure itself.
Driving with confirmed low fuel pressure is not recommended beyond a short trip to reach a repair facility. Sustained lean-running conditions accelerate catalytic converter degradation and stress oxygen sensors. A complete fuel pressure loss at highway speed creates a sudden stall condition that poses a real safety risk, particularly in heavy traffic or on high-speed roads.
Low fuel pressure symptoms are among the more straightforward automotive problems to confirm with the right equipment — a $30 gauge kit and 25 minutes of methodical testing can prevent hundreds of dollars in misdiagnosed parts replacement. Our team encourages anyone experiencing the signs described here to begin with a proper pressure test before authorizing any component work, and to bring those documented gauge readings to a trusted shop if the results point toward a pump replacement, a GDI high-pressure system, or any repair beyond the scope of available tools and experience.
 |
 |
 |
 |

About Sarah Whitfield
Sarah Whitfield is a diagnostics and troubleshooting specialist who spent ten years as an ASE-certified technician before joining the editorial team. She specializes in OBD-II analysis, electrical gremlins, and the kind of intermittent problems that make most owners give up.
Get some FREE car parts & gear.. Or check out the latest free automotive manuals and build guides here.
Disable your ad blocker to unlock all the hidden deals. Hit the button below 🚗
| | | |