Is that small oil stain under the car just road grime — or a sign of something worse? In most cases, it deserves a closer look. Oil pan gasket leak symptoms often appear gradually, giving drivers a window to act before serious engine damage sets in. This guide covers what to watch for, how to confirm the source, what the repair involves, and what it typically costs. For related drip and leak issues, the troubleshooting section covers dozens of similar problems.
The oil pan gasket is a seal positioned between the oil pan (the reservoir bolted to the bottom of the engine block) and the block itself. Its job is simple: keep engine oil from escaping. Heat cycling, engine vibration, and age all degrade the gasket material over time. Most factory gaskets last between 50,000 and 100,000 miles, though harsh driving conditions and infrequent oil changes accelerate the timeline.
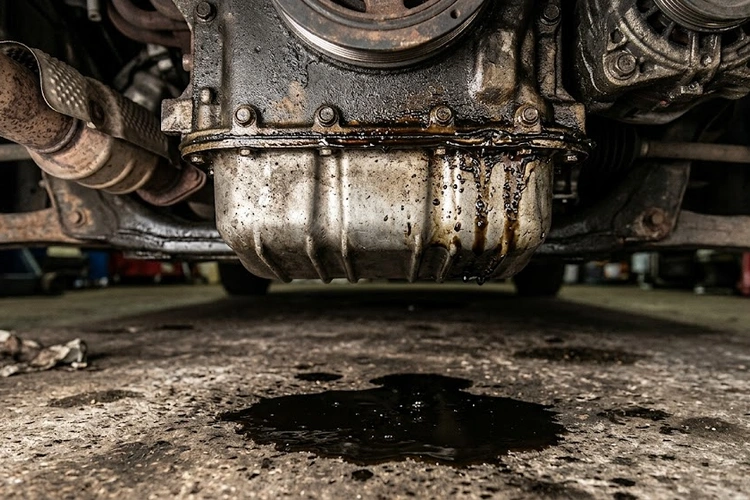
Figure 1 — Dark oil residue along the pan-to-block seam is one of the earliest oil pan gasket leak symptoms drivers can spot.
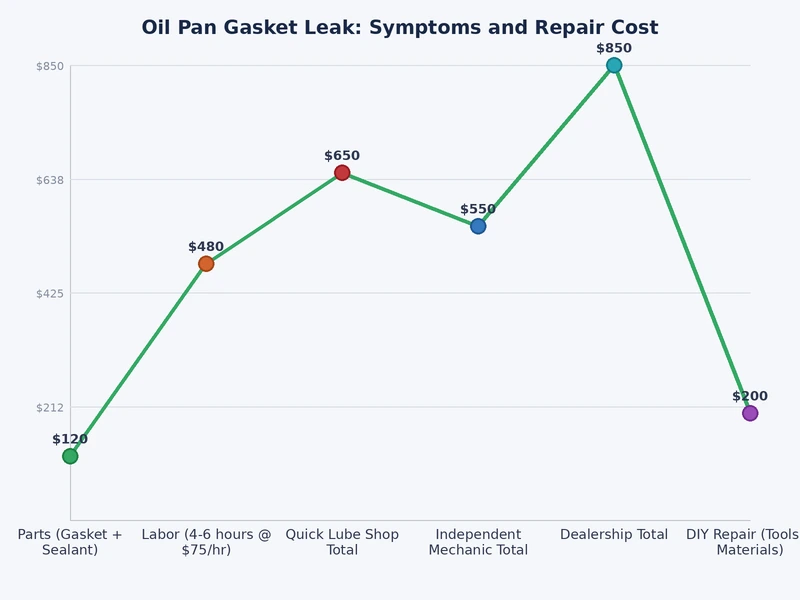
Figure 2 — Repair cost varies significantly by vehicle type, driven mostly by labor hours rather than parts price.
Recognizing Oil Pan Gasket Leak Symptoms
Oil pan gasket leak symptoms fall into two categories: things visible under the car, and things detected through smell, smoke, or dashboard warnings. Catching them early keeps repair costs low. A slow seep costs far less to fix than a leak that runs the engine dangerously low on oil.
Visual Clues Under the Car
Dark puddle beneath the engine — A brown or black stain directly under the front-to-center area of the engine is the most common sign. Fresh oil appears shiny and dark. Older, dried oil leaves a crusty ring.
Oily film along the pan seam — Running a clean rag along the bottom edge of the oil pan picks up any fresh oil. This confirms active seepage before a visible puddle forms on the ground.
Heavy grime buildup on the underside — Engine oil acts as an adhesive for road dust and debris. A thick layer of caked-on grime on the pan and surrounding components signals a slow, long-running leak.
Consistently low oil on the dipstick — Regular oil checks that show unexpected low levels — with no visible external source — point to a leak somewhere in the engine. The oil pan gasket is one of the first places to investigate.
A drip near the rear of the engine may signal a different problem entirely. Drivers who notice oil toward the back of the engine or near the transmission should also check for rear main seal leak symptoms — a separate failure that requires a different repair approach.
Smell, Smoke, and Dashboard Warnings
Burning oil smell — Oil dripping onto a hot exhaust pipe produces a sharp, acrid odor. It is one of the earliest sensory indicators of a pan gasket leak and tends to intensify after highway driving.
Thin bluish or gray smoke — Smoke rising from under the hood after driving means oil is contacting hot engine or exhaust surfaces. This is more pronounced after extended runs when the exhaust system is fully heated.
Oil pressure warning light — A sustained leak eventually drops oil levels far enough to trigger the low oil pressure indicator on the dashboard. This is a serious sign requiring immediate attention.
Accelerated oil consumption — Needing to add oil more frequently than the manufacturer's interval recommends is a reliable early indicator. Understanding how long engine oil typically lasts helps establish a baseline for what is normal consumption versus abnormal loss.
Warning: A burning oil smell combined with a flickering low oil pressure light is an emergency — the engine must be shut off immediately and oil level checked before any further driving.
How to Diagnose the Leak Source Accurately
Oil does not always drip from where it originates. It travels along engine surfaces before falling, which means the visible stain and the actual leak point are often in different locations. A systematic approach is the only reliable way to confirm the source.
Cleaning the Engine Before Inspection
A degreased engine is the starting point for any credible leak diagnosis. Without it, distinguishing a fresh leak from years of accumulated residue is nearly impossible.
A commercial engine degreaser spray or a drive-through engine wash service both work effectively.
After rinsing, compressed air speeds drying in crevices and hard-to-reach areas.
Parking on clean white cardboard overnight — or after a 15–20 minute test drive — shows exactly where fresh oil is falling.
Fresh oil spots on the cardboard narrow the leak zone before any visual inspection begins.
Some shops use a UV dye kit: dye is added to the engine oil, the car is driven briefly, and a UV light reveals the exact escape point as a bright glow.
What to Look for During Inspection
After cleaning, several specific components warrant close inspection before concluding the oil pan gasket is at fault.
Oil pan gasket seam — A clean rag pressed along the full length of the gasket edge picks up any active seepage. Wet oil on the rag confirms the source.
Drain plug and washer — A loose drain plug or worn crush washer is frequently mistaken for a gasket failure. It is a faster and cheaper fix and should be ruled out first.
Valve cover gaskets — Located at the top of the engine, leaking valve covers drip oil downward. Trails of fresh oil running vertically from above the pan seam point to a higher source.
Crankshaft seals — Front and rear crankshaft seals can produce drips in similar locations to the oil pan. Distinguishing them requires checking the seal positions relative to the wet area.
According to Wikipedia's overview of gaskets, engine gaskets are manufactured from rubber, cork, multi-layer steel, or composite materials. Each material degrades differently. Rubber cracks under repeated heat cycling. Cork crumbles with age and dryness. Identifying the gasket material beforehand helps predict how quickly the leak will worsen and which replacement products are appropriate.
What Oil Pan Gasket Replacement Actually Involves
Replacing an oil pan gasket is a manageable repair on many vehicles. The procedure itself is consistent across most cars, but access difficulty varies enormously and directly determines both time and cost.
DIY vs. Professional Repair
Access to the oil pan is the deciding factor. On many older rear-wheel-drive trucks and sedans, the pan is fully visible and reachable from underneath with basic tools. Front-wheel-drive cars and modern crossovers often require removing subframes, steering components, or engine mounts — turning a two-hour job into a six-hour or longer job.
DIY-friendly vehicles — Older trucks, body-on-frame SUVs, and rear-wheel-drive sedans with simple engine layouts. Basic floor jack, jack stands, socket set, and a torque wrench cover most of the tool requirements.
Professional recommended — Front-wheel-drive compact cars, European luxury vehicles, and any application requiring drivetrain component removal to access the pan.
Pro tip: Before attempting a DIY repair, searching forums specific to the vehicle's exact year, make, and model often reveals whether the job requires steering rack or engine cradle removal — a detail that can add four hours to the job.
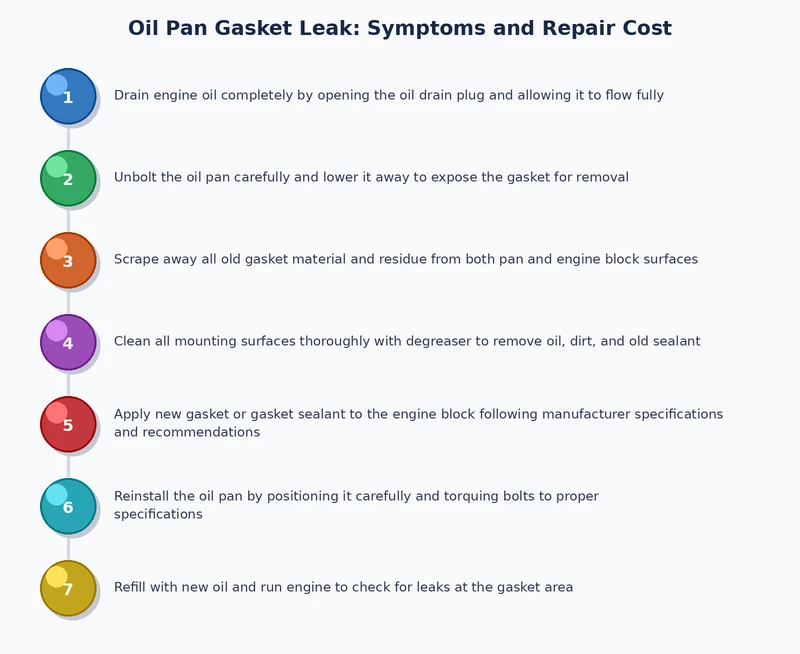
Step-by-Step Repair Overview
Drain the engine oil completely into a catch pan.
Raise the vehicle on jack stands — a floor jack alone is not safe as a work support.
Remove any components blocking oil pan access, noting order for reassembly.
Unbolt the pan carefully, following the bolt pattern in the service manual.
Scrape all old gasket material from both mating surfaces using a plastic scraper — metal scrapers risk gouging aluminum pans.
Degrease both surfaces thoroughly and allow to dry completely before proceeding.
Install the new gasket. Apply oil-rated RTV (room-temperature vulcanizing) sealant at corners or step joints only if specified by the manufacturer.
Torque bolts in a crossing pattern to the manufacturer's specification — never by feel alone.
Reinstall all removed components in reverse order of removal.
Refill with the correct grade and quantity of fresh oil. Choosing between synthetic blend vs. full synthetic oil is worth considering at this point — the right oil affects how well the new seal holds over time.
Start the engine, monitor for drips immediately, and recheck after a short test drive.
Figure 3 — Oil pan gasket replacement follows a consistent 11-step sequence; access difficulty determines total job time.
Oil Pan Gasket Repair Cost Breakdown
Parts for an oil pan gasket repair are inexpensive — typically $15 to $100 depending on the vehicle. Labor is where costs accumulate. Most shops charge between $80 and $150 per hour, and the number of hours depends almost entirely on how difficult the pan is to access.
Parts and Labor Costs by Vehicle Type
Vehicle Type
Estimated Labor
Parts Cost
Total Estimate
Economy Sedan
$100–$150
$15–$40
$115–$190
Mid-Size SUV
$150–$250
$20–$50
$170–$300
Pickup Truck / 4WD
$200–$350
$25–$60
$225–$410
Luxury / European Vehicle
$300–$500
$40–$100
$340–$600
Labor accounts for 70 to 85 percent of the total bill in most cases. A straightforward job on a simple domestic sedan takes 1.5 to 2 hours. A complex application requiring subframe removal can take 5 to 8 hours at the same hourly shop rate. Getting quotes from two or three independent mechanics before committing is standard practice for any repair above $300.
What Drives the Price Up
Engine orientation — Transversely mounted engines (standard in most front-wheel-drive cars) sit sideways in the engine bay, making the oil pan significantly harder to access from below.
Subframe removal requirements — Vehicles that require dropping the subframe to reach the pan add two to three hours of labor regardless of pan complexity.
Pan material — Aluminum oil pans strip and crack more easily than steel. They require more careful bolt torquing and sometimes need replacement rather than regasket, adding parts cost.
Dealer vs. independent shop — Dealers typically charge 20 to 40 percent more than independent mechanics for the same labor hours on the same job.
Geographic location — Labor rates in major metropolitan areas frequently run 30 to 50 percent above rural rates for identical repairs.
Mistakes That Make the Leak Worse
Most oil pan gasket failures escalate because of preventable errors. These are the decisions that convert a $150 repair into a multi-thousand-dollar engine job.
Ignoring Early Warning Signs
Topping off oil instead of fixing the leak — Adding oil masks the symptom without addressing the cause. The gasket continues to deteriorate. By the time the leak becomes too large to ignore, the repair bill has grown considerably.
Dismissing a small stain — A coin-sized stain today can expand into a large puddle within weeks as the gasket degrades further under continued heat and pressure cycling.
Skipping oil level checks between changes — Infrequent dipstick checks allow oil levels to drop to dangerous levels without warning. Running an engine significantly low on oil accelerates bearing wear and can trigger irreversible internal damage quickly.
Oil escaping onto hot exhaust components creates a secondary risk. Sustained exposure degrades catalytic converter efficiency over time. Drivers dealing with emissions test failures or a sulfur smell alongside an active leak should check for signs of a bad catalytic converter as a potential linked symptom.
In cases where oil levels have dropped severely, more serious engine symptoms may follow. Engine stalling during acceleration alongside a confirmed oil leak indicates the problem has moved well past a simple gasket replacement — and warrants immediate professional evaluation.
Using the Wrong Fix
Relying on stop-leak additives — Chemical stop-leak products can temporarily slow minor seepage. They do not replace a failed gasket. In some engines, they carry the risk of clogging oil passages, creating a worse problem than the original leak.
Using non-oil-rated sealant — General-purpose silicone sealant breaks down rapidly when exposed to engine oil. Only oil-rated RTV sealant is appropriate for use on oil pan seams, and only where the manufacturer specifies it.
Incorrect bolt torque — Pan bolts have precise torque specifications. Under-torquing leaves the gasket seeping. Over-torquing warps the pan flange or strips threads — both outcomes require additional, more expensive repairs.
Skipping the surface cleaning step — Installing a new gasket onto an oily, corroded, or uneven surface almost guarantees early failure. Both the pan flange and the engine block mating surface must be clean and flat before the new gasket is seated.
An oil pan gasket leak caught early is a $150 repair — left alone, it can become a $1,500 engine rebuild.
Sarah Whitfield is a diagnostics and troubleshooting specialist who spent ten years as an ASE-certified technician before joining the editorial team. She specializes in OBD-II analysis, electrical gremlins, and the kind of intermittent problems that make most owners give up.