by Sarah Whitfield
Have you ever pulled into your driveway after dark, glanced in the mirror, and noticed one headlight blazing while the other sits completely dead? You might brace for an expensive shop visit, but one headlight not working almost always comes down to a burned-out bulb, a blown fuse, or a corroded socket — problems you can solve in your own driveway in under an hour with tools you probably already own.
This guide covers every real cause, the diagnostic sequence that actually isolates the fault fast, honest repair costs, and a clear answer on when DIY makes sense versus when you genuinely need a professional. If electrical gremlins are a recurring theme on your car, our breakdown of car radio not working causes and fixes follows exactly the same systematic logic and is worth reading before you start pulling fuses blindly.
Contents
Most of the bad advice floating around about headlights comes from one reasonable but wrong assumption: because the two headlights are the same part installed in mirror-image positions, they should fail at the same time and for the same reasons. That's not how electrical components behave in the real world. Each bulb accumulates independent runtime hours from the day it's installed, and manufacturing tolerances mean one filament reaches the end of its service life weeks, months, or even years before its twin does — completely independently and for completely unrelated reasons.
Wiring connectors, ground straps, and headlight sockets corrode independently on each side of the vehicle because each side experiences different heat cycles, road spray patterns, and physical stress from road impacts and vibration. A single corroded ground connection can kill one headlight while the other runs perfectly for another two years, and you'll stare at a perfectly functional bulb wondering why it refuses to light up. Skipping the fuse test and socket inspection before buying a replacement bulb is the most expensive and time-wasting diagnostic mistake you can make.
Pro tip: Before buying a replacement bulb, swap the working bulb from the good side into the dead socket. If it lights up, the original bulb is fine and your problem is the socket, fuse, or wiring — not the bulb.
When both headlights fail simultaneously, you're almost certainly chasing a shared component: the headlight relay, a primary fuse, or a Body Control Module fault. One headlight not working, by contrast, always points toward a single-circuit fault, which narrows your diagnostic path dramatically and keeps the repair cost manageable. These are categorically different failure modes, and treating one headlight out the same way you'd treat both lights out sends you down the wrong diagnostic path every time.
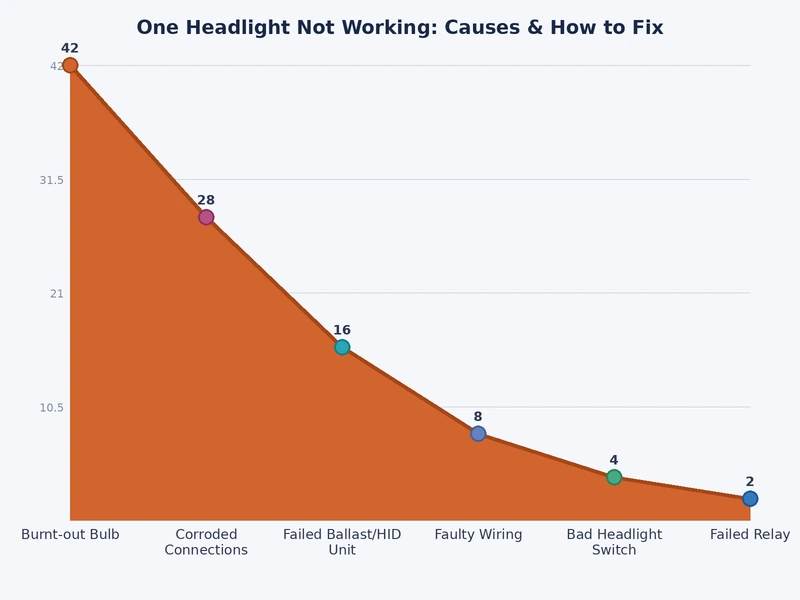
Four causes cover the vast majority of single-headlight failures, and they escalate in complexity in roughly this order. Work through them from the top and you'll find the fault before spending money on the wrong part — guaranteed.
A failed filament or an expired gas-discharge arc is responsible for roughly 80 percent of single-headlight complaints, which makes it the first thing you check. Halogen bulbs last between 500 and 1,000 hours of actual use before the tungsten filament burns through, and that number drops sharply with voltage spikes, repeated vibration, or oil contamination from bare-handed installation. HID bulbs last considerably longer — typically 2,000 to 3,000 hours — but when they fail, they often flicker through a range of colors first before going permanently dark, which is a useful diagnostic clue that tells you the ballast is likely still functional.
Many vehicles run each headlight on its own dedicated fuse circuit, which means a single blown fuse kills exactly one light while leaving the other completely unaffected. Pull your owner's manual, identify the headlight fuse for the affected side, and check it with a test light or a fuse tester before you do anything else — this is a two-minute test that costs nothing. Relays are equally straightforward: a failed headlight relay controlling a single circuit produces exactly this symptom, and swapping it with an identical relay from another circuit in the fuse box is a free, thirty-second swap test that confirms or rules out the relay immediately.
The headlight socket lives in a brutal environment — it cycles through extreme heat every time you use the lights, and it absorbs road moisture and road salt from below the vehicle. Green or white oxidation on the terminals kills electrical contact progressively, and what starts as an intermittent or dim headlight eventually becomes a permanently dead one. Mild corrosion cleans up with electrical contact cleaner and a terminal brush, but a socket with melted plastic or physically deformed terminals needs full replacement. The socket pigtail harness runs between five and fifteen dollars at any auto parts store and is a straightforward splice repair even for a beginner.
Warning: Never touch halogen bulbs with bare hands — the oils from your skin create localized hot spots on the quartz envelope that cause the bulb to fail prematurely, sometimes within hours of installation. Use nitrile gloves every time, no exceptions.
A chafed, broken, or pinched wire in the harness running to one headlight is the least common cause, but it's the one that catches drivers completely off guard because the damage is invisible without a physical inspection of the entire harness run. Rodent damage has become a more common culprit than most people expect — automotive wiring harnesses use soy-based insulation materials on many modern vehicles that rodents actively chew through, particularly in winter months when a warm engine bay is attractive shelter. Trace the harness physically from the headlight connector back toward the fuse box and look for abrasion damage, melted insulation from heat contact, or connector pins that have backed out of their housing.
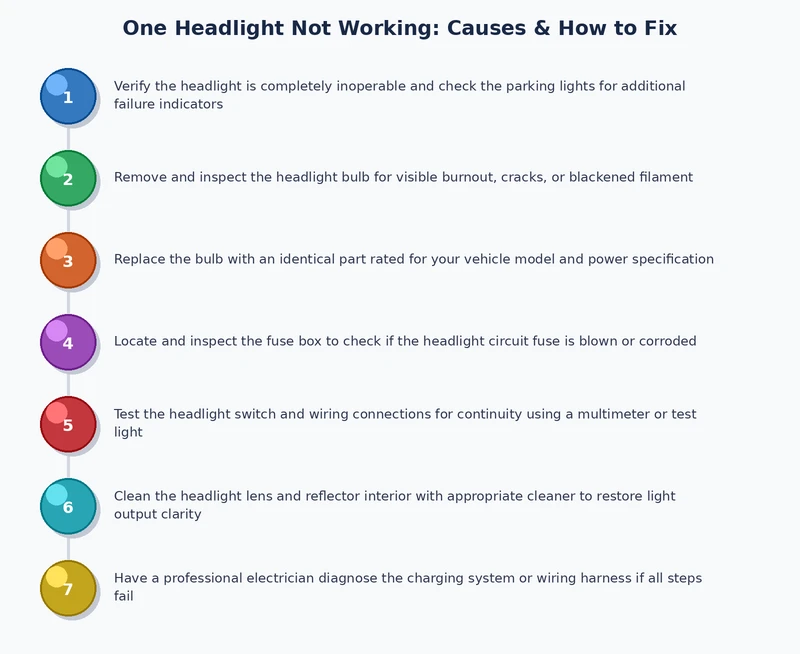
Diagnosing and fixing one headlight not working doesn't require a professional scan tool or an oscilloscope. You need a specific, inexpensive kit of diagnostic tools, and having all of them before you start means you never end up three steps into a diagnosis with nothing to test the next component with.
Cross-reference your vehicle's year, make, and model in the Sylvania or Philips bulb catalog before you start — buying the wrong bulb base type and discovering it in your driveway at night is avoidable. If corrosion is your likely culprit based on the socket inspection, also pick up a replacement socket pigtail; they're cheap and widely available in the OEM connector style for most popular vehicles. Applying dielectric grease to the reinstalled socket contacts before you button everything back up is the single most effective preventive measure you can take against the same failure recurring in two or three years.
Most single-headlight repairs are completely DIY-friendly, but a few specific scenarios genuinely warrant professional intervention, and knowing the difference before you start prevents you from creating a more expensive problem than the one you started with. The boundary between a simple swap and a complex wiring diagnosis is similar to troubleshooting a remote start that's stopped working — it often comes down entirely to how comfortable you are reading a wiring diagram and using a multimeter under the hood.
HID systems that have failed at the ballast, igniter, or control unit require a scope and a wiring diagram to diagnose accurately, because a standard multimeter won't reveal the full picture of how the high-voltage circuit is behaving. If a new fuse blows immediately after you install it, stop replacing fuses — you have a hard short circuit somewhere in the harness, and continuing to install fuses will damage wiring and create a genuine fire risk. Vehicles with adaptive or steerable headlight systems add another layer of complexity: if the steering motor, control module, or level sensor has failed alongside the bulb, the system requires scan tool calibration after the repair that you can't perform with basic tools. Keeping on top of routine electrical diagnostics — including knowing when and why to reset a check engine light — is always cheaper than letting electrical problems compound into something much harder to untangle.
Warning: If a brand-new fuse blows the moment you restore power, stop immediately — you have a hard short in the headlight circuit that will damage wiring and can potentially cause a fire if you keep replacing fuses.
The spread between the cheapest and most expensive repair for one headlight not working is enormous, driven entirely by which component failed and what headlight technology your vehicle uses. Here's an honest cost breakdown across every likely scenario, with shop totals reflecting real labor rates rather than best-case estimates.
| Repair Type | DIY Parts Cost | Shop Total (Parts + Labor) | DIY Difficulty |
|---|---|---|---|
| Halogen bulb replacement | $5 – $30 | $40 – $110 | Very Easy |
| HID bulb replacement | $20 – $80 | $100 – $250 | Moderate |
| LED bulb or assembly replacement | $30 – $200 | $120 – $400 | Moderate |
| Fuse replacement | $1 – $5 | $50 – $100 (includes diagnostic) | Very Easy |
| Socket pigtail replacement | $5 – $15 | $80 – $160 | Easy |
| HID ballast replacement | $30 – $120 | $150 – $380 | Moderate |
| Wiring harness repair | $20 – $60 (materials only) | $200 – $600+ | Hard |
Halogen bulb swaps on most domestic vehicles bill at 0.3 to 0.5 hours of labor at shop rates between $100 and $160 per hour, putting the labor charge at $30 to $80 for a straightforward bulb job. Electrical diagnosis is open-ended: most shops charge a flat diagnostic fee of $100 to $150 to identify the fault, and the actual repair time after that depends entirely on where the break or short is located in the harness. Adaptive headlight recalibration after a module replacement adds another $75 to $200 in dedicated scan tool time on top of the repair cost itself, which is a significant jump that many shops don't warn you about upfront.
If you're replacing one headlight, you buy the exact same bulb technology that's already in the other socket — no exceptions. Mixing bulb types creates mismatched color temperatures and inconsistent beam patterns that are both a roadworthiness failure and a genuine visibility problem for you and for oncoming drivers. But if you're replacing both headlights at the same time, here's the unfiltered comparison of what each technology actually delivers.
The recommendation is simple: match your replacement bulb to what the housing was designed for, and don't let a bargain aftermarket conversion kit talk you into a scattered beam pattern that makes your headlight problem worse, not better.
Technically your car will move, but driving with one headlight not working is illegal in every U.S. state and most countries worldwide. Beyond the legal exposure, a single headlight cuts your lateral visibility significantly, and oncoming drivers may misjudge your vehicle's width and position in the dark — especially on narrow roads. Fix it before your next nighttime drive.
The fastest test is the bulb swap: pull the working bulb from the good side and install it in the dead socket. If it lights up, the dead socket has power and the original bulb is the problem. If it stays dark, the fuse or wiring has failed. Check the fuse immediately after if the swap test comes back dark.
On most vehicles with accessible headlight housing, a halogen bulb swap takes 10 to 20 minutes once you have the correct replacement in hand. Some vehicles — particularly those with tight engine bays or sealed composite headlight assemblies — require removing the wheel liner or the battery to reach the housing, which extends the job to 45 minutes or more.
Flickering before failure is the classic symptom of a dying HID bulb or a degrading HID ballast. The arc inside the HID tube becomes unstable as the electrodes erode or as the ballast loses the ability to maintain consistent output voltage. Flickering in a halogen bulb is more often a loose socket connection or an intermittent ground fault than a bulb at the end of its life.
Yes, and this is one of the most commonly overlooked causes of one headlight not working. Each headlight circuit runs its own ground path back to the chassis, and a corroded or loose ground connection on one side creates high resistance that drops the voltage below what the bulb needs to illuminate. Clean the ground connection at the headlight bracket and at the chassis grounding point before replacing any other component.
You don't have to, but it's strongly recommended if your headlights are older. Both bulbs have accumulated similar runtime hours, so the one that's still working is often close to failure as well. Replacing both at once costs only slightly more than one bulb and saves you from doing the same job again in a few months on the other side.
Repeated premature bulb failure almost always comes down to one of three causes: voltage spikes from a failing alternator that push voltage above 14.7V and overstress the filament, oil or moisture contamination inside the housing that creates thermal stress, or bulbs being handled with bare hands during installation. Check your charging system voltage before blaming the bulbs themselves.
Many halogen headlight systems use a dual-filament bulb — specifically H4 or 9003 types — where the low-beam and high-beam filaments are separate wires within the same glass envelope. When the low-beam filament burns out while the high-beam filament remains intact, you get exactly this symptom. The fix is a straightforward single bulb replacement with a new dual-filament unit.
One headlight not working is almost never the catastrophe it feels like at midnight in a dark parking lot — it's a systematic diagnosis that takes you from fuse to socket to bulb to wiring, and the right answer almost always costs under thirty dollars and thirty minutes if you approach it in order. Start your diagnosis today with the bulb swap test described above, work through the fuse and socket checks before spending money on parts, and use the cost table in this guide to decide whether the repair belongs in your driveway or in a professional's hands.
 |
 |
 |
 |

About Sarah Whitfield
Sarah Whitfield is a diagnostics and troubleshooting specialist who spent ten years as an ASE-certified technician before joining the editorial team. She specializes in OBD-II analysis, electrical gremlins, and the kind of intermittent problems that make most owners give up.
Get some FREE car parts & gear.. Or check out the latest free automotive manuals and build guides here.
Disable your ad blocker to unlock all the hidden deals. Hit the button below 🚗
| | | |