by Sarah Whitfield
Ever climbed into your car, reached for the mirror adjustment switch, and got absolutely nothing — no movement, no hum, no response? Power mirrors not working is one of those electrical faults that feels trivial until you're merging onto the highway with a mirror frozen in the wrong position. The short answer is that you're dealing with a failure somewhere along the circuit between the master switch on your door panel and the small DC motors inside each mirror housing. The diagnosis tree is shorter than most people expect, and in the majority of cases you can resolve it before writing a check to the dealer. This guide walks you through every failure point in the system, a structured diagnostic sequence, and the repairs that actually hold.
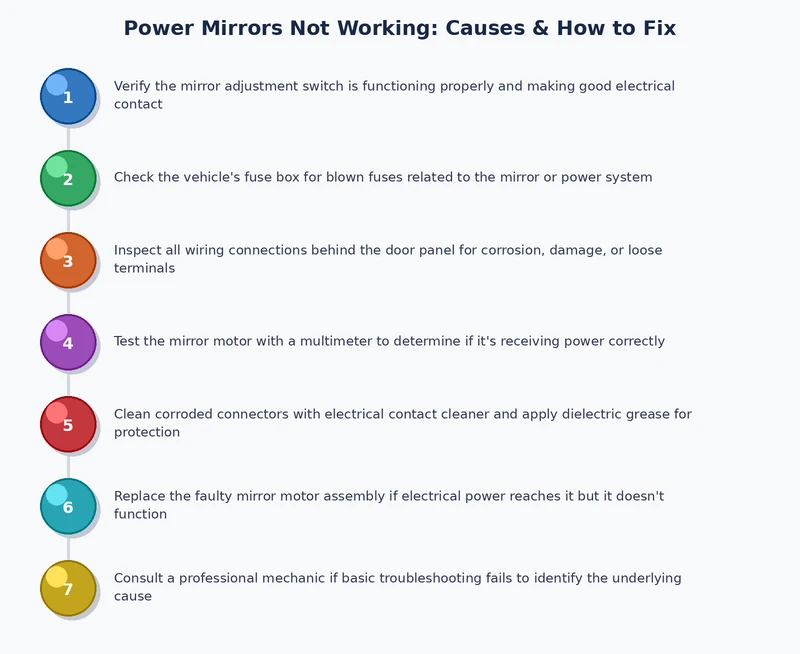
Power mirror faults break down into four categories — fuse, switch, motor, and wiring — and working through them in that order keeps your diagnostic cost as close to zero as possible before you start ordering parts. If you've already noticed other accessory failures alongside your mirror problem, a shared ground fault may be the root cause, which changes the repair sequence entirely.
Contents
Your power mirror system is a low-voltage DC circuit that runs from the fuse box, through a master mirror select switch on the driver's door panel, into individual motors inside each mirror housing. Most mirrors carry two small reversible DC motors per unit — one for horizontal adjustment, one for vertical — and a third motor on vehicles with power folding. Current flows from the switch to whichever motor the switch directs, and polarity reversal at the motor terminals is what moves the mirror in the opposite direction. There are no modules, no CAN bus messages, and no calibration procedures on most platforms — just switched DC power and a ground path, which makes this one of the more approachable electrical diagnostics you'll encounter.
Vehicles with wiring looms running through the door hinge — which is every door-mounted power mirror setup — are inherently vulnerable to flex fatigue over time. High-mileage trucks and older SUVs see the most failures because the door-opening cycle stresses the same wire bundle thousands of times per year, and individual conductors crack internally while the insulation looks intact from the outside. Compact cars with small door cavities trap more moisture against the mirror pigtail connector, accelerating pin corrosion faster than the wiring itself deteriorates.
Work through this list in ranked probability order — most common to least — before touching any parts.
The most overlooked starting point is also the statistically most common cause. A single blown fuse kills both mirrors simultaneously because they share one fused circuit on virtually every platform. Check your owner's manual or the fuse box lid diagram for the mirror fuse — labeled "PWR MIRROR," "DOOR MIRROR," or similar — pull it with a fuse puller, and test it with a multimeter in continuity mode. Some fuses blow internally without a visible break in the element, so visual inspection alone is unreliable. Replace with the same amperage rating and nothing higher.
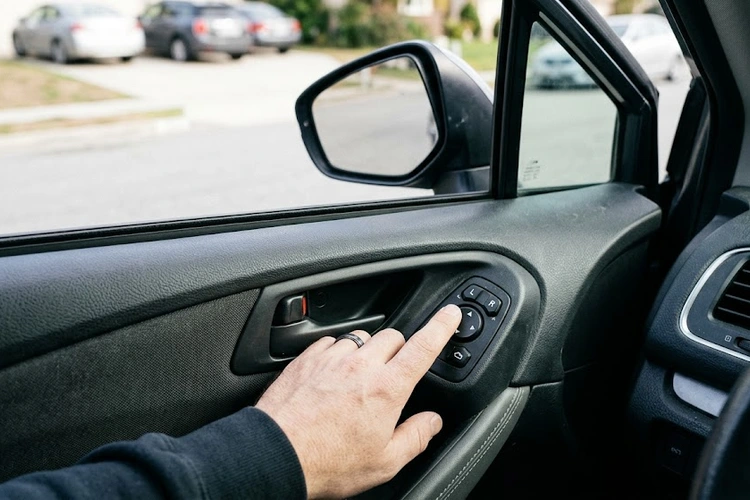
If the fuse checks out, the master switch is the next suspect. Mirror switches on driver's door panels accumulate contact oxidation that produces intermittent or total failure, and the select position contacts — left mirror versus right mirror — tend to fail before the directional contacts. A switch that's dead on both mirror selections but still operates the mirror fold function points to internal contact failure rather than a downstream wiring problem. Test across the switch terminals with a multimeter in voltage mode while a helper presses each direction — no output voltage on a confirmed live circuit means the switch is condemned.
When only one mirror is dead, or when one movement axis is gone while the other works, the motor inside the housing is the primary suspect. Mirror motors are small permanent-magnet DC motors that fail from moisture intrusion, seized pivot gears, or contact brush wear. Applying 12V directly to the mirror pigtail connector — bypassing the switch entirely — is the definitive test. No movement with direct 12V indicates a failed motor; movement with direct 12V but not through the switch redirects your diagnosis back toward the switch or the wiring between them.
This failure mode trips up more DIYers than any other because the damage is invisible from the outside. The wiring loom that passes through the rubber grommet at the door hinge flexes every time you open or close the door, and individual wires develop internal fractures while the insulation holds its shape. You'll typically see intermittent failure that comes and goes depending on door position, or a fault that appeared suddenly after cold weather when a stressed wire finally snapped. Wiggling the door while someone operates the switch — watching for the mirror to briefly respond — is the fastest field confirmation.
If your vehicle shows related electrical failures alongside the mirror problem — interior lights flickering or behaving erratically at the same time — that pattern points to a shared ground or wiring loom issue rather than an isolated mirror fault. The diagnosis for interior car lights not working covers shared-ground tracing in detail and applies directly to this scenario.
Never overlook corrosion at the mirror pigtail connector — a pin that looks intact visually can carry enough oxidation to block continuity entirely. Clean the terminals with electrical contact cleaner and a brass brush before condemning the motor or the switch.
You don't need a scan tool for a straightforward power mirror diagnosis. The complete toolkit:
| Symptom | Most Likely Cause | Confirming Test |
|---|---|---|
| Both mirrors completely dead | Blown fuse or bad ground | Pull and test fuse; ohm ground path to chassis |
| One mirror dead, one works | Motor or pigtail connector on dead side | Apply 12V direct to dead mirror pigtail |
| One axis dead (up/down or left/right only) | Single motor inside housing failed | Direct 12V to relevant motor terminals |
| Intermittent — works when door is in certain position | Broken wire in door jamb harness | Wiggle door while operating switch |
| Neither direction works but fuse is good | Failed master switch | Backprobe switch connector for output voltage |
| Mirror moves slowly or weakly | High-resistance connector or ground | Ohm connector pins and ground path |
Pull the mirror fuse and test it. While it's out, check for voltage on the fused side of the socket with the ignition on — you should see 12–14V. Reinstall a known-good fuse and verify voltage appears on the output side as well. If the new fuse restores function briefly and then blows again, you have a short to ground somewhere in the harness — stop adding fuses and trace the short, because a repeatedly blown fuse is protecting you from a wiring fire.
With the fuse confirmed good, backprobe the switch connector while it's still plugged in. Most mirror switch connectors carry 5–8 pins: constant power, chassis ground, and switched outputs to each motor direction and polarity. Your factory wiring diagram — available from ALLDATA, Mitchell OnDemand, or your vehicle's service manual — shows which pin is which. You should see 12V on the power pin at all times with the ignition on, and 12V appearing on the relevant output pin only when you press that direction. A switch that receives power but produces no output is dead internally and needs replacement.
Remove the interior door panel — typically four to six T25 screws hidden under trim caps plus two along the door pull — and disconnect the mirror pigtail. Touch jumper wires connected to a 12V source to the pigtail terminals in both polarities while watching the mirror. A seized motor gets warm under direct 12V power as the stalled armature draws current; a motor with a broken internal wire stays completely cold. Replacement motors are available as standalone units for most popular platforms, or you can source a complete mirror assembly from a salvage yard for a cost similar to the standalone motor at a parts store.
The diagnosis sequence for mirror motors is identical to what you'd use for failed power seat actuators — direct power test, check for heat against no movement, replace accordingly. The guide on power seat not working covers the same methodology for anyone dealing with multiple accessory failures at once.
The single most expensive diagnostic mistake is ordering a replacement switch or motor before pulling the fuse. A $4 fuse fix bypassed in favor of a $90 mirror switch is straightforward money wasted. Work the fault tree in cost order: fuse first, then connector and wiring, then switch, then motor. If both mirrors are completely dead, the fuse is responsible in the majority of real-world cases — don't let the simplicity of the fix discourage you from checking it first.
When the power system fails, the instinct is to push the mirror glass by hand to get it into a usable position. On mirrors with plastic ball-and-socket pivot assemblies, this cracks the socket or strips the drive gear on the motor shaft. If the motor is seized, manually forcing the glass transfers the full load directly through the gear train, and the gears lose. Leave the mirror where it sits until you've confirmed the motor is operational and the fault is electrical, not mechanical. If the motor is fine but the switch is dead, use jumper wires to position the mirror correctly while you wait for the replacement part.
If both mirrors fail simultaneously and the fuse is good, a high-resistance ground path is the most underdiagnosed explanation. The mirror circuit grounds through the door structure, and elevated resistance on that ground path produces a voltage drop that isn't sufficient to drive the motors reliably. Ohm the ground path from the switch ground pin to chassis — anything above 0.5Ω is too much resistance for consistent motor operation, and the fix is cleaning or relocating the ground lug rather than replacing any components. The same ground fault that kills your mirrors can simultaneously affect other systems, which is why taillights not working or other simultaneous electrical symptoms should push you toward ground diagnosis before anything else.
The most effective preventive measure you can take is protecting the wiring loom at the door hinge. After any door panel removal, inspect the rubber grommet where the harness passes through — if it's cracked, distorted, or hardened, replace it and apply dielectric grease to the wire bundle inside it. The grommet costs under $5 at the dealer and prevents the abrasion that eventually destroys conductor insulation. If you're replacing a harness segment anyway, build in a small service loop — a gentle curve of extra wire length — at the hinge point to reduce the flex stress on each door cycle over the life of the vehicle.
Mirror pigtail connectors on most production vehicles are not sealed to a meaningful standard. After reconnecting a mirror following any repair, fill the connector body with dielectric grease before seating it — this displaces air and dramatically slows the electrochemical oxidation that eventually creates the intermittent resistance failures you're diagnosing today. It's the same technique used on trailer plugs for the same reason: low-tech, proven, and cheap enough that there's no argument for skipping it.
If you've confirmed the fuse, connector, switch, and motor are all functioning and the mirrors still refuse to work, the fault is buried inside the wiring between those components — and intermittent conductor breaks in a door harness can be genuinely difficult to pinpoint without factory wiring diagrams and a capable meter. A shop with the right documentation can often trace a broken wire in under an hour. Before paying for that diagnosis, check your vehicle's recall and technical service bulletin history on NHTSA.gov — door wiring harness failures are a documented recall item on several platforms, and the repair may be covered at zero cost. Clearing any stored diagnostic codes after your repair is complete is straightforward once you understand how to reset a check engine light and related fault codes.
When both mirrors fail simultaneously, the most likely cause is a single blown fuse — both mirrors share one fused circuit on virtually every vehicle. A failed master switch or a high-resistance ground path can also kill both mirrors at once, so pull the fuse first, then test the ground, then backprobe the switch for output voltage before replacing anything.
On most vehicles you can replace the individual motor inside the mirror housing without buying the complete assembly. Standalone mirror motors are available for most popular platforms and cost significantly less than a full mirror. However, if the mirror housing itself is cracked, the pivot socket is broken, or the glass is shattered, a complete salvage-yard assembly often costs less than piecing together multiple individual components.
A blown fuse costs under $5. A replacement mirror switch runs $25–$90 depending on whether the mirror fold and heat functions are integrated into the same switch assembly. A standalone mirror motor is typically $20–$60. Professional labor for a door panel removal and direct-test diagnosis runs one to two hours at shop rate. If the fault is a broken wire in the door harness, budget an additional hour for the harness repair on top of diagnosis time.
 |
 |
 |
 |

About Sarah Whitfield
Sarah Whitfield is a diagnostics and troubleshooting specialist who spent ten years as an ASE-certified technician before joining the editorial team. She specializes in OBD-II analysis, electrical gremlins, and the kind of intermittent problems that make most owners give up.
Get some FREE car parts & gear.. Or check out the latest free automotive manuals and build guides here.
Disable your ad blocker to unlock all the hidden deals. Hit the button below 🚗
| | | |