by Joshua Thomas
When a serpentine belt begins to fail, the warning signs are rarely ambiguous — most vehicles produce distinct noise, visible wear, or accessory dropout well before the belt snaps completely. Identifying serpentine belt symptoms at the earliest stage is the most cost-effective maintenance decision available to any vehicle owner, and our team ranks it among the highest-priority inspections on any preventive maintenance schedule. A proactive belt replacement costs a fraction of the repair bill that follows sudden failure on the road.
The serpentine belt is a single continuous ribbed loop that drives the alternator, power steering pump, water pump, air conditioning compressor, and — on many rear-wheel-drive platforms — the mechanical cooling fan. When that loop degrades, multiple systems fail simultaneously, and the downstream consequences compound with alarming speed. Our experience across hundreds of inspection records confirms that most people who ignore early symptoms end up replacing not just the belt but several of the driven components as well.
Contents
The serpentine belt — also called the drive belt or accessory belt — is a single ribbed rubber loop routed through a spring-loaded tensioner and a series of fixed idler pulleys to drive every belt-powered accessory on the engine. Unlike older V-belt configurations that used individual belts for each accessory, the serpentine design consolidates all accessory drive functions into one component under continuous spring tension.
Because all of these systems depend on a single belt, failure is not a localized event — it is a systemic shutdown that eliminates electrical generation, coolant circulation, and steering assist simultaneously. Our team considers serpentine belt inspection a Tier 1 maintenance priority precisely because a single $35 rubber component can strand a vehicle and trigger $2,000 in collateral damage when it fails without warning during normal driving.
Our team has identified six reliable indicators that appear consistently across failing belts, regardless of vehicle platform or accumulated mileage. These serpentine belt symptoms present in roughly the order a belt progresses through stages of deterioration, from early glazing to complete material failure.
A loud squealing or chirping sound from the engine bay — particularly pronounced during cold starts or the moment the air conditioning compressor clutch engages — is the most common early indicator of belt degradation. The sound originates from the belt slipping across pulley surfaces due to glazing, oil contamination, or insufficient tensioner pressure. Our team notes that this noise is frequently misattributed to brake hardware or exhaust components, delaying accurate diagnosis by weeks and allowing further belt deterioration to continue unchecked.
Pro tip: Spray a small amount of water directly onto the running belt — if the noise momentarily intensifies then subsides, the belt surface is glazed and slipping rather than the tensioner bearing or a failed idler pulley.
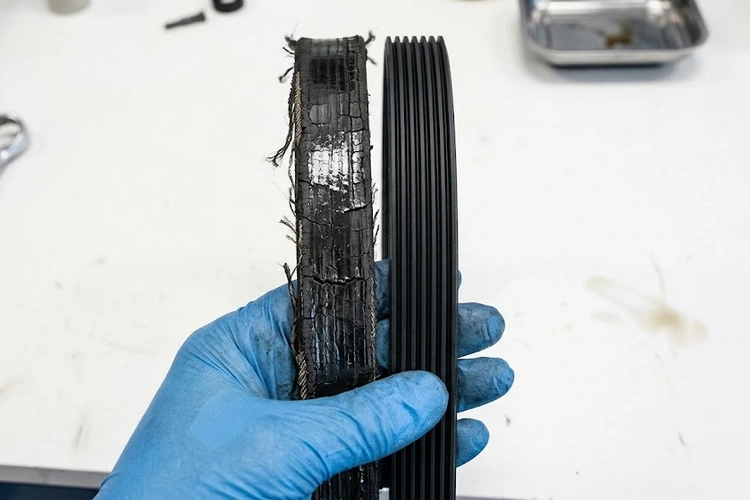
A thorough visual inspection reveals the belt's internal health far more reliably than noise alone. Our team evaluates four specific visual indicators during any engine bay assessment:
When the air conditioning stops producing cold air and the power steering simultaneously becomes heavy, a failed or severely slipping serpentine belt is the leading diagnosis. Our team has documented numerous cases where a partially failed belt drove some accessories intermittently while others lost power entirely, creating a confusing multi-system symptom pattern that led mechanics toward expensive component replacements rather than a simple belt inspection. Our detailed coverage of bad AC compressor symptoms outlines the diagnostic overlap between a failed compressor and a slipping drive belt that powers it.
Because the alternator is belt-driven, a slipping or broken serpentine belt immediately reduces charging output and triggers the battery or charging system warning lamp on the instrument cluster. Our team emphasizes that this warning light does not always indicate a failed alternator — it frequently signals a belt that is slipping under electrical load and not spinning the alternator rotor at sufficient speed to maintain output voltage above 13.5 volts. Anyone experiencing a recurring battery warning light alongside any other item on this list should inspect the belt before authorizing an alternator replacement. Our analysis of a car battery that keeps dying covers how alternator-related charging faults present across multiple failure scenarios.
On vehicles with hydraulic power steering, a belt that slips on the power steering pump pulley produces a sudden and unmistakable increase in steering effort, particularly at low speeds and during parking maneuvers. The wheel becomes dramatically heavier than normal, and fine directional corrections require noticeably more input force than the driver expects. Our team recommends inspecting the serpentine belt tension and condition as the first diagnostic step when this symptom appears, before assuming pump failure or rack damage. Noise accompanying the steering effort change is explored in depth in our guide to why the steering wheel makes noise when turning.
On platforms where the water pump is belt-driven rather than chain-driven, a failed serpentine belt eliminates coolant circulation entirely and within minutes the engine temperature gauge climbs rapidly toward the red zone. The risk of warped cylinder heads, cracked blocks, and blown head gaskets rises sharply beyond 230°F coolant temperature, and the repair costs that follow frequently exceed the vehicle's market value on older platforms. Our team treats any overheating episode that coincides with belt noise or accessory dropout as a belt-out-of-service event requiring roadside assessment rather than further driving under any circumstances.
Warning: Continuing to operate an overheating engine for more than two to three minutes after the temperature gauge enters the red zone risks head gasket failure — a repair that often costs more than $1,500 and exceeds the value of many high-mileage vehicles.
Not every belt symptom demands same-day replacement, but the threshold for action is lower than most people expect, and our team consistently errs toward early replacement rather than extended monitoring. The following decision framework reflects our collective position across all belt inspections.
Our team's position is unambiguous: when any doubt exists about a belt's remaining service life, replace it. The labor time to install a new belt is nearly identical to the labor time to diagnose a marginal one, and belt material costs between $25 and $75 — a negligible investment against the risk of roadside failure.
A proper serpentine belt inspection requires the engine to be cold, the vehicle on a level surface, and the ignition key removed before any hands-on assessment begins. Our team follows a structured protocol that prevents both missed defects and unnecessary replacements driven by surface-level assessment alone.
Insight: Our team strongly recommends replacing the belt tensioner and idler pulleys simultaneously with the belt — the incremental parts cost is minimal, and a worn tensioner or seized idler destroys a new belt within one service interval.
Belt failure is frequently a symptom of an upstream mechanical problem rather than simple mileage-based wear, and our team treats every belt replacement as a diagnostic opportunity to identify the root cause before new components are installed. Replacing the belt without addressing the underlying cause guarantees a repeat failure within weeks.
Our diagnostic sequence always includes spinning each accessory by hand with the belt removed, before the new belt is routed, to identify any seized components that would immediately destroy the replacement. This step adds three minutes to the service time and prevents the majority of repeat belt failures our team sees in second-visit inspections.
In our collective experience, serpentine belt failure follows one of two distinct patterns: gradual degradation over many thousands of miles, or sudden catastrophic breakage with little to no prior warning. Both failure modes carry serious consequences, and the sudden-failure pattern is particularly dangerous because it eliminates power steering and charging simultaneously — often at highway speed with no time for controlled deceleration.
The majority of belts follow a predictable degradation path — transverse surface cracking develops first, followed by progressive glazing, intermittent squealing under load, and eventually partial accessory dropout. Most people who adhere to a 60,000-mile replacement interval will never experience sudden catastrophic failure, because inspection at that threshold catches the belt before structural material loss begins and before any driven accessory is placed at risk.
Sudden failure most commonly occurs when oil or coolant contamination saturates the belt rapidly, when a pulley seizes under full accessory load, or when an already-cracked belt encounters a single high-demand event such as a hard acceleration from a stop or a sharp steering input at low speed. The failure is immediate and total — every belt-driven system goes offline within one crankshaft revolution after the belt leaves the pulley system, and the driver loses both electrical generation and steering assist without warning.
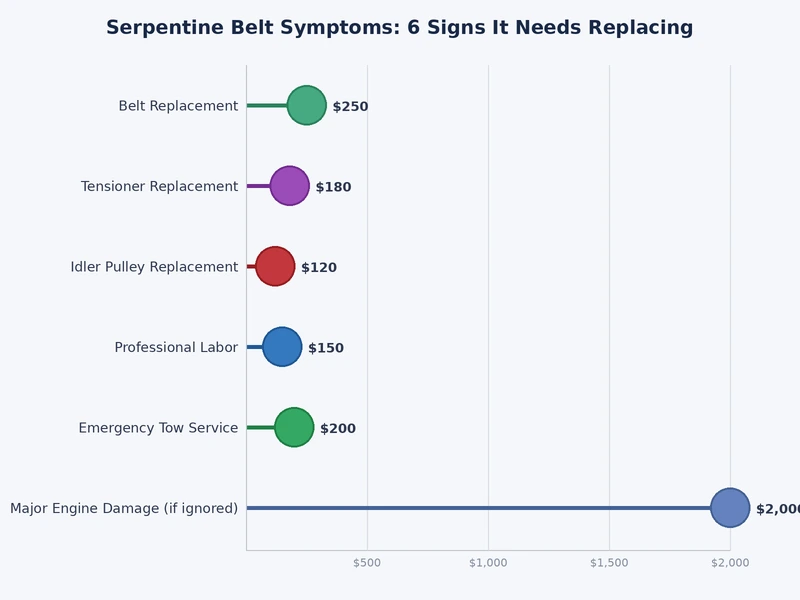
Serpentine belt replacement is among the most cost-effective maintenance operations available, particularly when performed proactively before any accessory system failure occurs. Our team's pricing data reflects current rates at independent shops, franchise service centers, and dealership service departments across multiple vehicle segments.
| Service Component | DIY Cost | Independent Shop | Dealership |
|---|---|---|---|
| Serpentine belt (parts only) | $25 – $75 | $35 – $90 | $50 – $120 |
| Belt tensioner assembly | $30 – $80 | $40 – $100 | $60 – $140 |
| Idler pulley | $15 – $45 | $25 – $60 | $40 – $90 |
| Labor (belt replacement only) | — | $50 – $120 | $80 – $180 |
| Complete belt system service (belt + tensioner + idler) | $70 – $200 | $150 – $370 | $230 – $530 |
Emergency belt replacement following roadside failure adds towing charges ($80–$200), possible after-hours shop labor premiums of 20–30%, and frequent collateral damage to accessories that overheated or lost lubrication during the failure event itself. Our team calculates the average cost differential between proactive scheduled replacement and emergency post-failure service at $300–$1,500, a clear and unambiguous economic argument for replacing the belt at the manufacturer's recommended service interval rather than waiting for symptoms to progress to failure.
Most modern serpentine belts are rated for 60,000 to 100,000 miles under normal operating conditions, though our team recommends physical inspection at the 60,000-mile mark regardless of outward appearance. Belts operating in high-heat climates, dusty environments, or alongside weeping engine seals frequently reach the end of serviceable life well before the rated mileage threshold is reached.
Operating a vehicle with a visibly cracked, glazed, or fraying serpentine belt carries substantial and avoidable risk. Our team's position is unequivocal: any belt exhibiting material loss or longitudinal rib cracking should be replaced before the vehicle is driven further under any conditions. A belt that severs at highway speed eliminates hydraulic power steering assist instantly, creating a genuine steering emergency with no warning interval for the driver to respond.
Serpentine belt replacement is accessible to competent DIY mechanics on most four-cylinder and straight-six platforms, provided the engine bay offers reasonable access to the tensioner arm and all driven pulleys. Our team recommends photographing the belt routing diagram and each pulley position before removal, and inspecting all pulley bearings by hand during the process before the new belt is installed. Transverse-mounted V6 and V8 engines with deeply recessed belt systems benefit from professional service to prevent pulley alignment errors that destroy the replacement belt prematurely.
 |
 |
 |
 |
About Joshua Thomas
Joshua Thomas just simply loves cars and willing to work on them whenever there's chance... sometimes for free.
He started CarCareTotal back in 2017 from the advices of total strangers who witnessed his amazing skills in car repairs here and there.
His goal with this creation is to help car owners better learn how to maintain and repair their cars; as such, the site would cover alot of areas: troubleshooting, product recommendations, tips & tricks.
Joshua received Bachelor of Science in Mechanical Engineering at San Diego State University.
Get some FREE car parts & gear.. Or check out the latest free automotive manuals and build guides here.
Disable your ad blocker to unlock all the hidden deals. Hit the button below 🚗
| | | |