7 Signs Your Shocks and Struts Need Replacing

by Diego Ramirez

Does the vehicle bounce excessively after every pothole, or does the front end dip sharply during routine braking? These are not trivial comfort complaints — they are among the most recognizable signs of bad shocks and struts, and ignoring them puts tires, brakes, and steering components at risk. This guide covers all seven warning signs, explains their root causes, and walks through exactly what vehicle owners should do when those signs appear. For a broader look at suspension care within a complete maintenance plan, the CarCareTotal vehicle maintenance guide provides an excellent starting point.

worn shock absorber with visible oil seepage illustrating signs of bad shocks and struts
Figure 1 — A worn shock absorber with visible hydraulic fluid seepage — one of the most definitive signs of bad shocks and struts.
bar chart showing frequency of signs of bad shocks and struts reported in vehicles over 50000 miles
Figure 2 — Frequency of reported warning signs among vehicles with more than 50,000 miles on original suspension components.

How Shocks and Struts Actually Work

The Role of Each Component

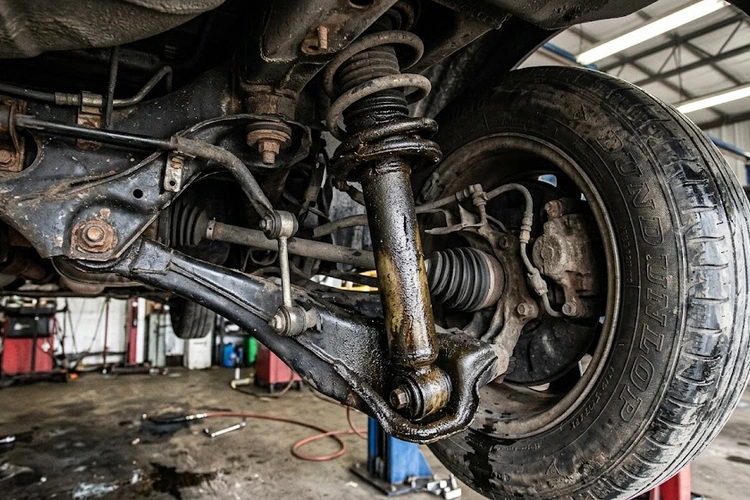
Shocks and struts both belong to the suspension system, but they perform different functions and are not interchangeable terms. Understanding the distinction clarifies why the signs of failure differ between the two.

  • Shock absorber: Controls spring oscillation. After a wheel hits a bump, the spring compresses and rebounds. The shock absorber (also called a damper) converts that kinetic energy into heat via hydraulic fluid, preventing the vehicle from continuing to bounce.
  • Strut: A structural assembly that combines a shock absorber with a coil spring seat and a top mount. Struts bear a portion of the vehicle's weight. Replacing a strut is more involved than a shock swap because the strut is load-bearing and integral to the steering geometry.
  • Typical layout: Most front-wheel-drive vehicles use struts up front and shock absorbers in the rear. Rear-wheel-drive trucks and SUVs often use shock absorbers at all four corners.

According to the National Highway Traffic Safety Administration (NHTSA), suspension integrity directly affects braking efficiency and vehicle stability — making timely shock and strut replacement a safety matter, not merely a comfort preference.

How Wear Develops Over Time

Shocks and struts degrade gradually. The internal hydraulic fluid breaks down, seals crack, and valving wears unevenly. Most manufacturers recommend inspection at 50,000 miles and replacement between 50,000 and 100,000 miles, though actual service life depends heavily on road conditions and load patterns.

  • Gravel roads, potholes, and speed bumps accelerate seal wear.
  • Frequent towing or carrying heavy cargo compresses the suspension more aggressively, shortening component life.
  • Extreme cold reduces hydraulic fluid viscosity temporarily, but it is heat cycling — not cold alone — that degrades seals over time.

The 7 Signs of Bad Shocks and Struts

The signs of bad shocks and struts rarely appear all at once. Most vehicles develop one or two symptoms first, then others follow as wear progresses. Catching the early indicators prevents cascading damage to tires, brakes, and steering components.

Sign 1 — Excessive Bouncing After Bumps

A healthy shock or strut settles wheel movement within one to two oscillations after a bump. When the damper is worn, the vehicle continues bouncing three, four, or more times before stabilizing. This is the most intuitive sign and is easy to notice on railroad crossings, speed bumps, or pothole-heavy roads.

The effect is cumulative — what begins as a mild extra bounce at highway speeds becomes pronounced body roll and instability as wear progresses.

Sign 2 — Nose-Diving During Braking

When brakes are applied, weight transfers forward. Functional front shocks or struts resist this transfer, keeping the nose relatively level. Worn units allow the front end to dip sharply — a condition called brake dive (or nose dive).

  • Brake dive increases stopping distances by shifting excess load to the front tires.
  • It also compresses the front suspension prematurely, accelerating wear on front strut mounts and top bearings.
  • Drivers experiencing this symptom should rule out concurrent brake issues. A review of brake fade symptoms helps identify whether the stopping distance increase is suspension-related, brake-related, or both.

Sign 3 — Swerving or Drifting in Crosswinds

A vehicle with healthy shocks tracks straight with minimal steering input, even in crosswinds or on cambered roads. Worn shocks allow lateral forces to upset the vehicle's path. The steering wheel requires constant small corrections. This is often misdiagnosed as a wheel alignment problem, particularly when the tire wear pattern appears normal.

Sign 4 — Uneven or Cupped Tire Wear

Worn shocks allow the wheel to bounce up and down excessively, causing the tire to make inconsistent contact with the road surface. The result is a pattern called cupping (or scalloping) — a series of shallow, evenly spaced divots around the tire circumference.

  • Running a hand along the tread reveals a wavy, uneven texture.
  • Cupped tires generate a persistent humming or rumbling noise at highway speeds, easily confused with a wheel bearing problem.
  • Replacing tires without addressing the worn shocks causes the new tires to cup within 10,000–15,000 miles.

Sign 5 — Clunking or Knocking Over Bumps

A worn shock or strut can produce clunking, knocking, or rattling sounds when the suspension compresses. The sound typically originates from:

  • Worn bushings: The rubber mounts at each end of the shock deteriorate and allow metal-to-metal contact.
  • Loose shock body: A failing mount allows the entire unit to shift under compression.
  • Failed strut top mount: The bearing at the top of a strut assembly can collapse, creating a sharp knocking sound during turning or bump absorption.

These sounds can overlap with other suspension noises. Drivers who also notice a popping noise when turning should assess whether the sound occurs over bumps as well — a combination that often points to multiple worn suspension components rather than a single isolated failure.

Sign 6 — Visible Fluid Leaks on the Shock Body

Shock absorbers rely entirely on sealed hydraulic fluid for their damping function. When the shaft seal fails, fluid seeps down the outside of the cylinder as a dark, oily streak or film. This is one of the most unambiguous signs of a bad shock — a leaking unit loses damping capacity progressively as fluid level drops.

Pro Tip: A light film of moisture on the shock body does not always indicate imminent failure — but any visible oily streak or accumulation warrants a follow-up inspection within 1,000 miles to confirm whether the leak is progressing.

Sign 7 — A Harsh or Unstable Ride Feel

Counter-intuitively, worn shocks often make a ride feel harsher, not softer. When internal valving deteriorates unevenly, the damper loses its ability to absorb small road vibrations smoothly. Every pavement seam and minor surface ripple registers more forcefully inside the cabin. A ride quality that has noticeably worsened over 20,000 miles — with no changes to tire pressure or road conditions — is a reliable indicator that the suspension is due for inspection.

How Worn Shocks Affect Everyday Driving

Impact on Braking Distance

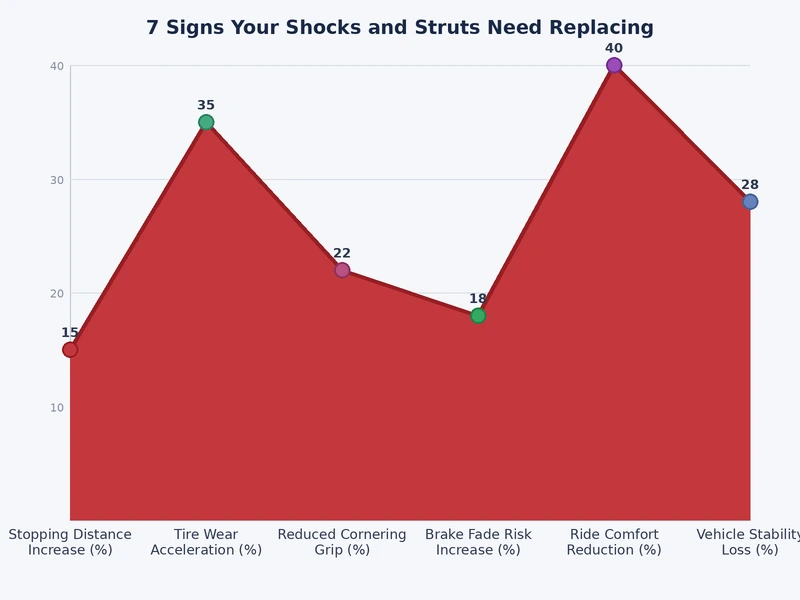
The safety consequence most drivers underestimate is extended stopping distance. When a shock is worn, the wheel bounces during hard braking, periodically breaking contact with the road and reducing tire grip. Engineering studies have documented stopping distance increases of 20% or more at highway speeds when suspension damping is significantly degraded.

The risk compounds when other systems are also compromised. Drivers dealing with low brake fluid symptoms alongside worn shocks face a double reduction in braking effectiveness that neither symptom alone would produce. Similarly, drivers who notice their steering wheel pulls to one side when braking should inspect the front struts — uneven wear between the two front struts produces exactly this symptom under brake load.

Handling in Emergency Maneuvers

Emergency lane changes and evasive maneuvers depend on the suspension keeping tires in contact with the road during rapid weight transfers. Worn shocks degrade the vehicle's ability to respond predictably. The front end feels vague or loose — a subtle sensation during normal driving that becomes critical at highway speeds when a sudden obstacle appears.

  • Body roll increases in corners, reducing driver confidence and actual handling capability.
  • Oversteer or understeer tendencies can emerge or worsen as the suspension loses its ability to distribute cornering loads evenly.
  • Stability control systems (ESC) can partially compensate, but they cannot replace the mechanical contribution of functional dampers.

Diagnosing Suspension Problems at Home

The Bounce Test

The bounce test (also called the push test) requires no tools and takes less than five minutes. It provides a rough indication of shock condition at each corner of the vehicle.

  1. Park on level, firm ground and set the parking brake.
  2. Press down firmly on one corner of the vehicle — apply force at the fender over the wheel, not at the door or quarter panel.
  3. Release and count the number of times the corner bounces before settling.
  4. One to two bounces indicates adequate damping. Three or more bounces suggests the shock or strut at that corner is worn and may need replacement.
  5. Repeat at all four corners. A significant difference between the same axle's two sides (e.g., driver side settles in one bounce, passenger side takes four) indicates uneven wear requiring professional evaluation.

Visual Inspection Points

With the vehicle safely supported on jack stands, examine the following areas. If the noise source is ambiguous, a comparison against the characteristics described in the wheel bearing vs. CV joint noise guide helps rule out adjacent drivetrain components before concluding that the shock or strut is at fault.

  • Shock/strut body: Any oily film, streaking, or wet residue on the cylinder indicates a leaking seal.
  • Bushings: The rubber mounts at the top and bottom of each unit should be intact, with no cracking, separation from the metal sleeve, or visible compression set.
  • Strut top mount: On strut-equipped vehicles, the top mount (upper strut bearing) should feel firm with no roughness when rotated. A collapsed mount creates knocking sounds during turning.
  • Coil spring: Inspect for cracks or breaks, particularly at the lower coil seat. A cracked spring is a distinct failure requiring immediate attention and is often found during strut replacement.

Best Practices for Shock and Strut Replacement

Replace in Axle Pairs

The standard industry recommendation is to replace shocks or struts in matched pairs — both front units together, or both rear units together. Replacing only one side creates a handling imbalance:

  • The new unit provides significantly more damping than the worn unit on the opposite side.
  • Under braking or cornering, the vehicle pulls toward the side with the worn unit.
  • Uneven spring preload between sides can also develop if the old spring and mount are reused on only one side.

Replacing all four at once is advisable when the vehicle has exceeded 80,000 miles on original units, or when two units have already failed and the vehicle is already in the shop — the labor overlap makes it economical to complete all four simultaneously.

Choosing the Right Parts

Replacement options span several categories with different performance and cost profiles:

  • OEM-equivalent (direct replacement): Matches the original ride characteristics. The appropriate choice for most passenger vehicles operated under normal conditions.
  • Performance-tuned: Stiffer damping rates improve handling and reduce body roll. Better suited for drivers who prioritize cornering over ride compliance.
  • Heavy-duty: Designed for trucks and SUVs that carry heavy loads or traverse unpaved surfaces regularly.
  • Complete strut assembly: Includes the spring, top mount, and bearing pre-assembled. Reduces installation time and eliminates the need for a spring compressor, making it the preferred choice for DIY installers replacing front struts.
  • Adaptive/electronic: Found on luxury vehicles. Requires OEM-matched replacement and, in many cases, dealer-level programming. Not interchangeable with standard hydraulic units.

What Shock and Strut Replacement Actually Costs

Replacement costs vary significantly based on vehicle type, parts quality tier, and regional labor rates. The table below provides a general budgeting reference for the most common replacement scenarios.

Component Type Parts Cost (per unit) Labor Cost (per axle) Estimated Total (per axle)
Standard shock absorber $30 – $80 $60 – $120 $120 – $280
Strut insert only $50 – $130 $100 – $200 $200 – $460
Complete strut assembly $100 – $300 $80 – $150 $280 – $750
Performance/heavy-duty shock $80 – $250 $60 – $120 $200 – $620
Adaptive/electronic strut (luxury) $300 – $900+ $150 – $350 $750 – $2,500+

Parts vs. Labor

Labor accounts for a significant portion of total cost, particularly for strut replacement. Several factors influence the final labor charge:

  • Shop type: Dealerships typically charge 20–40% more per hour than independent shops for equivalent work.
  • Spring compressor requirement: Replacing a strut insert (as opposed to a complete assembly) requires a specialized spring compressor tool, which adds time.
  • Wheel alignment: Strut replacement disturbs caster and camber angles. A four-wheel alignment after any strut job is not optional — it is required to restore proper tire wear and straight tracking. This adds $80–$150 to the total.
  • Related components: If sway bar end links or control arm bushings are worn, technicians often recommend replacing them during the same visit to avoid paying for a second labor hour on the same corner of the vehicle.

When to Replace All Four at Once

Replacing all four shocks or struts in a single service visit is cost-effective under these conditions:

  • The vehicle has exceeded 80,000 miles on original suspension components — all four units are near the end of their service life regardless of which one failed first.
  • Two units have already been confirmed as worn and the vehicle is already in the shop — bundling all four eliminates a second labor charge and a second alignment fee later.
  • The vehicle will be used for increased payload or towing after the service — all four units should be rated appropriately before taking on added stress.

Next Steps

  1. Perform the bounce test at all four corners of the vehicle and note any corners that take more than two bounces to settle — document which corners so a technician can prioritize those during inspection.
  2. Raise the vehicle on jack stands and visually inspect each shock or strut body for oily streaking, cracked bushings, or loose top mounts. Photograph any fluid leaks found for reference during the shop visit.
  3. Check each tire for a cupping or scalloping wear pattern by running a hand along the tread surface. If cupping is present, schedule a suspension inspection before purchasing replacement tires — new tires installed over worn shocks will replicate the same pattern within months.
  4. Request itemized quotes from at least two independent shops for axle-pair replacement, and confirm whether each quote includes a post-installation wheel alignment — this is a required step after any strut work, not an add-on.
  5. If replacement is confirmed, schedule related services — brake inspection, tire rotation, and sway bar end-link check — in the same visit to reduce total labor costs and address any compounding issues in a single appointment.

About Diego Ramirez

Diego Ramirez is a maintenance and care specialist who has been wrenching on cars since he was sixteen. He focuses on fluid changes, preventive care routines, paint protection, and the small habits that turn a five-year-old car into a fifteen-year-old car.

Get some FREE car parts & gear.. Or check out the latest free automotive manuals and build guides here.

Disable your ad blocker to unlock all the hidden deals. Hit the button below 🚗