by Joshua Thomas
A tire slowly losing air is almost always caused by one of four problems: a tread puncture, a damaged valve stem, a bead seal failure, or rim corrosion. Most drivers discover the issue only after the TPMS warning light activates or after noticing visibly soft tires during a walk-around inspection.
Slow leaks are deceptive. They develop over hours or days, not minutes. Our team finds that many vehicle owners mistake gradual pressure loss for normal temperature fluctuation — a costly assumption that delays a repair costing under $20 when caught early. The question of whether it is safe to drive with a nail in a tire is one our team addresses regularly. The short answer is that extended driving on a slow leak accelerates internal structural damage and meaningfully increases blowout risk.
Every pound of pressure lost affects fuel economy, handling precision, and tread longevity. Identifying the source quickly is always the correct course of action.
Contents
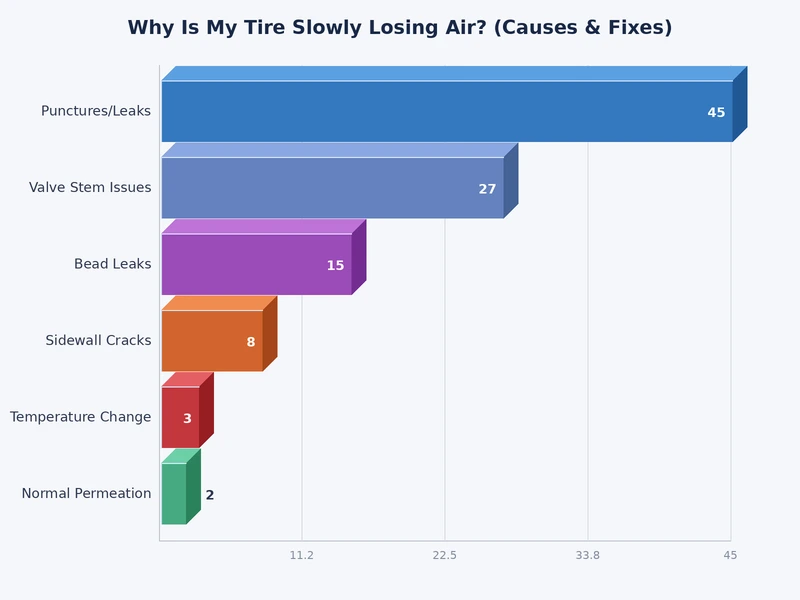
The most frequent cause is a small tread puncture. A nail, screw, or sharp road fragment embeds in the rubber and acts as a partial plug. Air escapes slowly around the object rather than releasing all at once. Our team regularly documents pressure drops of 2–4 PSI per day from a single roofing nail — enough to trigger a TPMS alert within 24 to 48 hours of the initial puncture.
Damaged valve stems are the second most common culprit. The valve stem is the small rubber or metal fitting that controls air entry and retention at the wheel. Rubber stems crack with age and UV exposure. Metal stems develop corrosion at the base. Both conditions allow air to bypass the internal Schrader valve continuously. Drivers who also notice that the tire is wearing unevenly alongside gradual pressure loss should take note — the two conditions share several overlapping root causes, including sustained underinflation.
A loose valve core deserves attention as well. The Schrader valve inside the stem can back out slowly over time. Tightening it with a valve core tool takes under 60 seconds and costs nothing. Our team checks this first before recommending any other repair, because it resolves a measurable percentage of slow leaks immediately.
Rim porosity is a less-discussed but genuine cause of a tire slowly losing air. Cast aluminum and alloy wheels develop microscopic pores over time, particularly along the bead seat area where corrosion concentrates. Air migrates through these pores gradually. The leak is nearly impossible to detect with a visual check alone. Wire brushing corroded bead seats and applying a bead sealer product resolves most rim porosity cases without requiring rim replacement.
Bead damage from improper tire mounting is another underdiagnosed source. A mounting machine that contacts the bead zone aggressively can nick or distort the rubber. The damage is invisible externally but breaks the airtight contact between tire and rim. Our team recommends requesting hand mounting on low-profile tires specifically — their tighter bead geometry makes them far more vulnerable to mounting damage than standard-profile tires.
Temperature changes create apparent pressure fluctuation but not genuine leaks. For every 10°F drop in ambient temperature, tire pressure falls by approximately 1 PSI — a normal thermodynamic effect. According to the National Highway Traffic Safety Administration, underinflated tires are a leading contributor to tire failure on U.S. roads. Our team distinguishes thermal fluctuation from a structural leak by inflating the tire to spec and rechecking pressure after 24 hours in a stable indoor environment. A net loss of more than 1 PSI over that period confirms an active leak.
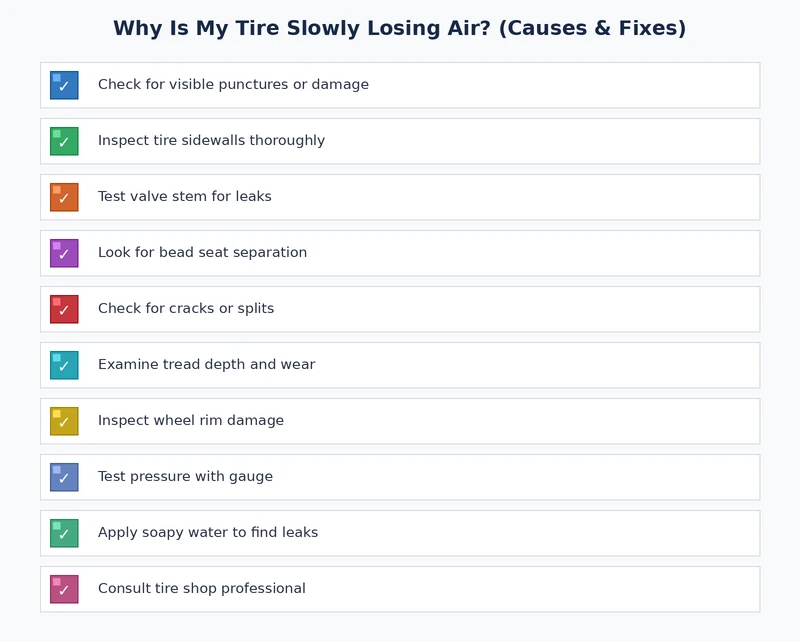
Our team always begins with the simplest possible diagnostic step. Inflate the tire to the manufacturer-recommended PSI. Then run a bare hand slowly across the entire tread surface. A small embedded nail or screw creates a detectable protrusion that a visual scan often misses entirely. This tactile sweep takes 30 seconds and catches the majority of puncture-type slow leaks immediately.
Inspect the valve stem next. Remove the cap and listen closely for hissing. Apply a small amount of soapy water to the valve tip. Sustained bubbling confirms a leaking Schrader valve or a cracked stem body. A valve core tool costs under $5 and addresses most valve-related leaks in under two minutes. If the stem itself is cracked or brittle, a complete stem replacement is required before reinstalling the wheel.
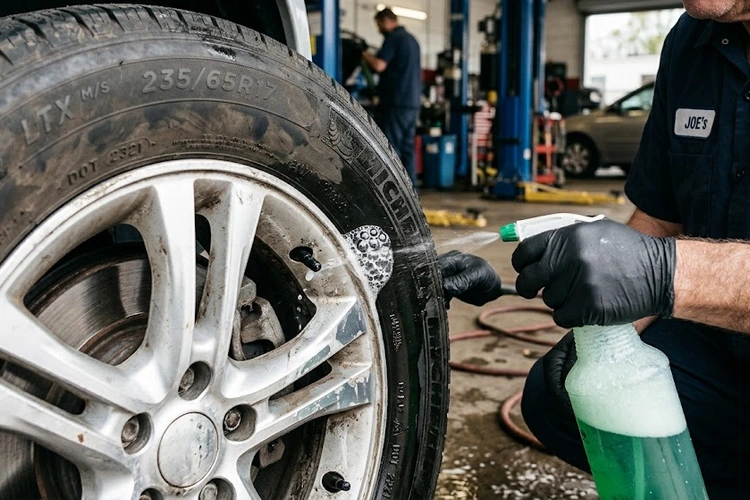
For leaks that a visual inspection does not locate, the soap-and-water test is the definitive diagnostic method. Mix dish soap with water and apply the solution with a soft brush across the full tire surface — tread, sidewall, bead area, and rim edge on both inboard and outboard faces. Steady, consistent bubbling at any point marks the exact leak location. This test works on valve stems, tread punctures, bead gaps, and rim porosity simultaneously.
Professional shops submerge the entire wheel in a water tank for the most thorough result. Our team recommends this method when rim porosity is the suspected cause, because micro-leaks in that context can occur across a wide area simultaneously. Once the source is positively identified, selecting the correct repair is straightforward.
Drivers who also notice vibration or unstable handling alongside pressure loss should review our analysis of bad strut mount symptoms. Worn suspension components frequently compound the handling effects of a tire slowly losing air, and both issues can develop concurrently on high-mileage vehicles.
| Repair Type | DIY Cost | Shop Cost | Best Application |
|---|---|---|---|
| Valve core tightening | $0–$5 | $5–$15 | Loose or backed-out Schrader valve |
| Valve stem replacement | $5–$10 | $15–$35 | Cracked rubber or corroded metal stem |
| Tire plug (temporary) | $5–$15 | $15–$30 | Tread puncture under ¼ inch diameter |
| Patch-plug combination (permanent) | Not recommended DIY | $25–$50 | Tread puncture requiring a lasting repair |
| Bead seal reapplication | $10–$20 | $30–$60 | Rim corrosion, minor bead gap |
| Full tire replacement | N/A | $80–$250+ | Sidewall damage, severe bead or rim damage |
The patch-plug combination is the only repair our team considers permanent for tread punctures. A plug alone — inserted from the outside without removing the tire — is a temporary measure. It addresses the leak short-term but lacks the structural reinforcement that an internal patch provides. Most tire manufacturers explicitly classify plug-only repairs as temporary in their warranty documentation.
Sidewall punctures cannot be repaired safely under any condition. The sidewall flexes continuously under load, and no patch or plug holds reliably in that location. Our team considers this a non-negotiable rule — any sidewall damage requires full tire replacement, regardless of the puncture size or location within the sidewall.
Severe rim corrosion that has compromised the bead seat surface also demands action beyond bead sealant. When corrosion has pitted the rim channel deeply, the rim itself must be professionally resurfaced or replaced. Driving on a severely corroded rim with a slow leak creates a risk of sudden, complete pressure loss at highway speed. For anyone also dealing with brake-side wheel concerns, our coverage of bad wheel cylinder symptoms addresses another common wheel-area failure mode that frequently develops alongside tire deterioration on aging vehicles.
Valve stem caps are not cosmetic components. They seal the valve tip against moisture and road debris, both of which accelerate Schrader valve degradation over time. Our team recommends replacing any missing caps immediately — a set of four costs under $2. Metal-capped stems provide meaningfully better protection than plastic versions, particularly in high-humidity or road-salt environments where corrosion develops faster.
Rubber valve stems should be replaced every five to six years, or at each tire replacement. Adding this step costs $5–$10 per wheel at installation but eliminates a primary slow leak source for the life of the new tire. Many shops omit this step unless asked directly. Our team always specifies it when scheduling tire service, and the result is measurably fewer pressure-related callbacks between service intervals.
Checking tire pressure monthly is the single most effective preventive practice. Most people rely entirely on the TPMS warning light, which only activates after pressure has already dropped 25% below the recommended level — a threshold that allows significant underinflation to persist undetected for days. A quality dial or digital gauge costs $10–$20 and provides an immediate, accurate reading in under 90 seconds per tire.
Nitrogen inflation reduces pressure fluctuation caused by temperature swings. Nitrogen molecules are larger than oxygen molecules and permeate rubber more slowly. Our team's experience shows that nitrogen-filled tires require top-offs less frequently, with roughly 1–2 PSI greater monthly stability than air-filled tires under identical conditions. If a vehicle develops unexpected handling changes alongside pressure loss, our diagnostic coverage of a car that shakes when put in drive examines tire-related vibration causes in detail.
Driving on a tire with an active slow leak accelerates sidewall flex fatigue. The sidewall heats under the increased flex stress. That heat weakens the internal structure — belts, body cords, and bead wire — progressively with each mile. A $25 patch repair becomes a $200 tire replacement after 150 to 200 miles of sustained underinflated driving. Our team's position on this is unambiguous: inflate before driving, even for short distances.
Low-profile tires are particularly unforgiving in this scenario. Their reduced sidewall height means less visible deflection at the same PSI deficit as a standard-profile tire, making underinflation harder to detect through a casual visual check. Drivers of vehicles with low-profile fitments should rely on gauge checks rather than visual assessment to catch a tire slowly losing air before structural damage sets in.
Can-based tire sealants are emergency tools, not repair solutions. Products in this category coat the inner liner and provide temporary sealing of small punctures — sufficient to reach a repair facility and nothing more. Our team has inspected numerous tires where consumer sealant use contaminated the TPMS sensor, requiring a $50–$150 sensor replacement on top of the standard tire repair. That cost far exceeds what a proper same-day patch would have cost initially.
Sealant residue also complicates the professional repair. Technicians must clean the inner liner thoroughly before applying a patch, adding labor time and cost to what should be a straightforward job. The correct protocol is to use sealant only to reach a tire shop, then have a proper patch-plug repair performed immediately upon arrival.
A tire losing more than 1–2 PSI per week under stable temperature conditions has an active leak. Normal air permeation through rubber accounts for roughly 1 PSI per month. A loss of 2–4 PSI per day indicates a puncture, valve failure, or bead gap that requires immediate diagnosis and repair.
Our team advises against driving on any tire that is measurably underinflated. A short drive to a repair facility is acceptable if the tire is inflated to the correct PSI first. Extended driving on a slow leak risks sidewall fatigue and significantly increases the probability of a sudden blowout at highway speed.
A correctly installed patch-plug combination is considered a permanent repair for tread punctures by most major tire manufacturers. Plug-only repairs done from outside the tire without dismounting are classified as temporary and can work loose over time. Our team recommends patch-plug exclusively for any repair intended to last the remaining life of the tire.
This pattern almost always reflects a temperature effect rather than a structural leak. Cold nighttime air contracts and lowers pressure. Warm daytime temperatures raise it. If pressure returns to the correct level by midday without manual inflation, the cause is thermodynamic. A genuine slow leak produces a net pressure loss after 24 hours regardless of ambient temperature changes.
Yes. Corrosion along the bead seat area of an alloy or aluminum rim breaks the airtight contact zone between tire and rim, allowing air to escape gradually. Wire brushing the corroded surface and applying a bead sealer product resolves most cases. Severe corrosion that has deeply pitted the rim channel typically requires rim replacement for a lasting repair.
A tire slowly losing air is never a minor inconvenience — it is an early structural warning that demands a proper diagnosis and repair before a $20 fix becomes a $200 blowout.
 |
 |
 |
 |
About Joshua Thomas
Joshua Thomas just simply loves cars and willing to work on them whenever there's chance... sometimes for free.
He started CarCareTotal back in 2017 from the advices of total strangers who witnessed his amazing skills in car repairs here and there.
His goal with this creation is to help car owners better learn how to maintain and repair their cars; as such, the site would cover alot of areas: troubleshooting, product recommendations, tips & tricks.
Joshua received Bachelor of Science in Mechanical Engineering at San Diego State University.
Get some FREE car parts & gear.. Or check out the latest free automotive manuals and build guides here.
Disable your ad blocker to unlock all the hidden deals. Hit the button below 🚗
| | | |