by Sarah Whitfield
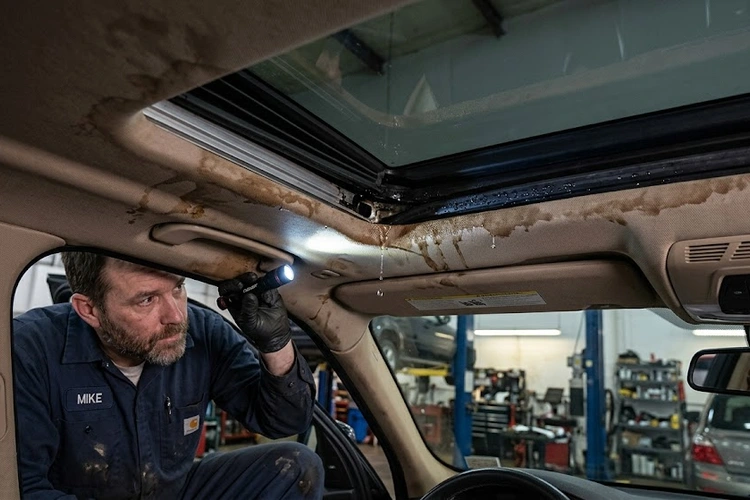
A sunroof leaking water is almost always a drainage problem — not a crack in the glass. Most people discover this after finding wet seat upholstery or a soggy headliner (the fabric panel lining the roof interior). In our experience, the fix is usually straightforward once the source is identified.
Sunroofs are not designed to be fully watertight. They rely on a network of small drain tubes to channel water away from the cabin. When those tubes clog, water has nowhere to go but inside. Our team has also traced leaks to worn weatherstripping (the rubber seal around the glass panel) and to misaligned panels that no longer close flush against the frame. For anyone dealing with water leaking into the car floor from multiple sources, diagnosing each entry point separately is the right approach — the sunroof is often just one piece of a larger puzzle.
This guide covers every common cause of a leaking sunroof, how to trace the exact source, and the most effective repairs — from a simple five-minute drain flush to a full weatherstripping replacement.
Contents
Most factory-installed sunroofs are not fully sealed against water intrusion. That might sound like a design flaw, but it is entirely intentional. The sunroof frame includes a trough — a shallow channel that collects water running off the glass panel. From that trough, four small drain tubes (one positioned at each corner of the frame) carry the collected water down through the structural pillars of the vehicle and out underneath the car body. The glass and seal provide a first line of defense. The drain tubes handle everything that gets past it.
This system works reliably for years under normal conditions. Problems start when something interrupts the flow — or when the rubber seal degrades faster than the drain tubes can compensate.
The two front drain tubes typically exit near the front wheel wells or route through the firewall (the metal panel separating the engine compartment from the passenger cabin). The two rear tubes run down the C-pillars (the rear roof support columns) and exit beneath the rear bumper or through the trunk floor area.
Because the tubes pass through tight interior channels, they are vulnerable to kinking, cracking, and debris accumulation. Leaves, pollen, pine needles, and fine road grit slowly pack into the narrow drain ports at the top of each tube. Once the flow is restricted enough, the trough overflows — and water finds the nearest gap into the cabin. In wet climates and tree-heavy parking spots, this process happens faster than most owners expect.
The weatherstripping around the sunroof glass acts as a secondary barrier. It does not stop all water — that responsibility belongs to the drain tubes — but it significantly reduces the volume that reaches the trough in the first place. When the rubber hardens, cracks, or compresses permanently, water bypasses this barrier in heavy rain or during car washes.
The glass panel itself sits in a metal frame secured to the roof structure. If the frame corrodes or the panel shifts out of alignment, even fresh weatherstripping cannot compensate for the resulting gap. Our team has diagnosed vehicles where a minor rear-end impact subtly warped the sunroof channel, creating a persistent drip that sealant alone could never permanently stop. Addressing the underlying geometry was the only lasting fix.
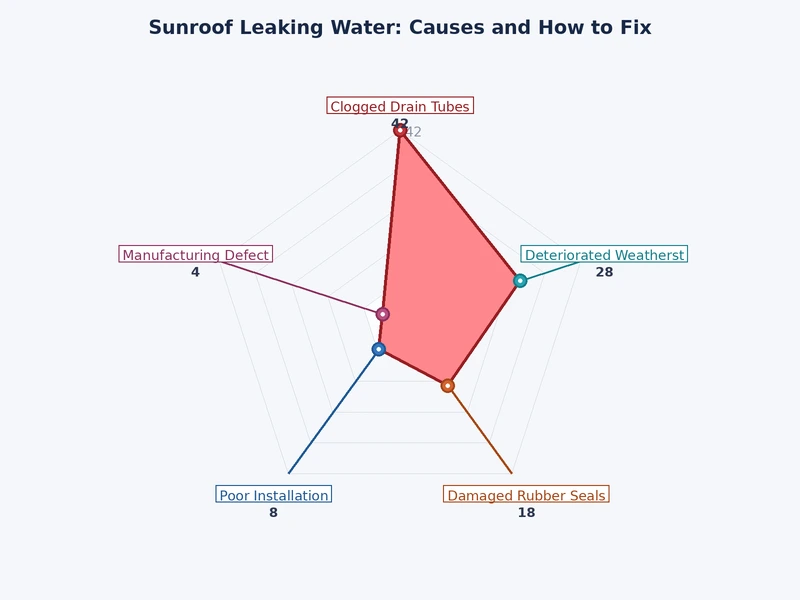
Several distinct failure modes lead to a sunroof leaking water. Identifying the correct one before attempting any repair saves significant time and avoids unnecessary parts purchases. These are the causes our team encounters most consistently across a wide range of vehicle makes and model years.
This is the leading cause — by a considerable margin. Partially blocked tubes still drain, just slowly. Most owners do not notice the restriction until the blockage becomes complete. After a heavy rain, the trough fills faster than it can drain. The overflow saturates the headliner and eventually drips onto the seats or floor.
Tubes can also disconnect from the drain port at the top or the exit point at the bottom. A pothole, a speed bump taken at speed, or even vibration over rough pavement can pop a tube off its fitting. A disconnected tube mid-pillar is particularly problematic — instead of exiting cleanly beneath the car, water dumps directly into the door pillar cavity, where it soaks insulation and can reach the floor without any obvious drip trail above.
Our team treats any unexplained wet headliner as a clogged drain tube until proven otherwise — in our experience, that assumption is correct more than nine times out of ten.
Rubber degrades over time. UV exposure, extreme heat cycles, and the repeated compression of opening and closing the sunroof all accelerate the process. Once the seal no longer conforms tightly to the glass, water works its way around the edge during sustained rain or a pressurized wash.
This type of leak typically develops gradually. A faint musty smell in the cabin is often the first sign — the result of moisture accumulating inside the headliner before any visible dripping begins. Rubber seal maintenance is part of a broader strategy for maintaining a car through hot weather, since prolonged heat exposure is one of the fastest ways to age and crack rubber seals across the entire vehicle.
Foam weatherstripping that has been squashed flat — common on vehicles with heavy use or aggressive car washes — no longer applies consistent pressure against the glass. Even if the material looks intact, it may have lost the resilience needed to form a reliable seal. Squeezing the seal by hand and watching whether it springs back quickly is a reliable field test.
A sunroof panel that sits slightly off-center or tilts higher on one side puts uneven pressure on the weatherstripping. High spots allow water to squeeze through gaps. Low spots create pooling areas where water lingers against the seal longer than it should. The usual causes are a worn or damaged lift mechanism, missing alignment shims (small plastic or metal spacers that calibrate the glass position), or frame deformation from a collision or improper roof rack installation.
Frame corrosion is a related but distinct issue. Steel sunroof frames in humid climates rust around the drain ports over time. Rust flakes partially block the ports while also roughening the surface in ways that tear weatherstripping prematurely. A visibly corroded frame changes the repair strategy significantly — surface sealants hold only temporarily when the substrate beneath is actively deteriorating.
Systematic diagnosis prevents misdiagnosis. Our team follows a consistent process before recommending any repair, because the right fix for a clogged drain tube is completely different from the right fix for a failed seal.
The simplest diagnostic is also the most reliable. With the sunroof fully closed, one person applies a slow, steady stream of water across the glass and frame while another person watches the interior ceiling and upper door trim panels. The person inside can identify whether water first appears at the front edge, rear edge, or at a specific corner — which immediately narrows the likely cause.
High-pressure washing is counterproductive here. A gentle flow mimics natural rain and avoids forcing water into marginal gaps that would not leak in real conditions. Starting at the front of the glass and working backward in stages makes it easier to isolate the entry point. A drip at the front headliner suggests a clogged front drain tube or a deteriorated front seal. A drip near the C-pillar or rear seat area almost always points to the rear drain tubes. Problems with windshield wiper sealing and trim sometimes surface during the same test — failed cowl seals can allow water to enter the cabin through a separate path, complicating the diagnosis if both issues are present simultaneously.
Testing each drain port takes only a few minutes. Pour a small amount of water directly into the drain opening at each corner of the sunroof trough. Watch for water to exit beneath the car within 30 to 45 seconds. Normal flow is visible as a steady drip or small stream. No exit flow — or flow from only two of the four corners — confirms a blockage or disconnection.
A thin, flexible wire can probe the port opening for shallow surface debris. Compressed air, applied in short controlled bursts, dislodges loose material effectively. For tubes that pass the flow test cleanly, the seal and frame become the focus. Pressing gently around the perimeter of the closed glass while the hose runs above it can reveal which section of seal has lost contact with the frame.
Most sunroof leaks can be resolved without a shop visit. The tools required are basic, the parts are inexpensive, and the repair logic is straightforward once the source is known.
For partial clogs, compressed air is often sufficient. Insert the nozzle gently into the drain port and apply short bursts — not a sustained blast, which can damage the tube walls. Follow with a water flush to confirm the clog has cleared and flow has been restored at the exit point beneath the car.
For stubborn blockages that resist compressed air, a trimmer line (the thin nylon cord used in string grass trimmers) works well. It is flexible enough to navigate the gentle curves inside the pillar without puncturing the tube walls. Our team avoids stiff metal wires for this reason — a perforated drain tube that leaks inside the pillar cavity is a worse outcome than the original clog.
For a disconnected tube, accessing the pillar trim panel is usually necessary. Most C-pillar panels snap free with a plastic trim removal tool (a flat pry tool that avoids scratching painted surfaces). Once the disconnection point is visible, the tube is reseated onto its fitting and secured with a small hose clamp or a tight wrap of self-fusing silicone tape. Replacement sections of drain tubing — matched by inner diameter — are available at auto parts stores for under ten dollars per foot.
Replacement seals are available from dealerships, OEM parts suppliers, and reputable aftermarket vendors. Our team recommends OEM or OEM-equivalent rubber for durability, particularly on vehicles parked in direct sun for long periods. Generic foam tape seals tend to compress flat within a season and do not maintain consistent contact pressure against the glass.
The old seal peels off in most cases with steady hand pressure. Any adhesive residue remaining on the frame channel should be removed with adhesive remover or isopropyl alcohol before the new seal is installed — a rough or contaminated surface prevents the new seal from seating correctly. Most replacement seals press into a groove around the frame edge with no adhesive required. Allowing the new seal to settle overnight before running the hose test gives the rubber time to conform to the channel.
If water enters at the outer perimeter of the frame rather than through the glass seal, the bond between the sunroof frame and the roof panel may have failed. A flexible urethane sealant — similar in formulation to windshield adhesive — can restore this joint. Our team applies a thin, continuous bead along the frame-to-roof seam, smoothed immediately with a gloved finger, and allows a full 24-hour cure before testing. Urethane remains pliable after curing, which matters in an area subject to vibration and thermal expansion.
This repair holds reliably on structurally sound metal. On frames with significant rust, it is a temporary solution. The corrosion will eventually break the new sealant bond, and the underlying metal loss will need professional attention.
| Cause | DIY Difficulty | Typical Parts Cost | When Professional Help Is Warranted |
|---|---|---|---|
| Clogged drain tubes | Easy | $0–$15 | Tubes disconnected deep inside the pillar column |
| Worn weatherstripping | Moderate | $30–$90 (OEM seal) | Frame channel is corroded or cracked |
| Panel misalignment | Moderate to Hard | $10–$40 (shims, clips) | Mechanism is bent or motor is failing |
| Frame-to-roof reseal | Easy to Moderate | $10–$25 (urethane sealant) | Active rust requires metal work before resealing |
| Disconnected drain tube | Moderate | $5–$20 (tube section, clamps) | Full headliner removal required for access |
Not every sunroof leak justifies a shop visit. But some do — and misreading the situation leads either to unnecessary expense or to a temporary fix that fails within months. Knowing where the line falls is part of making a sound repair decision.
A drain tube flush takes under 30 minutes and costs nothing beyond a can of compressed air. Weatherstripping replacement is within reach for anyone comfortable removing interior trim panels and following a methodical process. The full breakdown of sunroof leak causes provides additional guidance on which failure modes are realistically self-repairable across different vehicle platforms.
Professional repair becomes the better choice in a few specific scenarios:
Shops typically charge $100–$300 for a drain tube cleaning and basic reseal. Full weatherstripping replacement at a dealership or body shop runs $200–$500 depending on make and model. Frame repairs vary considerably. According to Wikipedia's overview of sunroof types, panoramic units — the large glass panels that span most of the roof — have substantially more complex drain routing than compact tilt-open panels, which affects both repair time and labor cost. Getting a second estimate before committing to any repair above $400 is a reasonable precaution.
Prevention costs far less than repair. Our team recommends a small set of consistent habits that keep the sunroof drainage system functioning reliably over the long term.
Flushing the drain ports with clean water every six months takes under five minutes and removes debris before it compacts into a hard blockage. Parking beneath trees — especially during spring when pollen, seed pods, and organic debris are heavy — accelerates drain clogging noticeably and is worth avoiding when practical alternatives exist.
Rubber weatherstripping responds well to a silicone-based conditioner applied once or twice a year. Petroleum-based products accelerate rubber degradation and should be avoided entirely. Silicone conditioner keeps the seal pliable, maintains the spring-back resilience that forms a tight contact surface, and extends the effective seal life by several years in typical use. The same careful attention to exterior rubber components that informs a thorough exterior detail routine applies here — seals and trim benefit from the same cleaning and conditioning process as paint and glass.
A quick visual inspection of the weatherstripping during any car wash takes only a few seconds. Cracks, flat sections, or areas that no longer rebound after compression are signals that replacement is overdue. Catching a degraded seal early — before water infiltration begins — avoids the far more expensive consequence of a moisture-saturated headliner that requires removal, drying, and sometimes full replacement.
For anyone applying a protective coating to the roof panel, keeping wax or sealant product out of the drain port openings is worthwhile. Wax buildup inside the ports narrows the opening progressively over several applications. Our team's comparison of carnauba wax versus synthetic sealants covers application technique, including working cleanly around trim edges, glass seals, and panel openings without causing secondary blockage issues.
A sunroof that drains properly never leaks — the fix is almost always in the tubes, not the glass.
 |
 |
 |
 |

About Sarah Whitfield
Sarah Whitfield is a diagnostics and troubleshooting specialist who spent ten years as an ASE-certified technician before joining the editorial team. She specializes in OBD-II analysis, electrical gremlins, and the kind of intermittent problems that make most owners give up.
Get some FREE car parts & gear.. Or check out the latest free automotive manuals and build guides here.
Disable your ad blocker to unlock all the hidden deals. Hit the button below 🚗
| | | |