by Sarah Whitfield
Ever wonder why a car groans and creaks over every speed bump? That suspension creaking noise is one of the most common complaints our team encounters — and it is almost never random. It signals worn parts, dry joints, or damaged components demanding attention. The fix depends entirely on the root cause. In this guide, our team covers 7 causes of suspension creaking noise and the steps to address each one. A related creak that appears specifically while turning is also covered in our clicking noise when turning guide.
Contents
The suspension system — the network of springs, shocks, struts, and linkages connecting the wheels to the vehicle frame — absorbs road impacts and keeps tires planted on the pavement. When any component dries out, wears thin, or loosens, metal-on-metal or rubber-on-metal contact creates a creak.
Several factors accelerate suspension wear:
According to the National Highway Traffic Safety Administration (NHTSA), worn suspension components can reduce braking effectiveness and affect vehicle handling — making early diagnosis more than just a comfort issue.
Our team finds that most creaks trace back to one of seven components. Pinpointing the correct one saves significant time and parts cost.
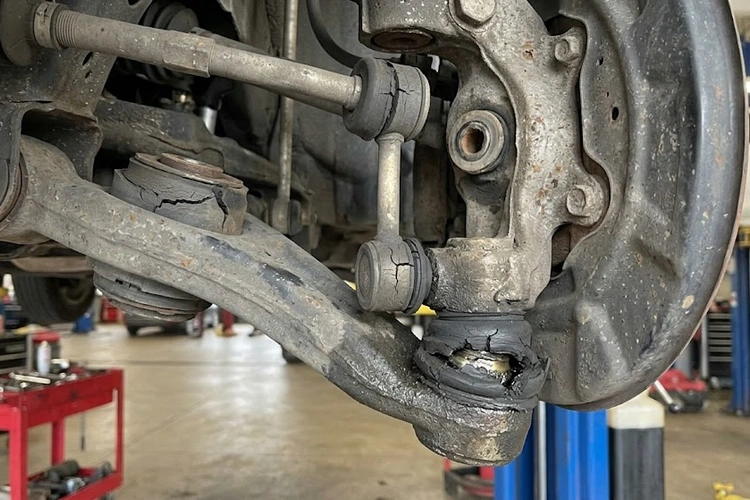
Ball joints (pivot points connecting the control arms to the steering knuckles) carry the full weight of the vehicle while allowing steering movement. When their protective rubber boots crack, grease escapes and metal contacts metal. The result is a deep creak or clunk felt over bumps.
Common signs:
Fix: Non-greaseable ball joints require full replacement. Greaseable units may recover with a fresh lube fitting and a shot of chassis grease — but only if the boot is still intact.
Bushings (rubber or polyurethane cushions at pivot points throughout the suspension) dampen vibration between metal parts. As they dry out, crack, and compress unevenly, metal begins contacting metal — producing a consistent squeak or creak with every movement.
Common signs:
Fix: Bushing replacement is the only lasting solution. Silicone spray offers temporary relief but does not address the underlying material degradation.
Strut mounts (upper bearing plates connecting each front strut to the vehicle body) contain a bearing that allows the strut to rotate smoothly during steering inputs. When that bearing corrodes or seizes, turning the wheel produces a grinding creak from the top of the strut tower.
Common signs:
Fix: Replace the strut mount bearing or the full strut mount assembly. Our team recommends replacing both sides at the same time to maintain even handling balance.
The sway bar (also called the stabilizer bar) limits body roll during cornering. Its end links connect the bar to the strut or control arm on each side. When the small ball-and-socket joints inside those links develop play, they produce a rattle or creak over every bump.
Common signs:
Fix: Sway bar end links are inexpensive parts. Most experienced home mechanics complete the job in under an hour per side with basic hand tools. Our team covers a similar low-speed rattle in the rattling noise when accelerating guide.
Control arm bushings (rubber inserts at each end of the control arm) absorb the constant shock of road inputs transferred through the wheels. Heavy use and age cause them to split or compress unevenly. The resulting creak often feels like it originates directly behind the wheel well.
Common signs:
Fix: Press out the worn bushing and press in a replacement. Some control arms are sold as complete assemblies — replacing the whole arm is frequently faster and more cost-effective than pressing individual bushings.
Coil springs (the large helical springs that support the vehicle's weight) develop surface rust, hairline cracks, or uneven settling with age and heavy use. A cracked spring produces a sharp creak or pop that appears over larger bumps rather than gentle road movement.
Common signs:
Fix: Coil spring replacement requires a spring compressor — a specialized tool that holds the spring under substantial load. Our team considers this an intermediate-to-advanced repair. Professional replacement is the safer call for anyone without prior spring compression experience.
Many older vehicles have Zerk fittings (small grease nipples) at ball joints, tie rod ends, and control arm pivots. Skipping routine grease service allows joints to run completely dry. Friction builds gradually, producing a creak that worsens steadily over weeks and months.
Common signs:
Fix: Pump fresh NLGI Grade 2 chassis grease into each fitting using a grease gun. Our team treats this as a routine maintenance item at every oil change on any vehicle equipped with Zerk fittings.
Accurate diagnosis prevents unnecessary parts spending. Our team's standard toolkit for tracing a suspension creaking noise:
Our team always inspects with the vehicle's weight on the suspension first, then repeats the check with the wheel raised off the ground. Some components only show play under load. Others only reveal wear when the weight is removed entirely.
Not every suspension repair demands the same skill level or tool investment. Our team breaks down the jobs by difficulty:
DIY-friendly repairs:
Repairs that benefit from professional handling:
Any repair that alters suspension geometry requires a wheel alignment check afterward. Skipping alignment accelerates tire wear significantly and can affect braking stability. Our team always includes alignment cost when estimating any suspension repair job.
Drivers noticing a shudder alongside the creak may find our car shudders when braking guide useful — both symptoms sometimes share a root cause in worn control arm or ball joint components.
For those comparing suspension repair costs across multiple components, the average wheel bearing replacement cost guide provides a helpful cost baseline and labor reference.
Preventing suspension creaking noise starts before any creak develops. Our team's standard maintenance approach covers the following:
The bounce test is a fast, zero-tool field check. Push firmly down on each corner of the vehicle and release. A healthy suspension settles in one smooth, controlled movement. Two or more oscillations indicate worn shocks or struts that are no longer damping correctly.
Spring is the best time to inspect suspension components. Winter road salt and freeze-thaw cycles accelerate rust on coil springs and corrode bearing surfaces inside strut mounts. A post-winter visual check catches damage early, before it becomes a noise — or a safety concern.
Our team uses the table below as a quick field reference when encountering an unfamiliar suspension creak. All cost estimates reflect parts only at retail pricing.
| Cause | When It Creaks | DIY Difficulty | Parts Cost (approx.) | Alignment Needed? |
|---|---|---|---|---|
| Worn ball joints | Bumps, low-speed turns | Hard | $50–$120 each | Yes |
| Dry or cracked bushings | Slow turns, parking | Moderate | $15–$60 per set | Sometimes |
| Failing strut mounts | Steering input, cold starts | Moderate | $40–$90 each | Yes |
| Worn sway bar links | Low-speed bumps | Easy | $15–$40 each | No |
| Control arm bushings | Braking, acceleration | Moderate | $20–$60 per arm | Yes |
| Cracked coil springs | Large bumps only | Hard | $60–$150 each | Yes |
| Dry grease fittings | All speeds and conditions | Easy | $5–$15 (grease only) | No |
It depends on the cause. Dry bushings and worn sway bar links are discomforts, not immediate safety hazards. Worn ball joints or cracked coil springs are a different matter — both can lead to sudden loss of directional control. Our team recommends diagnosing any persistent suspension creak promptly rather than waiting to see whether it worsens.
Cold temperatures cause rubber bushings to stiffen and contract temporarily. This hardening increases friction at pivot points and contact surfaces. Strut mount bearings are also prone to corrosion-induced seizing in cold, wet climates. The noise often diminishes once the vehicle reaches operating temperature, but it signals aging rubber that will eventually require replacement regardless of season.
Penetrating sprays like WD-40 provide brief, temporary relief on metal surfaces but evaporate quickly and can degrade rubber bushings over time with repeated use. The correct solution depends on the component involved. Zerk-fitted joints need NLGI Grade 2 chassis grease pumped through the fitting. Rubber-on-metal contact points respond better to white lithium grease or a dedicated rubber conditioner.
Costs vary significantly by root cause. Sway bar end link replacement runs $80–$150 at most shops. Ball joint replacement ranges from $200–$400 per joint including labor. A full strut assembly replacement with wheel alignment typically lands between $400–$700 per axle. Our team consistently emphasizes getting the diagnosis right first — replacing the wrong component wastes both money and time.
Yes. Worn control arm bushings and loose ball joints allow unintended movement in suspension geometry. As components develop play, alignment angles shift gradually — most commonly camber and toe. The result is accelerated tire wear, often uneven across the tread face. Our team performs a wheel alignment check after any suspension repair that involves components influencing these angles.
A suspension creak caught early is a $30 grease job or a $40 end link — left alone, it becomes a $400 ball joint and a safety conversation.
 |
 |
 |
 |

About Sarah Whitfield
Sarah Whitfield is a diagnostics and troubleshooting specialist who spent ten years as an ASE-certified technician before joining the editorial team. She specializes in OBD-II analysis, electrical gremlins, and the kind of intermittent problems that make most owners give up.
Get some FREE car parts & gear.. Or check out the latest free automotive manuals and build guides here.
Disable your ad blocker to unlock all the hidden deals. Hit the button below 🚗
| | | |