by Sarah Whitfield
Ever wonder why a truck or SUV suddenly starts grinding, struggling to shift into 4WD, or leaving mysterious puddles in the driveway? A transfer case fluid leak is behind more of these symptoms than most people realize — and catching it early can mean paying $150 instead of $1,500.
The transfer case (the mechanical unit that routes engine power to both the front and rear axles in 4WD and AWD vehicles) depends entirely on fluid to keep its internal gears, chains, and bearings lubricated. When that fluid escapes, everything inside starts wearing against itself. Our team has looked at enough of these cases to know that even a slow seep, ignored long enough, can turn into a full rebuild. Understanding the symptoms of a bad transfer case is the first step toward stopping that outcome.
In this guide, our team breaks down every major symptom, the most common causes, typical repair costs, and the maintenance habits that keep transfer case leaks from becoming a repeat problem.
Contents
Most people don't notice a transfer case fluid leak until it has already progressed past the easy-fix stage. The early warning signs are there — they just require some attention to spot. Our team consistently finds that symptoms fall into four main categories, and they often appear in sequence as the leak worsens.
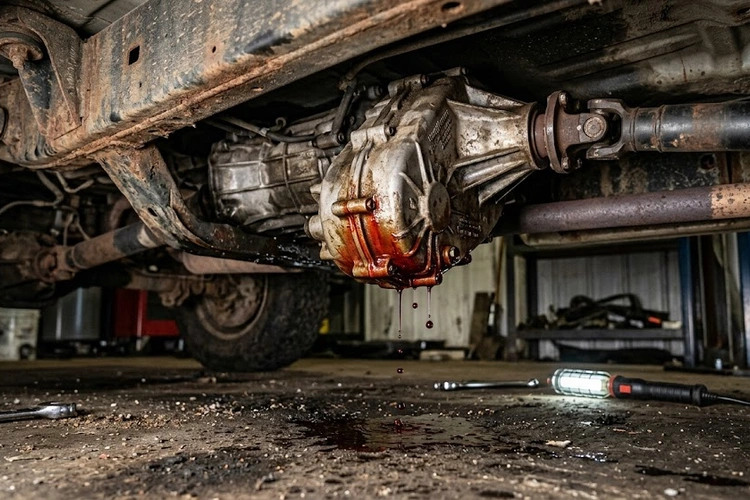
The most obvious clue is a puddle or stain on the ground after a vehicle sits parked for an hour or more. Transfer case fluid is typically reddish or brownish in color — similar in appearance to automatic transmission fluid (ATF), since many transfer cases actually use ATF as their lubricant. The location matters too: this puddle shows up near the center of the vehicle, not at the front or rear.
A small spot is easy to dismiss. But in our experience, even a slow seep can drain enough fluid within a few weeks to start causing real internal damage. The size of the puddle does not always reflect how serious the situation is — location and fluid condition matter just as much.
When transfer case fluid drops too low, the internal gears, chains, and bearings stop getting adequate lubrication. Metal starts rubbing against metal. The noises that follow are hard to ignore once they show up:
These sounds can also come from other drivetrain components. For example, a car that vibrates in neutral may point to an engine mount or transmission issue rather than the transfer case. Cross-referencing symptoms always helps narrow the source.
Sluggish, rough, or failed mode changes are a strong indicator of internal fluid trouble. Without enough lubrication, the mechanical components that handle the transition between 2WD, 4WD High, and 4WD Low can't move the way they're supposed to.
In severe cases, this progresses to a point where the engine revs but the vehicle won't move — a sign the drivetrain has lost its ability to transfer power to the wheels at all.
Many modern trucks and SUVs display a dedicated 4WD or AWD warning light when the system detects an abnormal condition. The check engine light may also trigger if drivetrain sensors pick up unusual behavior. Our team recommends treating these lights as early-warning tools rather than nuisances — they frequently appear before any mechanical damage becomes irreversible.
A combination of warning lights alongside unusual handling behavior is worth investigating without delay. Waiting until the noise becomes unbearable or the fluid runs completely dry dramatically changes the repair cost.
Understanding the root cause of a transfer case fluid leak makes diagnosis faster and repairs more targeted. Most leaks originate from one of four main sources — and the cause often determines whether the fix is a quick afternoon job or a full shop visit.
The transfer case has multiple rubber seals and gaskets (flexible rings and flat barriers that keep fluid inside the housing). These are the most common source of leaks, especially on higher-mileage vehicles. Heat cycles, road contaminants, and age cause rubber to harden, shrink, or crack over time.
Seal replacement is usually one of the more affordable transfer case repairs — but only when caught before the fluid level drops far enough to damage internal components. A seal job that costs $150 today can become a $900 rebuild if the grinding has already started.
The drain plug (a threaded bolt at the bottom of the transfer case) can loosen over time from road vibration. Damaged threads — often from a careless fluid change — prevent the plug from sealing fully. This is one of the simplest leaks to identify and fix.
The transfer case housing (the outer casing made of aluminum or cast iron) protects everything inside. Off-road impacts, road debris, or even a minor low-speed strike against a rock or curb can crack it. A cracked housing allows fluid to seep out continuously, regardless of seal condition.
At higher mileages, transfer case fluid leaks can occur simply because components have aged past their serviceable life. Seals dry out. Gaskets take a permanent set (compress and never spring back). Housings develop micro-cracks from years of thermal expansion and contraction.
According to Wikipedia's overview of transfer cases, these units are engineered to handle significant mechanical stress — but like any drivetrain component, they have a finite lifespan without consistent fluid maintenance. Vehicles that have gone long intervals without a fluid change tend to develop leaks earlier than those on a regular service schedule.
Cost is one of the first things most people want to understand when a transfer case fluid leak is diagnosed. The range is wide — from under $100 to well over $2,000 — and the difference comes down to where the leak is, how long it's been ignored, and the specific vehicle involved.
| Repair Type | Parts Cost | Labor Cost | Total Estimate |
|---|---|---|---|
| Drain plug replacement | $5–$20 | $30–$60 | $35–$80 |
| Transfer case fluid flush | $20–$80 | $50–$100 | $70–$180 |
| Single seal replacement | $10–$40 | $100–$200 | $110–$240 |
| Gasket replacement | $20–$60 | $100–$250 | $120–$310 |
| Housing repair (weld or epoxy) | $50–$150 | $150–$400 | $200–$550 |
| Transfer case rebuild | $200–$600 | $400–$800 | $600–$1,400 |
| Remanufactured transfer case replacement | $400–$1,200 | $400–$900 | $800–$2,100 |
These figures represent typical ranges across a wide range of domestic and import trucks and SUVs. Luxury vehicles and newer models with proprietary fluid requirements tend to land at the higher end of each range.
Some transfer case fluid leak repairs are genuinely manageable for a home mechanic with basic tools. Others require the vehicle to be raised, the transfer case partially disassembled, and specialized tools used to seat new seals correctly.
Our team has seen seal jobs attempted at home go wrong more often than expected. If a new seal isn't seated perfectly, it leaks again immediately — and the second visit to a shop costs more than the first would have. For anything beyond a fluid change, professional installation tends to be the more cost-effective choice in the long run.
Several variables can push repair estimates in either direction:
This is why our team consistently emphasizes getting leaks looked at early. A $130 seal repair has a way of becoming a $1,200 rebuild when the internal components have been grinding against each other for months without adequate lubrication.
Transfer case fluid maintenance is one of the most overlooked items in a routine service schedule. Most people know to change engine oil regularly, but the transfer case often gets skipped entirely until something goes wrong. Consistent fluid care is the single most effective way to prevent leaks and extend the life of the unit.
Unlike the engine, most transfer cases don't have a traditional dipstick. Checking the fluid level typically involves removing a fill plug on the side of the case. Here's the process our team follows:
While checking, it's also worth looking at the fluid's condition. Contaminated or milky-looking fluid — similar to what happens with milky oil on a dipstick — signals water intrusion, which causes accelerated internal wear and should be flushed immediately.
Most manufacturer recommendations call for transfer case fluid changes every 30,000 to 60,000 miles under normal driving conditions. Real-world use often shortens that interval significantly.
Fluid degradation follows a pattern similar to other vehicle fluids — once the protective additives break down, wear accelerates quickly. The same principle that makes dark brake fluid a warning sign applies here: old fluid that's lost its protective properties does more harm than good.
Using the wrong fluid is one of the most common maintenance mistakes our team encounters, and it's directly linked to premature seal failure.
The owner's manual or a quick check of the manufacturer's spec sheet is always the right starting point. Using a generic ATF in a case that requires a specific friction-modified fluid can soften or swell seals — turning a healthy unit into a leaking one within a few thousand miles.
Prevention is almost always cheaper than repair. Our team has found that drivers who catch transfer case issues earliest share one thing in common: consistent, simple inspection habits that take just a few minutes. None of these require special equipment.
A quick walk-around after parking is one of the most underrated diagnostic tools available. It takes under two minutes and can catch a developing leak before any symptoms appear inside the cabin.
Connecting symptoms across systems is also useful. A car that shakes at low speeds combined with fluid spots underneath is a strong prompt to have the entire drivetrain inspected, not just one component.
Bringing a vehicle in for a suspected transfer case fluid leak with specific details already noted helps a technician diagnose the issue faster — which directly reduces the labor portion of the bill. Our team recommends noting:
If the vehicle has also been struggling to accelerate from a stop, that's worth mentioning separately — it can indicate the drivetrain issue has extended beyond just the transfer case leak and into the transmission or axles.
Once a transfer case fluid leak has been repaired, the goal shifts to keeping it from coming back. The steps are straightforward:
Building these habits into a regular maintenance routine takes very little time. Our team consistently finds that vehicles with documented fluid service histories develop far fewer drivetrain problems over their lifespan than those serviced only when something breaks.
A transfer case fluid leak ranges from minor to severe depending on how much fluid has been lost and how long the leak has gone unaddressed. Our team considers even small leaks worth addressing promptly — running the transfer case low on fluid causes internal wear that can escalate from a $150 seal repair to a $1,400+ rebuild in a short period of time. The longer the leak continues, the more expensive the eventual repair becomes.
Short distances may be manageable in a pinch, but our team generally advises against driving any significant distance with a confirmed transfer case fluid leak. If the fluid level drops too low, the internal gears and chain can overheat and seize within minutes of hard use. The safer approach is to have the vehicle inspected and the leak addressed before resuming regular driving — especially any highway driving or 4WD engagement.
The required fluid varies by vehicle. Many domestic trucks use ATF (Automatic Transmission Fluid), while others require gear oil or a proprietary transfer case fluid specified by the manufacturer. Our team always recommends checking the owner's manual or OEM spec sheet rather than assuming — using the wrong fluid is one of the more common mistakes that leads to premature seal degradation and the very leaks this guide covers.
 |
 |
 |
 |

About Sarah Whitfield
Sarah Whitfield is a diagnostics and troubleshooting specialist who spent ten years as an ASE-certified technician before joining the editorial team. She specializes in OBD-II analysis, electrical gremlins, and the kind of intermittent problems that make most owners give up.
Get some FREE car parts & gear.. Or check out the latest free automotive manuals and build guides here.
Disable your ad blocker to unlock all the hidden deals. Hit the button below 🚗
| | | |