by Sarah Whitfield
Studies from the National Highway Traffic Safety Administration indicate that brake-related mechanical failures contribute to roughly 22% of vehicle crashes tied to component malfunction — and warped brake rotor symptoms are among the most frequently misread problems in that entire category. The rhythmic shimmy through the brake pedal, the steering wheel vibration that appears only when slowing down, the faint scraping sound that syncs perfectly with wheel rotation — these signals tend to confuse drivers who assume the source must be tires or suspension rather than the rotors themselves. Catching the problem early, understanding what drives it, and choosing the right repair path can mean the difference between a modest service bill and a dangerously compromised braking system.
This guide covers the full picture: the physics of how rotors fail, the symptoms that distinguish warping from other brake issues, the trade-offs between resurfacing and replacement, and the habits that prevent the problem from recurring. Drivers already dealing with a burning smell from their brakes should treat rotor condition as a high-priority inspection point alongside pad thickness and caliper function, since overheated pads and distorted rotors frequently develop together.
Contents
The brake rotor — also called a brake disc — is the flat, vented metal ring that the brake caliper clamps around every time a driver presses the pedal. A properly functioning rotor maintains consistent thickness all the way around its circumference, allowing the brake pads to generate even, uniform friction during every deceleration event. That uniformity translates directly into smooth, predictable stopping with no anomalous feedback through the pedal or steering column. Most passenger vehicle rotors are cast iron, though performance applications sometimes use carbon-ceramic composites that tolerate high temperatures with far less distortion than conventional iron alloys can manage under sustained stress.
When a rotor develops uneven thickness — a condition engineers call disc thickness variation, or DTV — the brake pads experience alternating zones of higher and lower friction as the rotor spins beneath them. In a high spot, the pads grip more aggressively; in a low spot, they release slightly before grabbing again with the next revolution. That grab-and-release cycle can repeat dozens of times per second during a typical highway deceleration, producing the rhythmic pulsation that has become the defining characteristic of warped rotor problems. Related to DTV is lateral runout, which measures how much the rotor face wobbles side to side as it rotates. Most manufacturers specify acceptable runout at 0.05 millimeters or less — a tolerance smaller than the thickness of a human hair — making precision a non-negotiable part of rotor service.
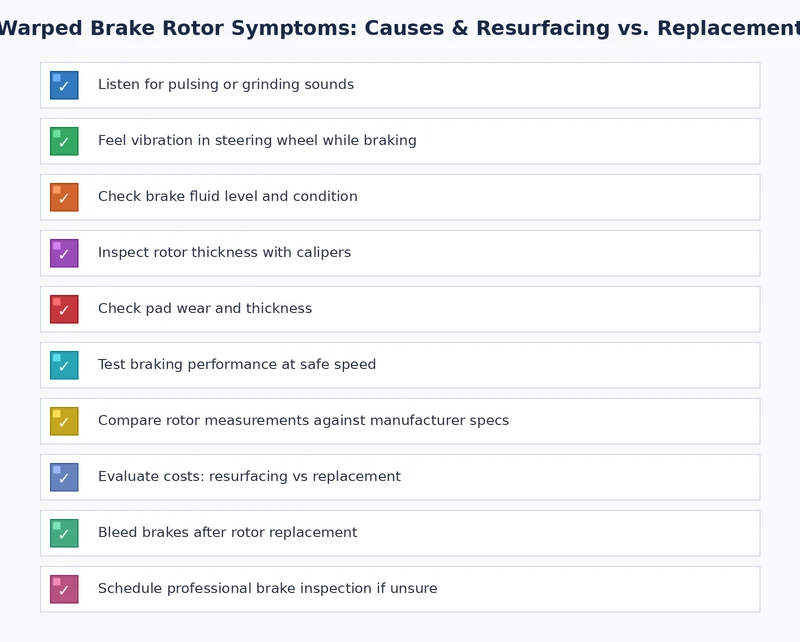
The defining characteristic among warped brake rotor symptoms is a rhythmic pulsation that travels through the brake pedal when slowing from moderate or highway speeds. The pulse frequency tracks with wheel rotation — it intensifies at higher speeds and diminishes as the vehicle decelerates toward a complete stop. Drivers frequently describe the sensation as the pedal "knocking back" or "breathing" against the foot with each wheel revolution, and in more severe cases the shudder becomes strong enough to travel through the steering column and floorboard simultaneously. At that stage, the vehicle can feel genuinely unstable under braking, which is why addressing the symptom early is far preferable to waiting until the distortion worsens.
Front rotor distortion almost always transmits vibration into the steering wheel during brake application, because the front suspension links the rotor assembly directly to the steering column through the wheel bearing and knuckle assembly. This is arguably the most frequently misattributed symptom in automotive diagnosis — wheel imbalance, worn tie rod ends, and worn wheel bearings all produce steering feedback, and the brake-application trigger is sometimes overlooked during an initial inspection. It is worth considering that bad strut symptoms can generate comparable wheel-level vibration as well, so isolating whether the sensation appears exclusively during braking or also during straight-line cruising is a critical diagnostic step. Rear rotor problems behave differently, tending to produce vibration through the seat and floor rather than the steering wheel, which is why rear warping often goes undiagnosed considerably longer than front rotor distortion.
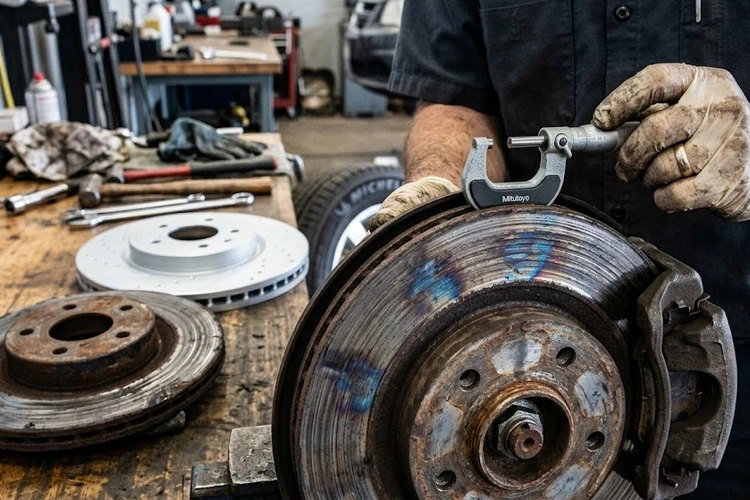
Beyond tactile feedback, warped rotors can generate a rhythmic scraping or light grinding sound during brake application that correlates precisely with wheel rotation speed. Drivers who also notice a grinding noise when reversing should investigate brake pad wear indicators and debris lodged in the caliper bracket as additional possibilities, since those conditions frequently coexist with rotor distortion in vehicles that have missed service intervals. A visual inspection with the wheel removed typically reveals tell-tale signs: concentric heat rings on the friction surface, blue discoloration near the rotor hat where temperatures concentrate most intensely, or an irregular contact band across the rotor face where pad material has transferred unevenly and hardened into raised deposits.
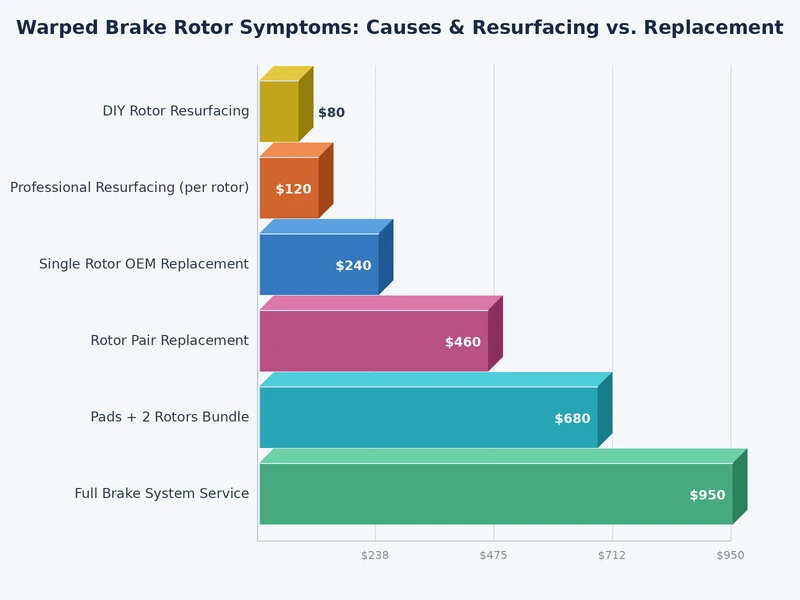
Resurfacing — also called turning or machining — involves mounting the rotor on a brake lathe and removing a thin layer of material from both friction surfaces until the face runs flat and parallel again. The primary advantage is cost: professional resurfacing typically runs $15 to $35 per rotor for the machining alone, a figure that compares favorably to new rotor prices in many applications. For rotors with adequate remaining thickness after machining and no structural defects, resurfacing restores geometry effectively and can add many thousands of additional miles of service life when the root cause of the warping is also corrected at the same time.
Modern rotors — particularly economy-grade units from large retail chains — have become inexpensive enough that replacement now frequently makes more financial sense than resurfacing once the complete cost picture is factored in. Labor charges for removing, machining, and reinstalling a rotor can approach or exceed the cost of simply installing a new one depending on the shop rate, and a freshly machined rotor begins its second service life with reduced thickness and proportionally reduced heat dissipation capacity. Many professional technicians now recommend replacing rotors alongside brake pads as standard interval service rather than machining existing hardware, particularly on high-mileage vehicles where the rotors may already be approaching their discard specification.
| Factor | Resurfacing | Replacement |
|---|---|---|
| Typical cost per rotor (service only) | $15–$35 | $30–$120 (part) + labor |
| Rotor thickness after service | Reduced by 0.5–1.5 mm | Full factory thickness |
| Heat dissipation capacity | Diminished proportionally | Full, as designed |
| Warranty coverage | Typically none | Usually 1–3 years |
| New pads required | Strongly recommended | Always required |
| Best candidate | Rotor well above discard spec, no cracks | Near/below discard spec or previously resurfaced |
Resurfacing represents a sound repair choice when the rotor's measured thickness after machining will still fall comfortably above the manufacturer's minimum discard specification — a value typically stamped directly on the rotor hat or listed in the vehicle's factory service manual. Rotors that are relatively new, show no radial cracking or deep scoring, and developed warping primarily because of a correctable external cause — such as improper lug nut torque applied during a tire rotation — are strong candidates for machining and reuse. Resurfacing also tends to make sense in specialty applications where exact-replacement rotors are difficult to source quickly or carry significant price premiums, such as vintage vehicles or low-volume imported platforms with non-standard rotor dimensions.
Replacement becomes the unambiguous choice when a rotor's thickness already sits near its discard specification, when deep radial cracks are visible anywhere on the disc, or when a previous resurfacing has already reduced available material to a marginal margin. Heat checking — the fine grid-like surface cracks that appear on severely stressed rotors — signals that the metallurgical integrity of the disc has been compromised by thermal cycling, making replacement necessary regardless of remaining thickness. Any rotor that has been machined once and returns with warping symptoms should be replaced rather than machined again, since the cumulative thickness loss from two resurfacing passes typically exceeds what any manufacturer deems safe for continued service.
Accurately checking lateral runout requires a dial indicator gauge — a precision measurement instrument that attaches to a fixed point on the suspension knuckle and contacts the rotor face with a small spring-loaded probe. A magnetic base stand positions and holds the gauge while the rotor is turned by hand. A complete dial indicator kit costs $20 to $80 at most auto parts stores, and the setup is reusable across many future inspections, making it a practical addition to any home garage. A calibrated torque wrench for reinstalling the wheel to manufacturer specification rounds out the required tooling, and the vehicle must be safely elevated on rated jack stands before the wheel is removed.
Never reinstall a wheel with an impact wrench after a runout inspection — torquing lug nuts unevenly is one of the most reliable ways to induce rotor distortion, and a calibrated torque wrench applied in a cross-star pattern is essential for achieving symmetrical clamping force across the hub flange.
With the wheel removed and the rotor exposed, the dial indicator is clamped to the suspension knuckle with its probe contacting the rotor face approximately 10 mm from the outer edge. The rotor is then rotated slowly by hand through one full revolution while observing the indicator needle — the total travel of the needle from minimum to maximum represents the lateral runout value for that rotor. A measurement below 0.05 mm falls within most manufacturers' acceptable range; values between 0.05 and 0.10 mm warrant monitoring and possible early resurfacing; anything above 0.10 mm indicates a rotor that needs immediate attention. Marking the high spot with a paint pen before reassembly helps a technician correlate the dial reading with the pulsation felt through the pedal during an actual driving evaluation.
Stop-and-go urban driving generates a rotor wear pattern that differs significantly from highway use. Short, frequent deceleration events keep brake temperatures elevated for extended periods without allowing the rotors sufficient time to cool between applications. Over thousands of miles, this sustained partial-temperature cycling encourages pad friction material to transfer onto the rotor in thin, uneven deposits rather than wearing away cleanly from the surface. The result is a DTV buildup that produces sensations identical to geometric warping but originates from pad material accumulation rather than metal distortion — a distinction that matters because the appropriate fix involves surface cleaning or pad replacement rather than aggressive machining. Many urban drivers encounter this condition within 20,000 to 30,000 miles of a fresh brake service even when their driving style is entirely unremarkable by any standard measure.
Extended downhill driving creates a different and more severe failure mode: acute thermal overload. A driver descending a long mountain grade while riding the brakes continuously can elevate rotor surface temperatures to 600°F or higher — far beyond the thermal limits of standard street-grade cast iron rotors. At those temperatures, the metal's crystalline structure becomes temporarily less stable, and the rapid cooling that occurs on flat ground afterward can lock asymmetric thermal stress patterns into the disc geometry, expressing themselves as lateral runout and DTV that grow worse with each subsequent heat cycle. Experienced mountain drivers manage this risk by using engine braking aggressively and applying the brakes in firm, brief intervals with full-release periods between each application — a technique that prevents heat saturation while still maintaining safe speed control on steep grades.
Drivers who have confirmed or strongly suspect warped rotors can take meaningful immediate steps to prevent the condition from worsening before a repair appointment can be scheduled. The most impactful adjustment is eliminating sustained light brake pressure — gentle, prolonged applications sustain high rotor temperatures without the cooling benefit of full pedal release between braking events, accelerating pad material transfer and geometric distortion simultaneously. Maintaining longer following distances allows for gradual, lower-temperature decelerations in ordinary traffic, and downshifting or simply lifting the throttle well in advance of required stops reduces the total kinetic energy the brake system must absorb, protecting both rotors and pads during the interim period before service.
Even without removing a wheel, a careful post-drive inspection can surface useful diagnostic information. Checking whether all four wheels feel approximately equally warm after a drive — using the back of the hand held near each wheel without touching it — can reveal a dragging caliper that is overworking a single rotor. Lug nuts that feel loose or were recently serviced with an uncalibrated impact wrench should prompt an immediate torque check, since asymmetric hub clamping is one of the most efficient mechanisms for inducing rotor distortion over a short driving distance. For a broad range of automotive maintenance topics beyond brake service, the CarCareTotal guide library covers everything from engine diagnostics to suspension care in accessible, practical detail.
New brake pads and freshly machined or replaced rotors benefit substantially from a deliberate break-in procedure called bedding, which deposits a thin, even layer of friction material from the pad onto the rotor surface under controlled conditions. The standard bedding protocol involves five to eight moderate-to-firm stops from progressively higher speeds — typically from 30 to 5 mph — with adequate cool-down intervals between each application and a final extended cool-down period with the parking brake released so the rotors can shed residual heat evenly. Properly bedded rotors develop a uniform friction transfer film that improves bite consistency, reduces uneven pad deposit buildup over time, and contributes meaningfully to quieter, more linear braking throughout the service life of the components.
Beyond the bedding process, the most effective long-term rotor care strategy is managing thermal load through driving technique and equipment selection. Engine braking on descents, coasting to reduce speed before late hard stops, and avoiding the habit of holding the brake pedal down while stationary on a slope after heavy braking all contribute meaningfully to extended rotor service life. Choosing a brake pad compound matched to the actual driving environment is equally important — street-oriented pads are formulated for the temperature range of typical road use and may suffer accelerated deposit transfer in sustained high-heat situations, while performance compounds designed for elevated operating temperatures can feel grabby and inconsistent during gentle city driving. Matching pad compound to real-world usage patterns remains one of the most practical steps toward preventing future warped brake rotor symptoms from returning after any repair.
Warped rotors do not typically cause total brake failure on their own, but they can significantly compromise braking effectiveness and stopping distances, particularly during hard stops from highway speeds. In extreme cases where heavy DTV is combined with worn pads and a sticking caliper, the combined degradation can push stopping distances beyond safe thresholds, making prompt attention essential rather than optional.
There is no universal mileage limit, since the answer depends on the severity of the distortion and the vehicle's intended use. Mild pulsation with rotors still above their minimum thickness is generally manageable for a few weeks of careful driving, but moderate to severe vibration or any accompanying brake fade warrants same-week service. Continuing to drive with heavily warped rotors accelerates pad wear and caliper stress simultaneously.
Not necessarily. Front rotors typically bear 60 to 70 percent of a vehicle's braking load and absorb proportionally more heat than rear rotors, so they tend to warp or wear unevenly at a faster rate. Rear rotor distortion is less common but does occur, particularly in vehicles with rear-biased brake bias or those that regularly carry heavy loads over long distances.
The minimum thickness — also called the discard specification — is unique to each rotor application and is stamped on the rotor hat or listed in the factory service manual. Attempting to resurface a rotor that is already at or near this specification removes what little remaining safety margin exists, which is why measuring current thickness with a micrometer before authorizing any machining work is a non-negotiable step in the repair process.
True rotor warping produces steering wheel vibration specifically during brake application, not during free rolling. Vibration that occurs at highway speeds without any brake input is more consistent with wheel imbalance, worn wheel bearings, or driveline issues rather than rotor distortion. If the shaking appears exclusively when the pedal is pressed, the rotors are the primary suspect.
Machining costs vary by market and shop, but most independent repair facilities charge $15 to $35 per rotor for the lathe work itself, not including any associated labor for wheel removal and reinstallation. When the full labor cost of the brake service is factored in, the total bill often approaches or equals the cost of installing new economy-grade rotors, which is why many technicians now recommend replacement over resurfacing as the default approach.
Prevention centers on three practices: torquing lug nuts to specification with a calibrated wrench every time wheels are removed or serviced, performing a proper bedding procedure after any pad or rotor replacement, and managing brake temperatures through driving technique — specifically avoiding sustained light brake pressure during long descents and maintaining following distances that allow gradual deceleration rather than late hard stops.
 |
 |
 |
 |

About Sarah Whitfield
Sarah Whitfield is a diagnostics and troubleshooting specialist who spent ten years as an ASE-certified technician before joining the editorial team. She specializes in OBD-II analysis, electrical gremlins, and the kind of intermittent problems that make most owners give up.
Get some FREE car parts & gear.. Or check out the latest free automotive manuals and build guides here.
Disable your ad blocker to unlock all the hidden deals. Hit the button below 🚗
| | | |