by Joshua Thomas
What does it mean when the washer stalk clicks, the pump hums, and nothing hits the glass? It means one of a handful of well-mapped failure modes has disrupted fluid flow — and our team has found that the correct cause can almost always be identified in under ten minutes with basic tools.
A windshield washer not spraying ranks among the most frequently reported minor vehicle complaints across all model years and mileage brackets. The system appears deceptively simple — reservoir, pump, lines, nozzles — yet each node introduces its own failure signature. Knowing how to read those signatures is the difference between a five-minute fix and an unnecessary parts swap. For context on how washer faults relate to the broader wiper assembly, our coverage of windshield wipers not working addresses the full system from linkage to motor.
Our team has worked through dozens of these cases on domestic, Japanese, and European vehicles. The pattern is consistent: the vast majority resolve at the nozzle or pump level, well within the reach of home mechanics. What follows is the complete diagnostic and repair framework our team uses.
Contents
According to Wikipedia's overview of windshield washer systems, the basic layout has remained structurally unchanged since the 1960s. Modern vehicles add heated nozzles and rear systems, but the core architecture is identical. The system consists of five elements:
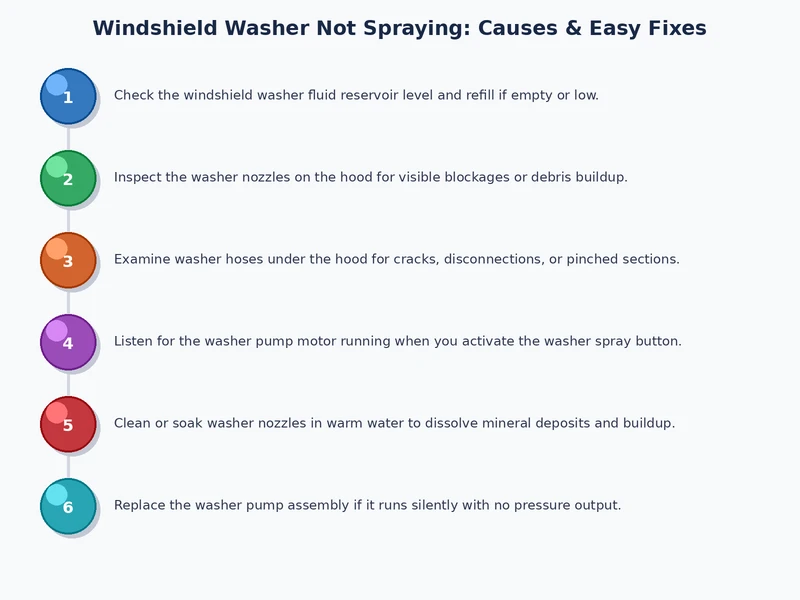
Every washer complaint traces back to one of three failure chains: no fluid reaching the pump, no fluid leaving the pump, or fluid blocked before reaching the nozzle. Our team's experience places nozzle clogs first in frequency, pump failures second, and line faults third. Electrical faults — blown fuses, failed switches, wiring opens — account for a smaller but significant share, particularly on vehicles with high mileage or prior water intrusion.
Vehicles stored for extended periods present a specific risk profile. Washer concentrate evaporates slowly, leaving mineral residue concentrated in the lines and nozzles. Our guide to maintaining a car that sits unused for months covers how fluid systems degrade during storage — the washer system is among the first affected.
The table below maps each documented failure mode to its characteristic symptom, DIY difficulty rating, and typical repair cost. This is the triage reference our team uses before touching a vehicle.
| Cause | Key Symptom | DIY Difficulty | Typical Cost |
|---|---|---|---|
| Empty reservoir | Pump runs audibly, no fluid output | Easy | $3–$8 (fluid) |
| Clogged nozzle(s) | Weak, misdirected, or absent spray | Easy | $0–$15 |
| Kinked or split line | No spray; wet spot under hood | Moderate | $10–$30 |
| Failed pump motor | Silence when stalk is pressed | Moderate | $25–$80 |
| Blown fuse | No pump sound; pump bench tests fine | Easy | $1–$5 |
| Frozen fluid lines | No spray in cold weather; resumes when warm | Easy (prevention) | $3–$12 |
| Failed wiper switch or control module | No pump activation; voltage absent at pump connector | Hard | $60–$250 |
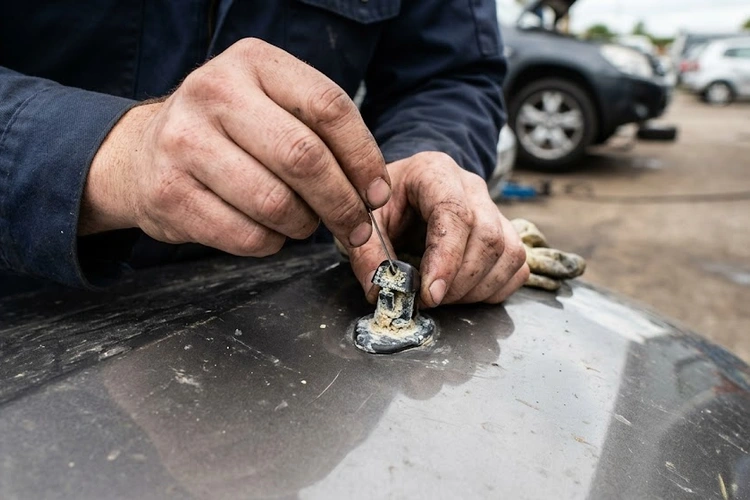
An empty reservoir is the most embarrassing diagnosis — and far more common than most technicians acknowledge. Always confirm fluid level first. Beyond that, clogged nozzles represent the single largest category in our caseload. Mineral deposits accumulate in the orifice from hard water and low-quality concentrate until flow drops to zero. The nozzle looks clean externally; the blockage is internal.
Our standard clearing procedure:
Pro tip: Flushing the system with plain water for two to three cycles after clearing a clogged nozzle removes loose mineral debris and prevents re-blockage within days of the repair.
When nozzles and fluid level check out, the fault moves to the pump or the supply circuit. Pump failures divide cleanly:
A fuse that clears once is a repair. A fuse that blows twice is a symptom. Our team has documented this pattern repeatedly — the root cause in such cases is almost always a corroded connector or chafed wire creating an intermittent short. The diagnostic logic parallels what our team described when diagnosing high beams not working, where repeated fuse failures masked a corroded ground connection that took two additional test cycles to surface.
The windshield washer system is genuinely one of the most accessible DIY repairs on the vehicle. Most people with basic mechanical confidence and a $15 multimeter can handle the following without professional assistance:
Parts cost for a replacement pump runs $20–$50 for the majority of domestic and Japanese platforms. European vehicles trend toward $40–$90 for OEM-equivalent parts.
Electrical faults beyond the fuse escalate quickly in diagnostic complexity. Tracing an intermittent short through a body harness, diagnosing a wiper control module, or accessing a rear washer pump buried inside a hatchback liftgate requires time, specialized tools, and disassembly experience that most home users do not have. Our position is direct: when a multimeter confirms correct voltage at the pump connector and the pump still does not operate, the repair moves to a shop.
Dealer labor for a washer system diagnosis typically runs $80–$150 per hour. Independent shops average $60–$110. A control module replacement, including parts, can reach $200–$350 on mid-range vehicles — a steep outcome for a system that resolves for under $15 in nine out of ten cases. Knowing when the problem is simple is itself a skill worth developing.
Our team follows a fixed sequence that moves from cheapest to most involved. Most people working through this list find their answer by step three or four.
Warning: Household glass cleaners containing ammonia should never be used as substitute washer fluid — ammonia degrades rubber pump seals and line hoses, converting a $5 fluid issue into a $40 line replacement within weeks.
When all beginner checks clear without a finding, the next diagnostic layer requires a digital multimeter and a basic understanding of automotive electrical circuits.
These four steps isolate the fault to one of four nodes: switch/module, relay, wiring, or pump motor. Each node has a clear repair path once identified.
Several persistent myths generate unnecessary parts expense and, in some cases, cause additional damage. Our team addresses the most common ones without qualification.
Myth 1: "Plain water works fine as washer fluid."
Water works in summer. Below 32°F, it freezes inside the lines and reservoir, cracking plastic components and seizing the pump impeller. In northern climates, our team recommends fluid rated to at least 20°F below the expected winter low — and switching before the first hard frost, not after the first failure.
Myth 2: "Weak spray just means the reservoir is low."
A weak, sputtering, or misdirected spray almost always signals a partially blocked nozzle orifice or a pump impeller that has lost efficiency from corrosion. Filling the reservoir to MAX changes nothing if the orifice is restricted. The nozzle must be physically cleared.
Myth 3: "Running the washer repeatedly will clear a clog."
Mineral deposits do not dissolve with increased fluid volume. Higher flow pressure risks popping a line fitting loose before it clears the orifice. Mechanical intervention — a needle or compressed air — is always required. Our team has never documented a clog that resolved through repeated washer activation alone.
Myth 4: "Dish soap is a viable substitute fluid."
Liquid dish soap leaves a smear film on glass that reduces visibility in glare conditions and causes foaming inside the pump housing. Foam introduces air into the line, producing a symptom that closely mimics a failed pump. Dedicated washer concentrate is formulated to clean without filming, foaming, or degrading rubber components.
Myth 5: "The pump is always the problem when there's no spray."
In our experience, the pump is actually responsible for a minority of no-spray cases. Clogged nozzles and empty reservoirs account for the majority. Replacing a functioning pump based on symptom alone — without completing the diagnostic sequence — is one of the most common unnecessary repairs in this category.
The windshield washer system requires almost no maintenance when managed proactively. The following protocol eliminates the most common failure modes entirely:
Nozzle clogs in hard-water regions can be reduced by using concentrate with a built-in water softener additive or by mixing with distilled water rather than tap water. Our team has found this practice eliminates recurring clog complaints on vehicles in high-mineral-content water zones.
Vehicles above 120,000 miles show predictable washer system degradation patterns. Our team's observations across high-mileage platforms:
On vehicles above 120,000 miles presenting a no-spray complaint, our team replaces the pump and grommet seal as a paired unit. Replacing the pump while leaving an aged, weeping grommet guarantees a return visit within months. Parts cost for both together typically runs $30–$60.
 |
 |
 |
 |
About Joshua Thomas
Joshua Thomas just simply loves cars and willing to work on them whenever there's chance... sometimes for free.
He started CarCareTotal back in 2017 from the advices of total strangers who witnessed his amazing skills in car repairs here and there.
His goal with this creation is to help car owners better learn how to maintain and repair their cars; as such, the site would cover alot of areas: troubleshooting, product recommendations, tips & tricks.
Joshua received Bachelor of Science in Mechanical Engineering at San Diego State University.
Get some FREE car parts & gear.. Or check out the latest free automotive manuals and build guides here.
Disable your ad blocker to unlock all the hidden deals. Hit the button below 🚗
| | | |