by Sarah Whitfield
Air conditioning compressor failures account for more than 3.5 million vehicle service visits each year in the United States alone, making the compressor one of the most frequently replaced components in the automotive HVAC system. Recognizing bad ac compressor symptoms early is the single most effective step toward preventing cascading refrigerant circuit damage and avoiding the substantially higher repair costs that follow a complete compressor seizure. Our team has evaluated compressor failures across hundreds of vehicle platforms, and the diagnostic patterns we encounter remain remarkably consistent regardless of make or model. This guide presents a structured approach to identification, diagnosis, and cost estimation — drawing on our direct workshop experience and data compiled from major independent repair networks across North America.
Contents
The compressor operates as the heart of the refrigerant circuit, and when internal components begin to degrade, the symptoms surface in predictable sequences that our team has documented extensively. Understanding these early indicators enables targeted diagnosis rather than costly trial-and-error parts replacement — a distinction that separates experienced technicians from less methodical approaches to HVAC service.
Warm or ambient-temperature air from the vents is the most universally reported complaint associated with compressor failure, and it warrants immediate compressor evaluation before assuming a refrigerant charge deficit. When the compressor loses displacement capacity, the refrigerant circuit cannot achieve the pressure differential required for effective evaporator heat exchange. Our team consistently finds that warm-air complaints accompanied by low-side pressure readings above 50 psi at idle point directly to compressor pumping inefficiency rather than a simple undercharge situation. Misdiagnosing this symptom leads to refrigerant overcharging, which accelerates internal compressor wear and creates a more expensive problem downstream.
A rattling, grinding, or high-pitched screaming noise that appears or intensifies when the AC clutch engages is among the clearest bad ac compressor symptoms available for field diagnosis without specialized equipment. These sounds originate from worn reed valves, damaged piston assemblies, or deteriorated shaft bearings — conditions that worsen rapidly under continued operation. Our experience also shows that a burning rubber smell accompanying the noise frequently indicates that the clutch bearing has seized while the pulley continues to spin, causing belt slippage and thermal breakdown of the surrounding rubber components. Technicians occasionally confuse accessory drive noise with engine knocking from internal combustion sources, which is why correlating the sound precisely to clutch engagement is essential before attributing it to the compressor.
Our team's consistent finding: any grinding noise that correlates precisely with clutch engagement warrants immediate compressor removal — continued operation risks debris contamination of the entire refrigerant circuit, converting a single-component repair into a full-system replacement.
Refrigerant oil staining around the compressor body — particularly at the shaft seal and manifold fittings — signals an active leak that degrades both system performance and internal lubricant levels simultaneously. According to the U.S. Environmental Protection Agency's mobile vehicle air conditioning program, refrigerant venting is subject to Clean Air Act prohibitions, making prompt repair both an economic and a regulatory obligation. Our team treats any visible oil weeping at the compressor shaft seal as an early failure indicator that justifies full compressor evaluation before refrigerant loss reaches the threshold that triggers low-pressure cutout cycling and compressor starvation.
Beyond the workshop environment, a failing compressor creates a specific set of drivability and comfort symptoms that most people notice during normal commuting well before connecting the experience to a mechanical failure. Identifying these patterns in context accelerates the diagnostic process and reduces the diagnostic time spent on unrelated system components.
A system that cools adequately for ten to fifteen minutes then transitions to warm air — repeating this cycle without stabilizing — exhibits the hallmark behavior of a compressor that engages but cannot sustain discharge pressure under continuous thermal load. Our team links this pattern to worn piston rings or valve assemblies that allow refrigerant blowback, causing low-side pressure to spike and trigger the high-pressure cutout switch prematurely. This cycling pattern also appears in combination with a radiator fan that is not operating at full capacity, since inadequate condenser airflow compounds head pressure and accelerates compressor thermal stress, making it essential to evaluate both systems simultaneously rather than assuming a single root cause.
A mechanically compromised compressor draws significantly more current as it struggles against increasing internal resistance, and this elevated amperage demand frequently manifests as a battery that keeps dying or a charging system warning on the instrument cluster. Our team measures clutch coil current draw as a standard step in any AC diagnostic, with readings exceeding 5 amperes at 12 volts indicating a clutch coil that is beginning to fail. The relationship between compressor condition and electrical system health is frequently overlooked, leading technicians to replace batteries or alternators before identifying the true underlying cause of the charging anomaly.
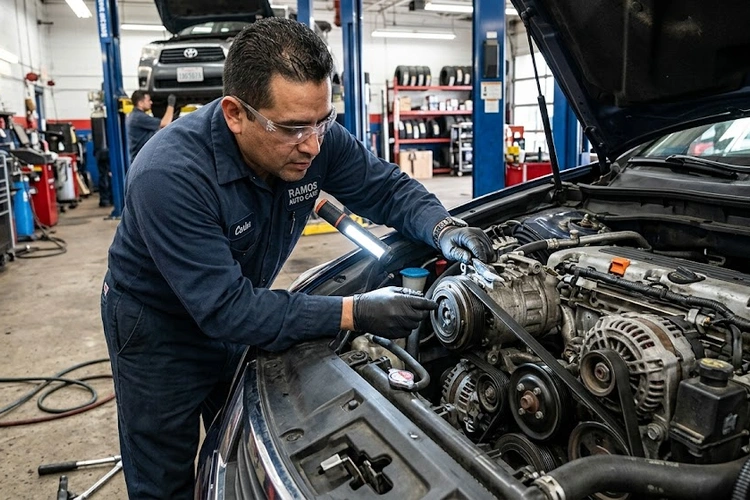
Accurate compressor diagnosis demands a structured methodology that combines physical inspection with instrumented measurement, eliminating the guesswork that drives unnecessary parts expenditure. Our team follows a consistent sequence designed to isolate the compressor as the fault source before any replacement recommendation is made.
The first step in our diagnostic sequence involves verifying that the compressor clutch engages fully when the AC system is activated, which can be confirmed visually by observing the center hub of the clutch assembly for rotation when the drive pulley is spinning. A clutch that cycles on and off more than three times per minute at stable ambient temperature indicates either a refrigerant charge deficit or an internal pressure irregularity caused by valve failure. Our team also checks clutch air gap, which should measure between 0.016 and 0.031 inches on most domestic and Asian platforms; a gap outside this specification produces slipping, sustained heat buildup, and accelerated friction disc wear that ultimately destroys the clutch assembly.
Static and dynamic pressure readings taken with a manifold gauge set provide the most reliable confirmation of compressor condition, and our team considers this step non-negotiable before recommending any component replacement. A low-side reading above 40 psi combined with a high-side reading below 150 psi at idle on an R-134a system is a definitive indicator of compressor pumping inefficiency rather than a refrigerant volume deficiency. These pressure anomalies sometimes accompany check engine light conditions on vehicles where the PCM monitors refrigerant circuit pressures through dedicated pressure transducer inputs, creating stored fault codes that point directly to compressor efficiency loss.
Performing leak isolation with dry nitrogen rather than refrigerant before recharging eliminates refrigerant loss during the diagnostic phase and is our team's preferred protocol on any system suspected of harboring multiple leak points.
A methodical physical inspection conducted in sequence prevents the oversights that occur when technicians focus narrowly on a single symptom and miss contributing factors. Our team follows this protocol on every AC compressor evaluation regardless of the presenting complaint or the vehicle platform involved.
Proper tooling elevates compressor diagnosis from informed speculation to data-driven conclusion, and our team has standardized on a specific instrument set that covers the full diagnostic range without requiring investment in redundant single-purpose equipment.
A quality manifold gauge set calibrated for both R-134a and R-1234yf refrigerants is the foundational instrument for any AC diagnostic, enabling simultaneous low-side and high-side pressure monitoring under static and dynamic operating conditions. Our team pairs the gauge set with a two-stage vacuum pump capable of achieving 29.9 inches of mercury — the threshold required for thorough moisture evacuation before refrigerant recharge. For technicians working on a 2-post or 4-post lift, compressor access for gauge connection is considerably more efficient, reducing diagnostic time significantly on vehicles with low ground clearance or minimal underhood clearance around the compressor manifolds.
Electronic halogen leak detectors provide point-source identification of refrigerant leaks with sensitivity in the range of 0.1 ounce per year, far exceeding the capability of soap bubble testing for small shaft seal weeps. Our team supplements electronic detection with UV dye injection and a 365-nanometer blacklight, which reveals leak pathways that have migrated along component surfaces and pooled at locations removed from the actual breach point. This dual-method approach reduces the probability of missing secondary leak sites that would cause a system recharged after compressor replacement to lose charge again within weeks of the repair.
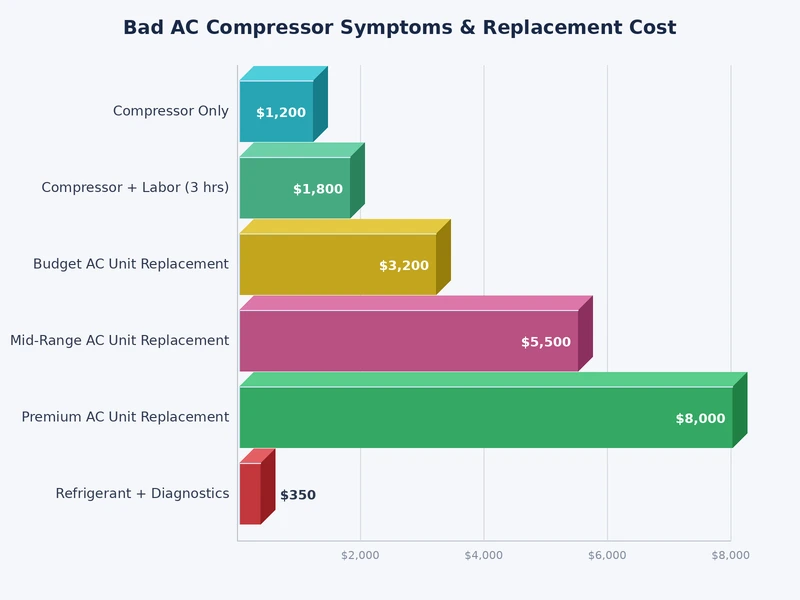
Replacement cost varies substantially based on vehicle platform, geographic labor rates, parts sourcing strategy, and whether the complete refrigerant circuit requires flushing and ancillary component replacement. The figures below reflect current market pricing from both dealership and independent shop environments across multiple vehicle segments.
| Vehicle Segment | Compressor Part Cost | Labor Cost | Refrigerant & Supplies | Total Estimated Range |
|---|---|---|---|---|
| Compact / Economy | $150 – $280 | $200 – $350 | $80 – $150 | $430 – $780 |
| Mid-Size Sedan / SUV | $250 – $420 | $280 – $450 | $100 – $180 | $630 – $1,050 |
| Full-Size Truck / SUV | $320 – $550 | $300 – $500 | $120 – $200 | $740 – $1,250 |
| Luxury / European Import | $550 – $1,200 | $400 – $750 | $150 – $300 | $1,100 – $2,250 |
Our team recommends obtaining at least three independent repair quotes before authorizing compressor replacement, as labor rate variation alone creates a $200 to $300 swing in the final invoice on a mid-size platform. Sourcing a remanufactured compressor from a reputable supplier — rather than a new aftermarket unit of uncertain manufacturing origin — consistently produces better long-term outcomes in our experience, provided the remanufacturer warrants the assembly against internal failure for a minimum of twelve months or twelve thousand miles.
The most consistent bad ac compressor symptoms our team observes include warm air from the vents, grinding or rattling noises during clutch engagement, refrigerant oil staining around the compressor body, intermittent cooling cycles that stabilize and then fail, and elevated electrical draw that places strain on the charging system. These symptoms typically appear in combination rather than isolation, which accelerates accurate diagnosis when evaluated together.
Most AC compressors reach end-of-life between 100,000 and 150,000 miles under normal operating conditions, though premature failure is common when refrigerant charge is allowed to run low for extended periods, which deprives the compressor of the oil carried by refrigerant vapor and accelerates bearing and valve wear well ahead of the expected service interval.
A fully seized compressor will cause immediate serpentine belt failure, which simultaneously disables the alternator, power steering pump, and water pump on most vehicle platforms, resulting in rapid overheating and loss of electrical generation — conditions capable of producing serious secondary engine damage if the vehicle continues operating after the belt fails.
Most people can operate the vehicle safely with a failing compressor provided the clutch disengages properly and the drive belt remains intact, though our team strongly advises against extended operation once grinding or seizing symptoms appear, as metallic debris contamination of the refrigerant circuit dramatically increases total repair cost when the full circuit requires flushing and component replacement.
The primary causes our team identifies for premature compressor failure are chronic refrigerant undercharge — which reduces oil circulation to internal bearings — moisture contamination from improper system service procedures, clutch slippage from excessive air gap producing friction disc heat damage, and debris ingestion from a previously failed compressor that was replaced without performing a complete refrigerant circuit flush.
Most passenger vehicle systems require between 1.5 and 3.0 pounds of refrigerant after complete evacuation and recharge, with the exact specification listed on the underhood HVAC label or in the vehicle service manual; our team follows manufacturer specifications precisely rather than relying on estimates, because overcharging causes high-side pressure spikes that stress the newly installed compressor and shorten its service life.
Our team recommends replacing the receiver-drier or accumulator whenever the refrigerant circuit is opened for compressor replacement, as the desiccant material inside these components becomes saturated with atmospheric moisture during exposure and will contaminate the recharged system with water vapor if reused — ultimately causing acid formation and internal corrosion of the new compressor within its first service season.
The compressor is the pump assembly itself, while the clutch is the electromagnetic engagement mechanism mounted on its front shaft; in specific failure scenarios — particularly clutch coil burnout or friction disc wear without measurable internal compressor damage — clutch replacement alone restores full system function at a fraction of the cost of complete compressor replacement, which is precisely why our team evaluates clutch condition independently before recommending the more extensive repair.
A failing AC compressor rarely fails without providing advance warning, and the diagnostic process outlined here gives any competent technician the structured approach needed to confirm the fault before committing to a costly replacement. Our team encourages anyone observing these symptoms to schedule a professional pressure test and clutch inspection at the earliest opportunity — catching compressor failure before system contamination occurs is the difference between a $700 repair and an $1,800 one. Reviewing our complete reference on bad AC compressor symptoms alongside these diagnostic steps provides the additional technical depth needed to approach the repair with confidence and avoid the misdiagnoses our team sees far too frequently in the field.
 |
 |
 |
 |

About Sarah Whitfield
Sarah Whitfield is a diagnostics and troubleshooting specialist who spent ten years as an ASE-certified technician before joining the editorial team. She specializes in OBD-II analysis, electrical gremlins, and the kind of intermittent problems that make most owners give up.
Get some FREE car parts & gear.. Or check out the latest free automotive manuals and build guides here.
Disable your ad blocker to unlock all the hidden deals. Hit the button below 🚗
| | | |