by Liam O'Brien
For hands-on repair work, the 2-post lift wins outright. For vehicle storage and drive-on convenience, the 4-post lift takes the lead. The decision between a 2 post vs 4 post car lift for home garage use comes down to one thing: what jobs will be done most often.
Both lift types are safe, capable, and worth owning. The mistake most buyers make is choosing based on price or looks rather than matching the tool to the task. This guide covers every major difference so the right choice becomes obvious.
Contents
The mechanical difference between these two lifts is significant. That difference determines which one belongs in a specific garage. Starting with the fundamentals makes every subsequent decision easier.
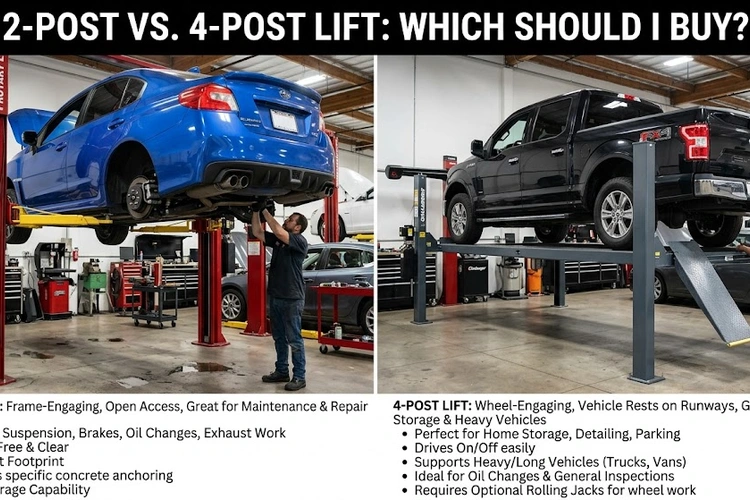
A 2-post lift consists of two steel columns anchored directly into the garage floor. Each column has swing arms that extend outward and contact the vehicle at its pinch welds, rocker frame, or designated lift points. Once positioned correctly, the vehicle rises with all four wheels hanging completely free.
That free-hanging wheel position is the defining advantage. It allows unobstructed access to:
For tracking down a car oil leak hiding behind a crossmember, or addressing worn suspension parts that cause car vibration at highway speeds, the 2-post delivers the clearest, most unobstructed view available without cutting a hole in the floor.
Installation requires concrete rated at a minimum of 4 inches thick with proper anchor bolt placement. This is a structural requirement — not a suggestion. Professional installation of the anchor bolts is money well spent.
A 4-post lift replaces swing arms with two parallel runways connected by four vertical columns. The vehicle simply drives onto the runways. No arm placement or pinch weld contact is needed per visit. Setup takes under two minutes.
The vehicle rests on its tires throughout the lift cycle. This creates a platform stable enough to leave a vehicle raised for weeks or months. That makes the 4-post the dominant choice for:
An optional bridge jack — a rolling hydraulic unit that slides across the runways — enables wheel removal on a 4-post. Adding slip plates allows alignment work. Without the bridge jack, brake jobs and suspension overhauls are not practical on a standard 4-post configuration.

Numbers and specs reveal what marketing language obscures. The table below is a direct, no-fluff comparison of what actually matters in a home garage environment.
| Feature | 2-Post Lift | 4-Post Lift |
|---|---|---|
| Undercarriage Access | Excellent — fully unobstructed | Limited — runways block sections |
| Wheel / Suspension Access | Excellent — wheels hang free | Requires optional bridge jack ($300–$500) |
| Long-Term Vehicle Storage | Not recommended | Excellent — stable for weeks or months |
| Setup Time per Vehicle | 5–10 minutes (arm placement required) | Under 2 minutes (drive-on) |
| Minimum Floor Space | ~10 ft wide × 12 ft deep per column | ~10 ft wide × 18–20 ft long |
| Minimum Ceiling Height | 11–12 ft recommended | 9–10 ft minimum |
| Concrete Thickness Required | 4 in minimum — anchor bolts mandatory | 4 in minimum — less critical for runways |
| Typical Price Range | $1,500–$4,000 | $2,000–$5,500+ |
| Vehicle Compatibility | Cars, trucks, SUVs with reachable pinch welds | Nearly universal — vans, trucks, RVs |
| Best Primary Use | Hands-on mechanical repair | Storage, alignment, light inspection |
Price should not be the deciding factor — suitability should. A $2,000 2-post lift will outperform a $4,500 4-post for a home mechanic doing weekly brake and suspension work. The reverse holds equally true for a collector storing vehicles.
According to Wikipedia's overview of vehicle lifts, 2-post and 4-post configurations are the dominant types used in both commercial and residential settings worldwide. Proper anchoring and rated load compliance are identified across all categories as the primary determinants of lift safety.

This is where most buyers go wrong. The job determines the lift — not the other way around. The decision tree is simple once the primary use case is honest.
Diagnosing the root cause of bad wheel alignment symptoms or pinning down why a car shakes when idle under load requires clear access to the suspension geometry. The 2-post delivers that without extra equipment.
For more tools that complement any lift setup — floor jacks, jack stands, and diagnostic scan tools — browse the full tools category.
Buying the right lift is step one. Using it correctly is everything else. These practices apply to both styles and separate safe operators from those who cut corners.
Always lower the lift slowly and listen for any unexpected clunking before the vehicle fully contacts the ground — a safety lock dragging at the last moment is far easier to handle at low speed than at full drop.
Online forums spread persistent misinformation about home garage lifts. Here are the most damaging myths — and the reality behind each one.
It does not. Without a bridge jack and slip plates, a standard 4-post cannot deliver free-hanging wheel access. Full brake jobs, suspension rebuilds, and drivetrain work remain 2-post territory. The 4-post is a capable, versatile tool — but it is not a replacement for the 2-post in a repair-focused garage.
This is not a design problem — it is an installation problem. A properly anchored 2-post on a compliant concrete slab is as safe as any commercial shop lift. Incidents trace back to improper anchoring, skipped safety locks, or incorrect arm placement. The lift design is not the variable. The operator and the installation are.
Many residential garage slabs measure only 3.5 inches thick — below the 4-inch minimum both lift types require for anchor bolt integrity. Before purchasing any lift, core-drill a test plug and measure actual slab thickness. If the slab is underspec, pouring a reinforced concrete pad over the existing surface is the correct fix — not anchoring directly into substandard material.
Price reflects capacity, features, and brand reputation — not safety compliance. A budget 9,000-lb lift from an established manufacturer installed correctly outperforms an expensive lift installed sloppily. Safety is determined by load ratings, engineering tolerances, and installation quality — not the sticker price.
A home garage lift is a multi-decade investment. Neglected lifts develop hydraulic seal failures, worn safety lock teeth, and stretched equalizer cables. A simple maintenance schedule catches problems before they become dangerous.
Annual third-party inspections are standard practice in professional shops. Home garage users routinely skip this step — and the consequences compound silently over time.
Most quality lifts from established manufacturers remain in safe service for 20–30 years with consistent care. Replacement parts — cylinders, pads, cables, and carriage assemblies — are widely available for all major brands. A lift that fails an inspection is not automatically scrap. A professional assessment often reveals a straightforward repair rather than a full replacement.
A 2-post lift typically requires 11–12 feet of ceiling clearance to raise a standard passenger vehicle to a comfortable working height. Low-rise 2-post models exist for ceilings as short as 10 feet, but they sacrifice maximum lift height. A 4-post lift generally requires only 9–10 feet of clearance, making it the better choice for garages with standard 9-foot ceilings.
Not in standard configuration. A bridge jack attachment is required to lift the vehicle's axles off the runways and allow wheel removal. Without a bridge jack, the wheels remain on the platform and free-hanging access is impossible. For frequent brake and suspension work, the 2-post lift is the more practical tool without additional accessories.
Both 2-post and 4-post lifts require a minimum of 4 inches of reinforced concrete. Many residential garage slabs are only 3.5 inches thick, which falls below this threshold. Core-drilling a test plug to verify actual slab thickness before purchasing any lift is strongly recommended. If the slab is underspec, a reinforced concrete pad poured over the existing surface is the correct solution.
The 2-post lift is the clear winner for DIY mechanical work. It provides full wheel-off access and completely unobstructed undercarriage visibility — both essential for brake jobs, suspension overhauls, exhaust repairs, and fluid leak diagnosis. The 4-post excels at storage and quick inspections, but the 2-post is the workhorse of a functioning home repair garage.
The right lift is not the most expensive one — it is the one that matches the job, fits the slab, and clears the ceiling.
 |
 |
 |
 |

About Liam O'Brien
Liam O'Brien has spent over a decade buying, field-testing, and evaluating automotive tools with a focus on what actually performs in a real DIY garage rather than what markets well on a spec sheet. His hands-on experience spans hand tools, diagnostic equipment, floor jacks, socket sets, and specialty automotive gear across a wide range of brands and price points. At CarCareTotal, he covers automotive tool and equipment reviews, garage setup guides, and buying advice for home mechanics.
Get some FREE car parts & gear.. Or check out the latest free automotive manuals and build guides here.
Disable your ad blocker to unlock all the hidden deals. Hit the button below 🚗
| | | |