by Sarah Whitfield
According to the National Highway Traffic Safety Administration, brake system failures contribute to more than 300,000 crashes in the United States each year. Brake squealing causes genuine alarm for a reason — that sharp, high-pitched screech is not random noise. It is your braking system sending a direct, urgent signal, and ignoring it is a mistake you cannot afford to make.
This guide breaks down every major brake squealing cause in precise detail, paired with practical steps to diagnose and fix each one. Whether your car squeals only in the morning, only under hard braking, or every single time you press the pedal, you will find a specific answer here. If you have also noticed a soft pedal, read our guide on what causes a brake pedal to go to the floor — the two problems frequently overlap and share root causes.

Contents
Your brake system works by converting kinetic energy (the energy of motion) into heat through friction. When you press the brake pedal, hydraulic pressure forces the brake caliper (a clamp-like device) to squeeze brake pads against a spinning metal rotor. That friction slows the wheel. The process generates enormous heat, and the materials involved — metal, composite compounds, and rubber — can produce sound under specific conditions. Understanding the mechanics makes it far easier to identify which brake squealing cause is affecting your vehicle.
Vehicles that log high mileage without brake problems — including many owners of reliable platforms like the Toyota RAV4 that surpass 200,000 miles — do so in part because they stay ahead of brake noise rather than rationalizing it away.
If the noise is consistent and repeatable, treat it as a warning. Do not rationalize it away.
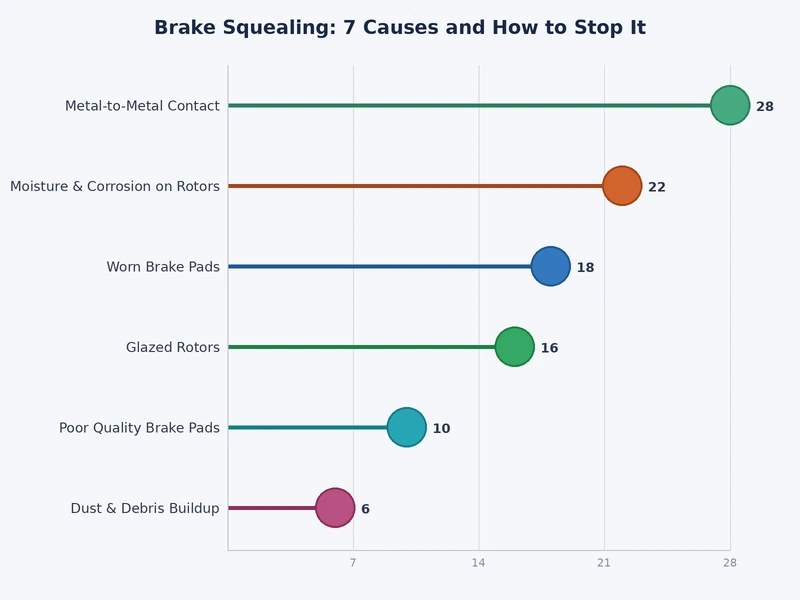
Each of these seven brake squealing causes has a distinct profile. Match your symptoms to the correct cause before purchasing any parts or scheduling service.
This is the most common — and most critical — brake squealing cause. Brake pads contain a small hardened metal tab called a wear indicator. When the pad friction material wears down to approximately 2–3 mm remaining, this tab contacts the rotor face and produces a sharp, continuous squeal. The sound is deliberately annoying. It exists to force your attention.
Glazing occurs when brake pads or rotor surfaces develop a hard, smooth layer due to excessive heat exposure. This happens when you ride the brakes on extended downhill grades, use pads with an inadequate heat rating, or skip the bedding-in procedure after installing new pads. A glazed surface produces less friction and vibrates against the rotor at audible frequencies.
A small stone, road grit, or clump of hardened brake dust lodged between the pad and rotor produces a sudden, persistent squeal or grinding noise. This brake squealing cause is common after driving on unpaved surfaces, through gravel parking lots, or in areas with heavy road debris.
Brake calipers move laterally on two metal guide pins coated in high-temperature grease. When this grease dries out — or the pins corrode due to moisture intrusion — the caliper cannot move freely. The result is uneven pad-to-rotor contact that generates a squeal or low groan during braking.
Not all brake pads perform equally. Inexpensive organic pads frequently squeal because their friction compounds vibrate against the rotor at audible frequencies under normal braking loads. Mismatched pads — compounds designed for one vehicle class installed on another — produce chronic noise because the friction characteristics do not align with the rotor's metallurgy or the vehicle's weight.
Pro Tip: Always confirm the pad compound rating — organic, semi-metallic, or ceramic — is appropriate for your vehicle's weight class and driving demands before purchasing. A pad compound rated for a compact sedan will squeal chronically on a full-size truck or SUV.
Cast iron rotors rust rapidly when exposed to moisture. After a vehicle sits overnight — particularly in humid, rainy, or coastal environments — a thin layer of iron oxide (rust) forms on the rotor contact surface. When you first apply the brakes, the pads scrape this rust away, producing a brief squeal or scraping sound for one to three stops. This is the only brake squealing cause that is generally harmless.
A warped rotor — one that has lost its perfectly flat, uniform surface — causes the brake pad to make contact unevenly as the rotor spins. This creates a pulsating or squealing noise during every brake application. Scored rotors (those with deep grooves worn into the contact surface) generate a similar effect. Both conditions also produce a pulsing sensation you can feel through the brake pedal.
Replacing parts at random wastes money and time. Use this structured approach to identify the specific brake squealing cause before spending a dollar on repairs.
| Sound Pattern | Most Likely Cause | Urgency Level |
|---|---|---|
| Squeal on first 1–3 stops only, then gone | Overnight surface rust | Low — monitor only |
| Constant squeal on every brake application | Worn wear indicator tab | High — replace pads immediately |
| Squeal combined with pedal vibration | Warped or scored rotor | High — measure rotor thickness |
| Squeal combined with pulling to one side | Seized caliper or dry slide pin | High — inspect caliper movement |
| Squeal present from day one of new pad install | Low-quality pads or missing bedding | Medium — upgrade pads or re-bed |
| Sudden squeal after off-road or gravel driving | Debris lodged between pad and rotor | Medium — inspect and clear debris |
| Harsh metal-on-metal grinding sound | Pad friction material completely worn through | Critical — stop driving immediately |
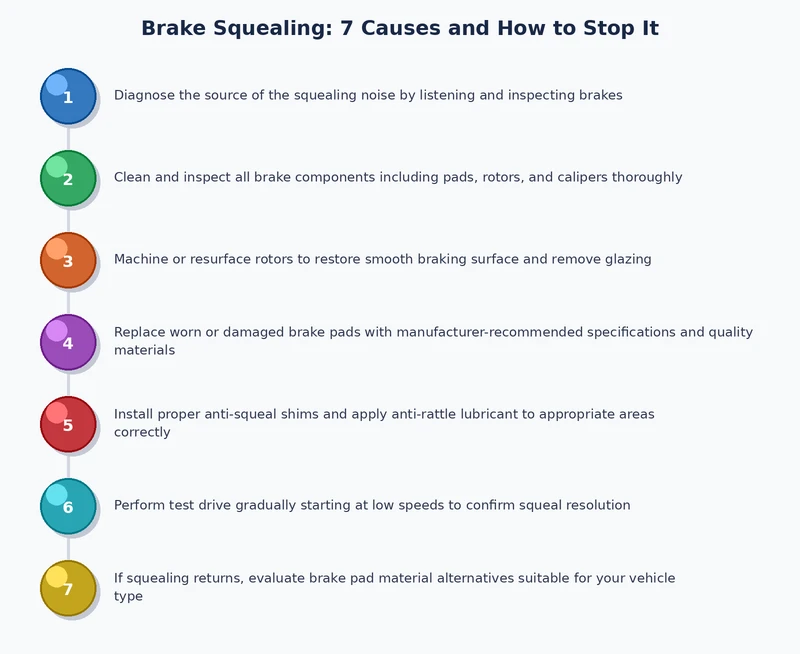
You do not need to remove the wheels for a basic preliminary check. Follow these steps in order:
Not every brake squealing cause demands an immediate shop visit. These targeted actions resolve noise in specific, straightforward situations.
Brake dust accumulation, light oil contamination, and surface rust all respond to a thorough cleaning. Here is the correct process:
If the squeal disappears after cleaning, contamination was the cause. If the noise returns within a day of driving, dig deeper into the remaining causes.
Lubrication is a targeted fix for specific metal contact points — not a general solution to spray around the brake assembly. Applied to the wrong surface, lubricant destroys braking performance and creates a safety emergency.
Choosing the correct brake pad compound is the single most effective preventive measure against chronic brake squealing. The two dominant options for everyday vehicles are ceramic and semi-metallic pads. Understanding the practical difference eliminates one of the most common brake squealing causes before it starts.
Ceramic brake pads are the correct choice for the large majority of passenger cars, crossovers, and light SUVs operated in daily driving conditions.
Semi-metallic pads contain between 30 and 65 percent metal fiber — typically steel, copper, or iron blended into the compound. They offer superior heat tolerance for specific high-demand applications.
If you drive a standard passenger car and your current semi-metallic pads squeal persistently, switching to a quality ceramic compound is the best upgrade you can make. Do not wait for the current pads to wear out — make the switch at your next brake service.
Prevention is more cost-effective than repair. These practices eliminate the most common brake squealing causes before they develop.
Bedding in — also called break-in or conditioning — is a procedure that most drivers skip entirely. It transfers a thin, uniform layer of pad compound onto the rotor contact surface, which improves friction coefficient consistency and prevents early glazing. Perform this procedure every time you install new pads:
This procedure takes less than 25 minutes and meaningfully extends both pad and rotor life while preventing glazing-related squeal. It is not optional — it is standard procedure every time new pads are installed.
These habits extend the service life of your rotors, tires, and suspension components simultaneously. For a complete overview of vehicle care practices that compound over time, review our guide on 8 great pointers for maintaining your vehicle — the same discipline that keeps brakes quiet also keeps the rest of the car in service longer.
Drivers attempting DIY brake work routinely make the noise worse by following incorrect advice or taking shortcuts. Avoid these mistakes without exception.
Incorrect lubrication is the most destructive error in brake work, and it is far more common than it should be. Specifically:
The wear indicator squeal gives you a warning window — typically two to four weeks of normal driving before the pad is fully consumed. Continuing past this point allows the metal backing plate to contact the rotor directly. At that stage, the consequences are significant:
The same principle governs every warning signal in your vehicle. Addressing a small symptom early — whether it is brake noise, a low transmission fluid warning, or any other early indicator — always costs far less than the damage that accumulates while you wait. Act on the first warning sign.
A consistent inspection schedule is the most reliable defense against brake squealing causes developing undetected. Build these checkpoints into your regular vehicle maintenance routine.
Keep your vehicle in sound overall condition. A car with one neglected system tends to develop problems across multiple systems. Monitoring your exhaust is one useful habit — unusual exhaust smoke colors can indicate engine problems that indirectly affect brake vacuum booster performance. Similarly, a thorough vehicle care framework like the one in our vehicle maintenance guide keeps every system operating within its design parameters.
Perform brake work yourself only when you have the correct tools, verified experience, and a safe working environment. Defer to a qualified mechanic for the following situations — without exception:
If your brake pedal sinks toward the floor under normal pedal pressure, stop driving the vehicle immediately and arrange a tow. A soft pedal indicates hydraulic failure — a condition that can make stopping impossible at any meaningful speed.
Cold temperatures temporarily harden brake pad compounds, which changes how the pad vibrates against the rotor and shifts that vibration into the audible frequency range. If the squeal disappears after a few minutes of driving once the brakes warm up, the cause is thermal and generally harmless. If the noise persists at all temperatures, inspect the pads for wear and the rotors for scoring — cold weather is not the root cause in that case.
It depends on the specific cause. The brief squeal produced by overnight surface rust on the first one to three stops of the day is harmless. However, a persistent squeal caused by a wear indicator tab, glazed pads, a seized caliper, or a debris obstruction represents a degraded braking system. Schedule an inspection immediately. Never assume a squealing brake is safe until you have identified the exact cause and confirmed the system is intact.
Most passenger vehicle brake pads last between 25,000 and 65,000 miles, depending on pad compound, vehicle weight, and driving style. Aggressive drivers in heavy trucks on semi-metallic pads may reach the wear indicator at 20,000 miles. Conservative drivers in lighter vehicles on ceramic pads may see 70,000 miles or more. The wear indicator tab begins producing its squeal warning when approximately 2–3 mm of friction material remains.
Yes, and it is more common than most people expect. New pads squeal for two primary reasons: the bedding-in procedure was not performed, or the pads are a low-quality compound that is mismatched to the vehicle's rotor metallurgy or weight class. Perform the full bedding sequence described in this guide. If the squeal continues after proper bedding, replace the pads with a higher-quality ceramic compound verified for your specific vehicle — do not attempt to live with the noise.
Ceramic pads reduce the likelihood of brake squealing dramatically because their friction compounds vibrate at ultrasonic frequencies that are above the range of human hearing. However, no pad type eliminates every possible noise scenario. A worn ceramic pad will still squeal from its wear indicator tab. A contaminated ceramic pad will squeal. Properly installed, freshly bedded ceramic pads on undamaged rotors are, however, the quietest available option for everyday passenger vehicles — the difference compared to budget organic pads is immediately noticeable.
Squealing is a high-pitched sound produced by metal wear indicator tabs, vibrating pad compounds, or surface rust contacting the rotor — the friction material itself is still present. Grinding is a harsh, low-pitched metallic sound produced when the friction material is fully consumed and the steel backing plate is contacting the rotor directly. Grinding is a brake emergency. Stop driving immediately and have the vehicle towed to a qualified shop — continuing to drive on metal-on-metal contact damages the rotor, caliper, and potentially the wheel hub, and significantly compromises your ability to stop.
Cost depends entirely on the cause identified. Cleaning and lubricating caliper slide pins at a shop runs approximately $50–$100 in labor, or under $10 in parts for a DIY repair. Brake pad replacement only runs approximately $100–$200 per axle at a shop. Replacing pads and rotors together runs approximately $250–$500 per axle depending on vehicle and parts quality. Caliper replacement adds $150–$400 per unit including labor. Addressing brake noise at the squeal stage consistently costs a fraction of what the same repair costs after the pads grind through completely.
Brake squealing is never something to dismiss, delay, or drive around hoping it resolves on its own. Use the diagnostic table and inspection steps in this guide to identify which specific brake squealing cause applies to your vehicle, apply the targeted fix, and schedule a professional inspection if anything you find is beyond your confidence level to address. Your braking system is the single most critical safety component on your vehicle — give it the immediate attention it demands, and you will avoid the far greater cost, in money and in risk, of allowing a squeal to become a grind.
 |
 |
 |
 |

About Sarah Whitfield
Sarah Whitfield is a diagnostics and troubleshooting specialist who spent ten years as an ASE-certified technician before joining the editorial team. She specializes in OBD-II analysis, electrical gremlins, and the kind of intermittent problems that make most owners give up.
Get some FREE car parts & gear.. Or check out the latest free automotive manuals and build guides here.
Disable your ad blocker to unlock all the hidden deals. Hit the button below 🚗
| | | |