Car Door Seal Leaking: Symptoms, Causes, and How to Fix

by Sarah Whitfield

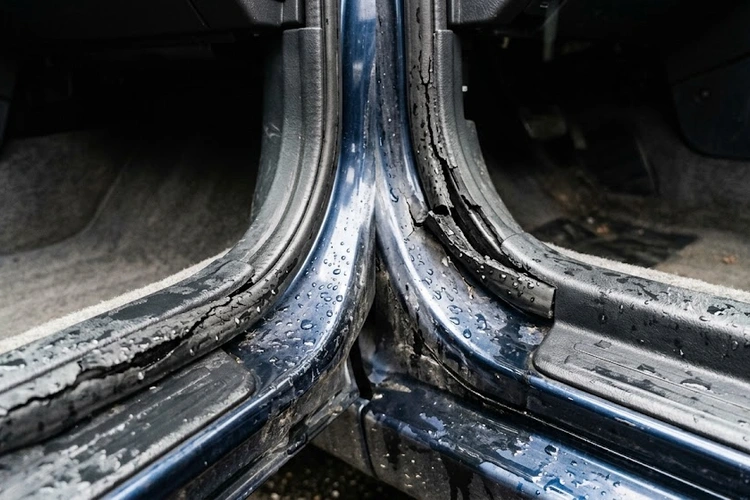
A leaking car door seal lets water, wind, and road noise into your cabin — and the fix is almost always something you can handle yourself in a single afternoon with basic supplies. Most car door seal leaking problems trace back to three root causes: rubber that has cracked or gone permanently flat from age and UV exposure, a door that sits slightly out of alignment and doesn't compress the seal evenly around the full frame, or a drain channel at the base of the door that's clogged with leaves and grit and forces water past the seal instead of channeling it safely out.

The symptoms are hard to miss once you know what to look for. Wet carpet or standing water on the floor after rain, a whistling or wind-rushing sound around the door frame at highway speeds, visible daylight around the door edges when the car is dark inside, and a musty smell building up in the cabin over weeks are all reliable signs that your door seal has failed and water is getting in. Left alone, that moisture corrodes wiring connectors inside the door, feeds mold in carpet foam, and silently damages door panel insulation month after month. This falls squarely in the car troubleshooting category of problems that punish you for waiting — early action costs twenty dollars, late action costs hundreds. If you've also been hearing odd noises around the door frame when you use your windows, our guide on what causes a car window grinding noise when rolling up covers a problem that frequently appears on the same door as a failing seal.

Car door seal leaking — cracked and compressed weatherstripping on a vehicle door frame
Figure 1 — Cracked, compressed weatherstripping is the most common cause of water intrusion through a car door.
Bar chart showing the most common causes of car door seal leaking by frequency
Figure 2 — Rubber aging and compression failure account for the majority of door seal leaks across all vehicle types.

What You'll Need to Tackle a Leaking Door Seal

Pull everything together before you start the repair — walking away mid-job to buy supplies is how a one-hour fix becomes an all-day ordeal with half-cured adhesive sitting in the sun.

The Essentials Every DIYer Should Have

  • Replacement weatherstrip seal — buy the part specific to your make, model, and which door you're repairing. OEM (original equipment manufacturer) fit is always better than universal seals, which often compress at the wrong pressure for your door geometry.
  • Weatherstrip adhesive — 3M Super Weatherstrip Adhesive is the industry standard that body shops use; Permatex also makes a reliable formula. Both come in black (less visible) or yellow.
  • Isopropyl alcohol at 90% or higher — wipes the metal flange clean before adhesive goes on. Any wax, soap film, or factory coating left on the surface will kill the bond.
  • Razor blade or plastic trim tool — removes old seal material and dried adhesive residue without gouging painted metal.
  • Clean rags and nitrile gloves — weatherstrip adhesive bonds to skin instantly and is genuinely difficult to remove.
  • Spray bottle with soapy water — lets you pinpoint the exact leak location by watching for bubbles while the car's HVAC pressurizes the cabin.

Helpful but Not Strictly Required

  • Heat gun or hair dryer — softens stiff rubber in cold weather so the new seal presses fully into the channel without cracking at the corners.
  • Painter's tape — masks adjacent painted surfaces and window glass so adhesive squeeze-out doesn't bond to anything it shouldn't.
  • Rubber conditioner or protectant — if the existing seal is dry but still structurally sound, conditioning it can restore enough pliability to delay replacement for another season.
  • Bright flashlight or work light — essential for seeing old adhesive residue hiding deep inside the door frame channel, which must be removed for the new bond to hold.

Pro tip: Never skip the isopropyl alcohol wipe-down, even if the door frame looks clean — a thin film of wax or soap residue is invisible but enough to prevent proper adhesive bonding, and the seal will lift within weeks of the repair.

How to Fix a Leaking Car Door Seal, Step by Step

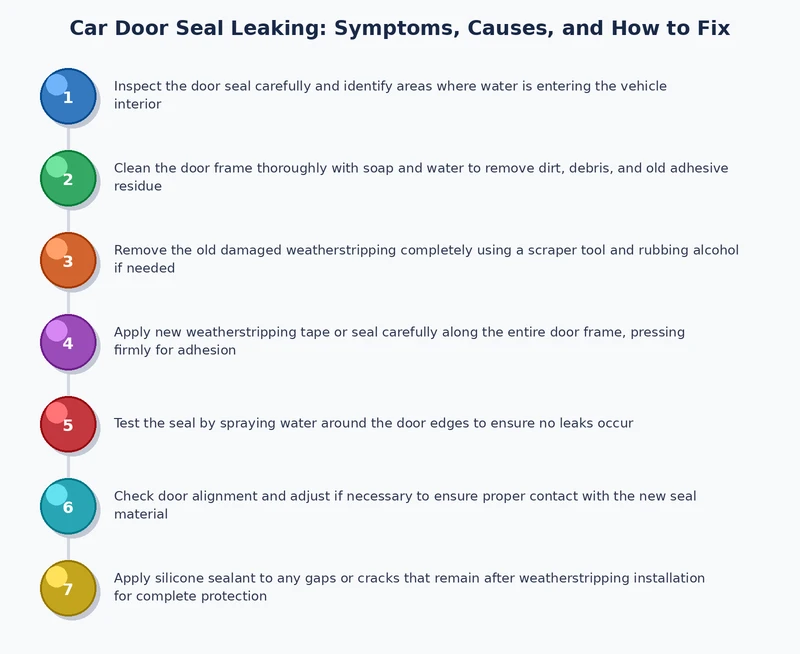
The repair breaks into three phases: locate the leak precisely, prep the surface completely, and then either reseat or replace the rubber. Follow the sequence and you'll avoid redoing work.

Finding Exactly Where the Leak Is

Not every door leak comes from failed weatherstripping — clogged drain holes and misaligned doors cause water intrusion that looks identical from inside the cabin, so diagnose before you order parts.

  1. Paper test. Close a strip of paper or a folded dollar bill in the door at various points around the frame. If it pulls out without resistance, the seal has lost compression at that spot and isn't creating a proper barrier against the door frame.
  2. Spray test. Have a helper run a garden hose slowly up the door from bottom to top while you sit inside with a flashlight — the exact point where water first enters tells you the location of the primary failure.
  3. Drain hole check. Open the door and examine the bottom edge for small rubber plugs or open holes that let water out of the door cavity. If these are blocked with debris, water backs up inside the door and overflows into the cabin even when the seal itself is still good.
  4. Daylight test. In a dark garage with all doors closed, look around every door frame for any visible light coming through — the smallest gap pinpoints where the seal has lost full contact with the frame.

Cleaning and Prepping the Door Frame

  1. Peel the old seal away from its channel using a plastic trim tool to avoid scratching the painted metal underneath the rubber lip.
  2. Hold a razor blade at a very low angle and scrape away every trace of old adhesive residue — new adhesive won't bond properly over old dried glue.
  3. Wipe the entire door frame flange and the inside of the seal channel with isopropyl alcohol on a clean rag, then let it dry completely for about 60 seconds before touching it again.
  4. Lightly wipe the back of the new seal's bonding surface with alcohol as well — factory residue on new parts is a real issue that's easy to overlook.

Reseating or Replacing the Seal

If the seal has merely pulled away in one section but the rubber itself is still soft and undamaged, reseating with adhesive is the right call. If the rubber is hard, cracked, or permanently compressed flat, full replacement is the only fix that will hold long-term.

  1. Apply weatherstrip adhesive to both the metal flange and the back surface of the seal. Let both surfaces become tacky for 2 to 3 minutes before pressing them together — this contact-bond technique is dramatically stronger than pressing wet adhesive.
  2. Start at one corner of the door frame and press the seal firmly into the channel, working in 6-inch sections around the entire frame perimeter.
  3. Hold each section in place for 30 seconds with firm pressure before moving to the next section along the frame.
  4. Close the door gently once the seal is set, and leave it shut for at least 1 hour before driving. Avoid slamming the door for 24 hours while the adhesive reaches full cure strength.
  5. Repeat the paper test and spray test to confirm the leak is fully sealed before calling the job done.

Just as with oil pan gasket leaks or rear main seal failures, catching a door seal problem early keeps the repair simple and cheap — letting moisture sit inside the door cavity for months turns a twenty-dollar adhesive job into a multi-day project involving mold treatment and corroded wiring.

Step-by-step process diagram for diagnosing and fixing a leaking car door seal
Figure 3 — The four-step repair process: diagnose the exact leak point, prep the surface, bond the seal, and test.

DIY or Call a Pro? Knowing the Difference

Most car door seal leaking repairs are well within reach for anyone who can use a scraper and follow adhesive instructions. A handful of situations, though, genuinely call for a shop's equipment and expertise.

Repairs You Can Handle Yourself

  • Reseating a section of weatherstrip that has lifted or pulled away from the channel
  • Full door weatherstrip replacement on any standard car door
  • Clearing clogged door drain holes with a thin wire or short burst of compressed air
  • Applying rubber conditioner to dry seals that are stiffening but haven't started leaking yet

When a Shop Makes More Sense

  • Door misalignment: If the door sags visibly or doesn't sit flush with the body panel, no seal repair will hold long-term — the hinge geometry needs adjustment before the rubber can compress correctly, and that work gets into bodywork territory.
  • Rust on the door frame flange: Adhesive won't bond to corroded metal, so the surface needs treatment and possibly filler before a new seal will hold for more than a few weeks.
  • Water already reached the door electronics: If water has been getting in for months and now your heated seats stopped working or your car radio went dead, take it to a shop — water damage inside door wiring is tedious to trace and easy to make worse with an amateur probe.
Repair Scenario DIY Difficulty Typical DIY Cost Typical Shop Cost
Reseat a lifted seal section Easy $5–$15 (adhesive only) $50–$100
Full weatherstrip replacement Moderate $20–$80 (part + adhesive) $100–$250
Clear clogged drain holes Easy $0 $40–$80
Door hinge adjustment for misalignment Hard $20–$50 (tools) $150–$350
Rust treatment on door frame flange Hard $30–$60 (supplies) $200–$500+

How to Keep Your Door Seals from Leaking Again

A door seal you've just replaced or reseated can last another 7 to 10 years with basic attention — most seal failures are preventable with low-effort care that takes less than five minutes per wash.

Routine Cleaning That Actually Matters

  • Wipe down all four door seals with a damp cloth every time you wash the car. Grit and road debris trapped in the rubber act like fine sandpaper against both the seal and the door frame with every open-and-close cycle.
  • Use a mild all-purpose cleaner diluted with water — nothing solvent-based, which strips the plasticizers that keep rubber flexible and accelerates cracking far faster than age alone would.
  • Check the small drain holes along the bottom edge of each door during every wash, and poke a thin wire through them to confirm they're clear — a clogged drain is one of the most overlooked and easily prevented causes of water intrusion into the cabin. A quality car detailing kit will include the brushes and picks that make this inspection quick and easy.

Building a Lubrication Schedule

Lubricate your door seals two to three times a year using a silicone-based rubber lubricant — not any petroleum product, which degrades rubber compound over time and causes the cracking you're trying to prevent. Apply with a foam applicator or cloth, work the lubricant into the full length of every seal, and wipe off the excess so it doesn't transfer onto clothing.

  • Spring: After winter's freeze-thaw cycles have repeatedly stressed and stiffened the rubber
  • Midsummer: Before peak heat causes rubber to swell and then contract, which accelerates surface cracking over repeated cycles
  • Fall: Before temperatures drop and rubber loses its natural pliability going into the cold months

Warning: Never spray WD-40 on rubber door seals — it softens and degrades the rubber compound, which causes the exact cracking and leaking you're trying to prevent, and the damage accumulates invisibly before the seal finally fails.

Best Practices for Door Seals That Last

Beyond cleaning and lubrication, a few deliberate choices in products and habits make a meaningful difference in how long your seals hold up before they need attention again.

Picking the Right Products

  • OEM seals over universal fit. Your door's geometry is specific to your model and trim year, and OEM or quality OEM-equivalent seals compress at the precise pressure that door was designed for — universal seals fit loosely, compress unevenly, and fail sooner as a result.
  • 3M or Permatex weatherstrip adhesive only. These two brands have consistent track records in professional body shops across decades of use. Generic hardware store adhesives often peel within a season, especially in temperature extremes.
  • 303 Aerospace Protectant or equivalent for conditioning. Applied quarterly, a product like this keeps rubber pliable and helps the seal maintain its original cross-section profile instead of flattening from compression fatigue over time.

Seasonal Considerations by Climate

  • Freezing winters: Door seals can bond to the metal frame overnight when wet rubber freezes solid against the door. Applying silicone spray on the seal surface before a hard freeze prevents the rubber from tearing when you force a frozen door open in the morning.
  • Hot summers: Parking in direct sun causes rubber to swell and then contract repeatedly over weeks and months — this thermal cycling is one of the primary causes of surface cracking that leads to a leaking seal. Parking in shade or using a windshield sun shade reduces thermal stress on every rubber component on the car.
  • After heavy rain events: Make a habit of checking all four door seals after any unusually heavy or sustained rainfall, because a borderline seal that held up to moderate rain will often start letting water through consistently after a storm puts it under real pressure for hours at a time.

What Most People Get Wrong About Door Seal Leaks

Plenty of bad advice circulates about car door seal leaking, and following it leads to repairs that fail quickly or cause new problems.

  • Myth: Silicone bath caulk works as a substitute for weatherstrip adhesive. It doesn't bond to rubber the way contact adhesive does, and it'll peel away from the seal within a few weeks of door cycling because it's designed for static joints, not dynamic rubber under repeated compression.
  • Myth: If the seal looks intact, it isn't the source of the leak. A seal can look perfectly fine from the outside while being compressed flat internally, losing all ability to create a barrier — always run the paper test before concluding the rubber itself is good.
  • Myth: If it only leaks in heavy rain, it's not a serious problem. A seal that leaks in heavy rain is already failing — conditions just haven't been severe enough yet to reveal the full extent of water intrusion. The rubber is degrading regardless of how much water you've seen so far.
  • Myth: Replacing one door's seal means replacing all four at once. Only replace seals that actually show degradation. The driver's side seal wears fastest from daily use, but rear passenger seals on a rarely-used door can be completely fine years after the driver's seal has failed and needs immediate replacement.
  • Myth: New or newer vehicles don't develop door seal problems. Seal quality varies significantly by manufacturer and trim level, and some vehicles develop consistent car door seal leaking issues within three to four years, particularly in climates with extreme temperature swings between seasons.

Frequently Asked Questions

How do I know if my car door seal is leaking versus a sunroof or windshield leak?

Use the spray test — have a helper move a garden hose slowly up the door from the bottom edge while you sit inside watching with a flashlight. If water enters at the door frame before your helper reaches the roofline, the door seal is the source. Sunroof leaks typically drip from the headliner above the center of the car, not from the door pillar area or the carpet beside the door sill.

Can I drive my car with a leaking door seal?

You can drive it, but every mile you put on it with water getting in makes the eventual repair more expensive and complex. Water that reaches door wiring triggers electrical problems — heated seats stop working, power windows become intermittent, and audio components fail — all of which cost far more to fix than the door seal that caused the intrusion in the first place. Fix it before the next rain event if at all possible.

How much does it cost to replace a car door seal at a shop?

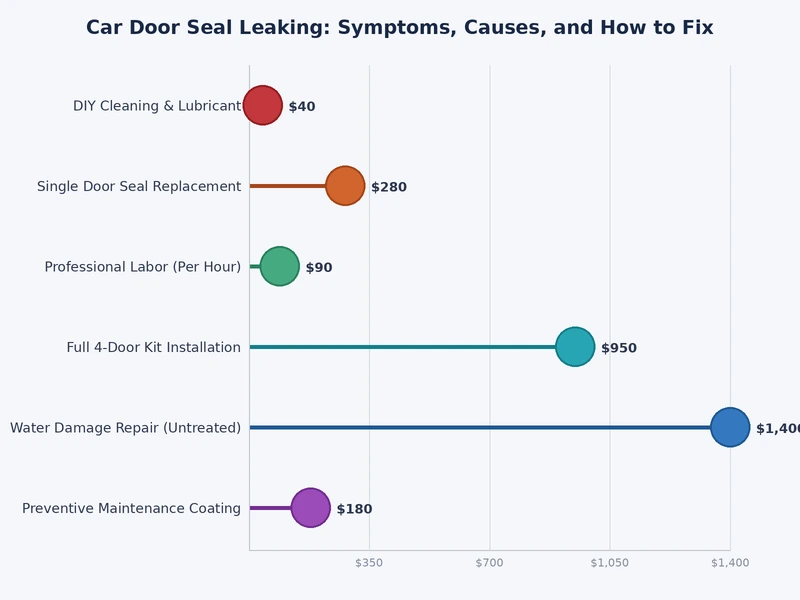
Expect to pay between $100 and $250 per door at a dealership or body shop, depending on your make, model, and whether the job is a simple reseating or a full weatherstrip swap. DIY with an OEM seal and a tube of weatherstrip adhesive typically runs $20 to $80 for a full replacement, and as little as $5 to $15 if you only need to reseat a section that has lifted.

Why does my door seal leak on only one side of the car?

The driver's door seal wears out first on almost every vehicle because it cycles open and closed far more frequently than any other door. If one side leaks and others don't, it's usually a combination of use frequency, a minor hinge misalignment specific to that door, or a drain hole that's clogged only on that side. Inspect all four doors individually, but prioritize the one you use every day.

How long should a replacement door seal last?

A quality OEM or OEM-equivalent seal, installed correctly with the right adhesive and maintained with silicone lubricant two to three times a year, should last 7 to 12 years in a moderate climate. Extreme heat or cold — particularly repeated freeze-thaw cycling — shortens that range to 5 to 8 years. Cheap universal seals from discount suppliers often fail within 2 to 3 years regardless of climate.

Will a leaking door seal affect my car's resale value?

Yes, significantly — especially if water intrusion has already caused visible mold growth, stained carpet, or triggered electrical failures inside the cabin. Any experienced used car buyer will smell the interior and press on the floor carpet; spongy, wet foam beneath the carpet is a red flag that immediately signals deferred maintenance and potential hidden damage throughout the door cavities and underbody.

Can I use Flex Seal or a spray rubber coating on my door weatherstripping?

No. Products like Flex Seal are formulated for static hard surfaces — gutters, boat hulls, and pipe joints — not for dynamic rubber seals that flex, compress, and decompress hundreds of times a day with normal door use. They won't bond to the rubber compound properly, they'll block the seal's designed compression behavior, and they'll peel away from the door frame within weeks while potentially making the underlying repair harder to execute correctly.

Key Takeaways

  • Car door seal leaking almost always comes from one of three causes — aged rubber, door misalignment, or a clogged drain hole — so diagnose before you buy any parts.
  • The paper test, spray test, and daylight test together give you a precise leak location and severity assessment before you spend a dollar on materials or labor.
  • DIY repair with weatherstrip adhesive is reliable and inexpensive for most leaks; hand the job to a shop when the door frame has rust or the door sits visibly out of alignment with the body panel.
  • Wiping seals clean at every wash and applying silicone lubricant two to three times a year is the single highest-leverage habit for doubling seal lifespan and preventing future water intrusion.

About Sarah Whitfield

Sarah Whitfield is a diagnostics and troubleshooting specialist who spent ten years as an ASE-certified technician before joining the editorial team. She specializes in OBD-II analysis, electrical gremlins, and the kind of intermittent problems that make most owners give up.

Get some FREE car parts & gear.. Or check out the latest free automotive manuals and build guides here.

Disable your ad blocker to unlock all the hidden deals. Hit the button below 🚗