Car Overheats at Idle But Not Highway: 6 Causes & Fixes

by Sarah Whitfield

On a sweltering afternoon, a client pulled into our shop with steam rising from under the hood. The temperature gauge had climbed deep into the red at every traffic light, yet the moment the driver merged onto the freeway, the needle dropped back to normal. This pattern — where a car overheats at idle but not during highway driving — is one of the most diagnostically informative cooling system symptoms we encounter. It narrows the problem significantly and points directly at the components responsible for low-speed heat management.

The good news is that this specific behavior eliminates a large portion of potential causes. If the engine held temperature on the highway, the water pump and most of the cooling circuit are functioning under load. The problem almost always lives in components that work hardest when the vehicle is stationary: the cooling fan, the radiator airflow path, or the thermostat. Our team has diagnosed hundreds of these cases, and the six causes outlined below account for the overwhelming majority of them. For anyone who has also noticed a coolant puddle under their car alongside this symptom, combining those two observations almost always points to a specific leak source that demands immediate attention.

car overheats at idle — temperature gauge climbing toward red in stop-and-go traffic
Figure 1 — A temperature gauge climbing toward the red at idle while remaining stable at highway speed is the defining signature of a cooling fan or airflow failure.
bar chart showing frequency of six causes when a car overheats at idle but not at highway speed
Figure 2 — Relative frequency of the six most common causes identified when a car overheats at idle but remains stable at highway speed, based on our diagnostic experience.

Understanding Why a Car Overheats at Idle

Before reaching for any tools, our team always takes a moment to understand the underlying physics. Idle overheating is a symptom, not a cause, and its distinctive pattern — heat building at rest, then dissipating at speed — provides a reliable roadmap to the failing component.

The Physics Behind Idle Overheating

An internal combustion engine cooling system manages heat through two primary mechanisms: forced airflow through the radiator core and active coolant circulation via the water pump. At idle, both mechanisms operate at their minimum capacity. The engine produces heat continuously, but the cooling system must compensate without the benefit of ram air generated by vehicle motion.

  • The water pump runs at low RPM at idle, reducing coolant flow through the radiator.
  • No ram air passes through the front grille to assist heat transfer.
  • The electric cooling fan becomes the sole source of airflow across the radiator core.
  • Heat accumulates faster than it can dissipate if the fan is compromised in any way.

This is why idle overheating is so revealing. Every component except the fan and the radiator's passive capacity is operating within its normal envelope. The fan failure stands alone as the thermal bottleneck.

Why Highway Driving Masks the Problem

At highway speed — typically above 35 to 40 mph — ram air flowing through the grille compensates for almost any moderate fan deficiency. The radiator receives abundant airflow regardless of whether the electric fan is spinning. This is precisely why the problem disappears at speed: the vehicle's forward motion effectively bypasses the failing component and creates a false sense of normalcy.

  • Ram air at 45 mph produces airflow roughly equivalent to a properly functioning electric cooling fan.
  • A completely failed fan will show no temperature symptoms whatsoever during highway driving.
  • Low coolant may similarly hide at speed due to improved pump flow at higher RPM.
  • This masking effect is dangerous — drivers often conclude the problem has resolved itself, then encounter overheating again the next time they sit in traffic.

Six Causes: From Minor to Severe

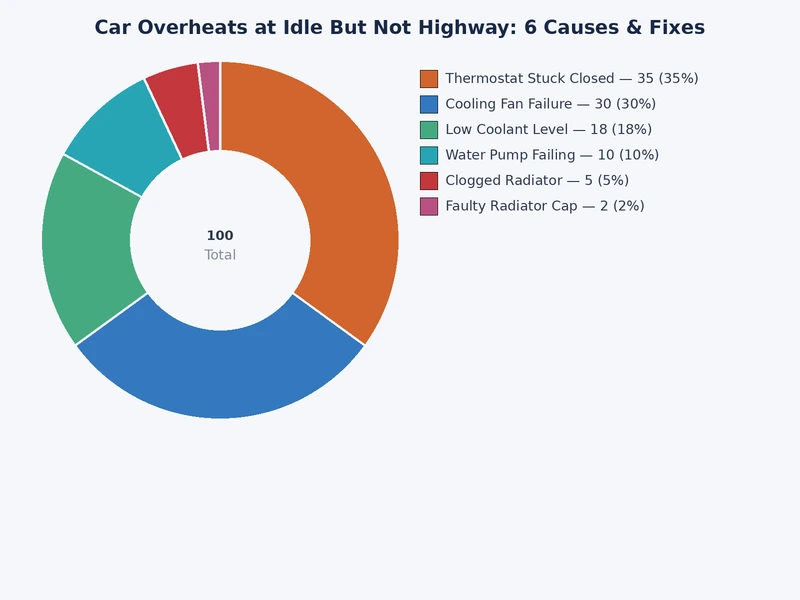
Our team ranks these causes roughly by frequency across the vehicles we service. The first two are far more common than most drivers realize, while the last represents a worst-case scenario that demands immediate action. The table below provides a quick reference before the detailed breakdown that follows.

# Cause Primary Indicator DIY Difficulty Estimated Repair Cost
1 Faulty Cooling Fan Fan not spinning at operating temperature Moderate $50–$500
2 Low Coolant Level Low reservoir, possible external puddles Easy $20–$80 (flush & refill)
3 Clogged Radiator Uneven radiator surface temperature, visible debris Moderate $100–$900 (flush or replace)
4 Bad Thermostat Rapid gauge spike after warm-up, erratic readings Easy–Moderate $150–$300
5 Failing Water Pump Whining noise, weep hole seepage, overheating Advanced $300–$750
6 Head Gasket Failure White exhaust smoke, milky oil, bubbling reservoir Shop-level $1,200–$3,000+

1. Faulty or Inoperative Cooling Fan

This is the single most common reason a car overheats at idle but remains stable on the highway. Electric cooling fans — used on virtually all modern vehicles — are controlled by a relay, a coolant temperature sensor, or the ECU directly. A failed fan motor, blown fuse, defective relay, or inaccurate temperature sensor can all result in the fan simply never activating.

  • Fan motor failure: Motor brushes wear over time. The blades may spin freely by hand but draw no electrical power under load.
  • Failed fan relay: The relay is the most common electrical weak point. It costs $10–$20 and should be tested or swapped before condemning the motor.
  • Coolant temperature sensor (CTS) failure: If the CTS sends incorrect data to the ECU, the fan never receives its activation signal. The engine can be at 220°F while the sensor reports 160°F.
  • Broken fan blade or damaged shroud: Physical damage sharply reduces airflow even when the motor is running at full speed.
  • Dual-fan systems: Many vehicles run two fans in series. One failed fan may reduce capacity enough to cause idle overheating while the remaining fan creates the illusion of normal operation.

Warning: Never assume a running fan is a healthy fan. Our team always verifies fan speed and blade integrity under load — a motor running at half speed due to worn brushes will pass a quick visual check but fail under real thermal demand in stop-and-go traffic.

2. Low Coolant Level

Low coolant reduces the system's overall thermal capacity and creates air pockets that interrupt circulation. At idle, where the pump runs slowly, air locks become trapped near the thermostat housing or heater core inlet and produce localized hot spots that the temperature gauge registers before the bulk coolant temperature has risen significantly.

  • Check the coolant reservoir when the engine is completely cold. The level should sit between the MIN and MAX marks.
  • A consistently dropping reservoir points to a leak — not normal evaporation. Evaporation loss over an entire season amounts to a fraction of an ounce.
  • For minor seepage while arranging a permanent repair, our team has reviewed the best radiator stop leaks in detail — they are a legitimate short-term measure when used correctly.
  • Inspect the radiator cap seal and pressure valve. A cap that fails to hold pressure effectively lowers the coolant's boiling point and accelerates vapor pocket formation.

3. Clogged or Restricted Radiator

A radiator clogged internally with mineral scale or externally with road debris cannot transfer heat efficiently. The restriction is far more pronounced at idle because there is no ram air to compensate for the reduced core capacity. Our team finds this cause most often in high-mileage vehicles with a history of infrequent coolant changes.

  • External blockage: Insects, leaves, and road debris pack between the fins over time. A gentle rinse with a garden hose — directed from the engine side outward — clears most surface contamination.
  • Internal scaling: Mineral deposits from years of neglected coolant reduce tube diameter progressively. A chemical flush is required, and in severe cases, replacement is more cost-effective than flushing.
  • Radiator fin damage: Bent fins interrupt the laminar airflow across the core. Fin-straightening tools exist, but extensive damage warrants core replacement.
  • Clogged radiator cap overflow tube: A blocked overflow path prevents the expansion tank from functioning correctly, causing coolant loss and pressure fluctuations.

4. Stuck or Failed Thermostat

The thermostat regulates coolant flow between the engine block and the radiator. A thermostat stuck in the closed position traps hot coolant inside the engine with no path to the radiator for dissipation. The result is rapid overheating — particularly noticeable at idle where the already-reduced pump flow is further blocked.

  • A stuck-closed thermostat causes the temperature gauge to spike quickly and dramatically shortly after the engine reaches normal warm-up temperature.
  • A stuck-open thermostat causes the opposite — the engine runs cold, the heater underperforms, and fuel economy drops. This is a different symptom profile entirely.
  • Thermostat replacement is one of the most cost-effective repairs in the cooling system. Our team replaces the thermostat as a matter of course during any cooling system overhaul — the part itself costs $10–$30 and the labor overlap is minimal.
  • Always replace the thermostat gasket or O-ring simultaneously. Reusing old sealing components invites immediate leaks.

5. Failing Water Pump

A deteriorating water pump impeller — particularly plastic impellers that have slipped on the shaft or corroded — may circulate sufficient coolant at high engine RPM but deliver inadequate flow at idle. This produces the idle-only overheating pattern precisely because the deficiency only appears when pump demand is lowest.

  • Listen for a whining or grinding noise from the front of the engine, particularly during warm-up.
  • Inspect the weep hole on the pump body for coolant seepage. This is a deliberate design feature — it signals that the internal seal is failing and replacement is imminent.
  • On timing belt-driven water pumps, our team replaces the pump every time a new belt is installed. Skipping the pump to save $100 on a $600 job is false economy.
  • Plastic impeller slippage is particularly common on older GM, Ford, and some European applications. The impeller spins freely on the shaft while the pulley rotates normally — the only reliable detection method is flow testing or removal.

6. Head Gasket Compromise

A failing head gasket allows combustion gases to enter the cooling system. These gases pressurize the coolant passages and displace liquid coolant, creating air pockets that prevent proper circulation. The result is a system that cannot manage heat effectively regardless of fan or thermostat condition. This is the most serious cause on this list.

  • White or sweet-smelling exhaust smoke at startup or during idle is a classic indicator of coolant entering the combustion chamber.
  • Milky or frothy engine oil — visible on the dipstick or under the oil filler cap — confirms coolant is mixing with the lubricant.
  • Bubbling in the coolant reservoir while the engine runs indicates combustion gas intrusion into the cooling passages.
  • Recurring low coolant with no external leak visible points strongly toward internal consumption via a gasket breach.

Anyone also noticing smoke coming from under the hood alongside idle overheating should treat the situation as an emergency. Operating the vehicle further risks warped cylinder heads and catastrophic engine damage.

Step-by-Step Diagnosis Procedure

Our team follows a structured diagnostic sequence to avoid misdiagnosis and unnecessary parts replacement. Each step builds on the previous one, progressively narrowing the suspect list. Skipping steps to save time invariably leads to replacing the wrong component first.

Initial Visual Inspection

  1. Allow the engine to cool completely before opening the radiator cap or disturbing any cooling system components. A pressurized hot system causes severe scalding burns.
  2. Inspect the coolant reservoir. Note the fluid level and color. Healthy coolant is bright green, orange, pink, or yellow depending on formulation. Brown, oily, or foamy coolant indicates contamination.
  3. Check the oil dipstick and filler cap underside. A milky or mayonnaise-like residue confirms coolant-oil mixing and points directly to a head gasket or cracked block.
  4. Look for external leaks. Inspect hose clamp areas, the radiator end tanks, water pump housing, and heater hose connections. Dried coolant residue (white or rusty deposits) marks the leak location.
  5. Inspect the radiator fins from the front. Debris accumulation, bent fins, and physical damage from road impacts are immediately visible.
  6. Observe the cooling fan at operating temperature. With the engine warmed up and idling, the electric fan should activate clearly and audibly. If it does not, proceed to electrical diagnosis before assuming a mechanical fault.

Pressure and Temperature Testing

  1. Apply a cooling system pressure tester to the cold radiator cap opening. Pressurize to the cap's rated pressure (typically 13–18 psi). Watch for pressure drop over 10–15 minutes — any drop indicates a leak in the system.
  2. Use an infrared thermometer to scan the radiator surface in a grid pattern. Cold spots among otherwise hot tubes indicate blocked passages. A uniform temperature gradient from the inlet to the outlet confirms adequate flow.
  3. Test the thermostat off the vehicle. Submerge it in a pot of water and heat it to boiling. A functional thermostat opens fully at its rated temperature (commonly 180–195°F / 82–90°C). One that remains closed in boiling water is definitively faulty.
  4. Check the fan relay and circuit with a multimeter. Test for voltage at the fan motor connector with the engine at operating temperature. Bypass the relay socket with a fused jumper wire to confirm whether the fan motor itself is functional independently of its control circuit.
  5. Use a combustion leak tester (block tester) on the coolant reservoir or radiator neck. The chemical indicator changes from blue to yellow in the presence of exhaust gases, confirming head gasket intrusion without engine disassembly.
diagnostic checklist for tracing idle overheating causes step by step
Figure 3 — Our recommended diagnostic checklist for systematically tracing idle overheating to its root cause before purchasing any replacement parts.

Quick Wins: Immediate Actions to Take

While a complete repair may require parts and professional labor, several immediate steps can stabilize the situation and prevent further engine damage while arranging a proper fix. These are the actions our team recommends taking the same day the symptom appears.

Checking and Topping Off Coolant

  • Topping the reservoir to the MAX mark is always the first action. It costs nothing and immediately eliminates the simplest possible cause.
  • Use the correct coolant formulation for the specific vehicle — mixing incompatible types (green conventional with orange OAT, for example) causes gel formation and accelerated internal corrosion.
  • In a genuine roadside emergency, distilled water is an acceptable temporary top-off. Tap water introduces minerals that accelerate scale buildup inside the radiator and water pump passages.
  • If the reservoir empties again within days, a pressure test to locate the source of coolant loss is mandatory — not optional. Repeatedly topping off a leaking system without finding the source is not a maintenance strategy.

Verifying Fan Operation

  • Turn on the air conditioning. On most vehicles, the A/C system triggers the cooling fan regardless of engine coolant temperature. If the fan runs with A/C active but not at operating temperature alone, the coolant temperature sensor or its circuit is the most likely culprit — not the fan motor itself.
  • Locate the cooling fan fuse and relay in the under-hood fuse box (listed in the owner's manual). Swap the relay with an identical-spec relay from another non-critical circuit to test it quickly without purchasing a new part.
  • With the engine at full operating temperature and the vehicle stationary, the fan should be clearly audible. A fan that is silent in these conditions is not functioning, regardless of what any previous visual inspection suggested.

Tools and Equipment for Cooling System Work

Having the correct tools eliminates guesswork, reduces diagnostic time substantially, and prevents the trial-and-error parts replacement pattern that costs far more in the long run. Our team considers the following items non-negotiable for any cooling system diagnosis or repair.

Essential Diagnostic Tools

  • Cooling system pressure tester kit: Available for under $50. Most kits include adapters for different radiator cap neck diameters. This single tool can confirm or definitively rule out system leaks in under 15 minutes — no professional equipment required.
  • Infrared thermometer: Essential for scanning the radiator surface temperature distribution and identifying blocked tube sections or thermostat failure patterns. A reliable basic model costs $20–$40 and has dozens of other diagnostic uses.
  • Digital multimeter: Required for fan circuit diagnosis — testing voltage at the fan motor connector, measuring relay coil resistance, and checking coolant temperature sensor resistance against published specification charts.
  • OBD-II scanner: Reads live coolant temperature sensor data in real time. Comparing the scanner's reported coolant temperature against an infrared reading of the thermostat housing immediately identifies a failed or miscalibrated sensor.
  • Block tester (combustion leak detector): A $30–$50 tool using a chemical indicator fluid. It provides a definitive head gasket assessment without engine disassembly and eliminates the most expensive cause early in the process if the result is negative.

Replacement Parts Overview

  • Cooling fan assembly: OEM or equivalent-grade aftermarket is the firm recommendation. Budget-tier assemblies with undersized motors frequently underperform within two service seasons and return the vehicle to the same condition.
  • Fan relay: Always replace the relay before the motor. At $10–$20, it resolves the problem in the majority of electrical fan failures and eliminates the most common cause with minimal investment.
  • Thermostat and housing gasket: Replace as a matched set. Reusing the old gasket on a new thermostat is the leading cause of immediate post-repair leaks at the housing.
  • Coolant temperature sensor: A $15–$40 part that is chronically overlooked in fan diagnostics. Verifying sensor accuracy against a known temperature reference is mandatory before condemning a fan motor that may be perfectly functional.
  • Water pump: Stick to OEM or established aftermarket brands with steel impellers. Plastic impellers are a documented failure point on high-mileage applications and are not worth the marginal cost savings.

Preventive Maintenance for Long-Term Cooling Health

The overwhelming majority of idle overheating cases our team encounters were preventable. A neglected cooling system does not fail suddenly — it degrades progressively until a minor inefficiency becomes a roadside emergency or an engine replacement. Consistent, basic maintenance interrupts that progression.

Coolant Flush Schedule

Coolant is a consumable fluid. Its corrosion inhibitors deplete over time, its pH drops, and degraded coolant becomes acidic — actively attacking aluminum components from within the passages it was designed to protect. Our team recommends the following minimum intervals:

  • Conventional green coolant (IAT formulation): Flush every 2 years or 30,000 miles, whichever arrives first.
  • Extended-life OAT or HOAT coolant (orange, pink, yellow formulations): Flush every 5 years or 50,000 miles.
  • After any confirmed overheating event: Flush immediately, regardless of coolant age. Sustained high heat accelerates inhibitor breakdown and may have introduced combustion residue or scale deposits into the system.
  • Radiator cap inspection at every flush: The cap's pressure seal and vacuum valve are wear components. Replacing the cap every two to three flushes costs $10–$15 and eliminates a pressure-related boil-over risk.

Fan and Radiator Inspections

Our team integrates the following checks into every routine service visit. None of them require specialized equipment, and catching degradation early prevents the conditions that lead to idle overheating.

  • Inspect the electric fan wiring harness connector for green corrosion or cracked insulation at every oil change interval. This is the highest-failure-rate point in the fan circuit and takes thirty seconds to examine.
  • Rinse the exterior radiator fins with low-pressure water at least once per season. Debris accumulation is silent and progressive — the radiator can lose 20–30% of its airflow capacity before any symptom appears.
  • Squeeze the upper and lower radiator hoses with the engine cold. A hose that feels soft, mushy, or gritty inside has degraded and will collapse or burst under operating pressure. Replace hoses that show any of these characteristics immediately.
  • Confirm the coolant reservoir cap seats securely and its seal is intact. A loose or cracked cap prevents the system from reaching design pressure, effectively lowering the coolant's boiling threshold by 20–30°F and creating marginal operation under normal load.
  • After any front-end collision — even a minor impact — inspect the radiator fins, fan shroud, and fan blade clearance. Even a minor strike can bend the shroud into the fan blades and create an intermittent failure that only appears under sustained idle conditions.

Frequently Asked Questions

Why does a car overheat at idle but cool down on the highway?

At highway speed, ram air flowing through the front grille provides sufficient airflow across the radiator without any assistance from the electric cooling fan. At idle, the cooling fan is the sole source of radiator airflow. When the fan fails — due to a motor fault, relay failure, or a faulty coolant temperature sensor — heat accumulates rapidly at idle but dissipates the moment the vehicle reaches highway speed and ram air compensates for the non-functioning fan.

How urgent is it to address a car overheating at idle?

Extremely urgent. Sustained overheating — even brief episodes — warps cylinder heads, degrades head gaskets, and can score cylinder walls or seize piston rings. Our team considers any confirmed overheating event a do-not-drive situation until the root cause is identified and corrected. Continuing to operate the vehicle typically converts a $150 fan relay replacement into a $2,500 head gasket repair or worse.

Can a bad thermostat cause a car to overheat only at idle?

Yes. A thermostat stuck in the closed position prevents coolant from reaching the radiator for heat dissipation. At idle, where the water pump circulates coolant slowly and no ram air assists the radiator, this blockage causes rapid temperature spikes. At higher RPM, the water pump generates enough pressure to force limited coolant past the partially stuck thermostat, which is why the symptom may appear reduced at speed — but the underlying failure remains and will worsen.

What is the typical cost to repair a car that overheats at idle?

Cost varies substantially by root cause. A fan relay swap runs $50–$100 with labor. A replacement cooling fan assembly costs $150–$500 installed depending on the vehicle. Thermostat replacement typically falls between $150 and $300. A water pump replacement ranges from $300 to $750 depending on engine configuration and whether a timing belt replacement is performed simultaneously. Head gasket repair represents the worst-case outcome at $1,200 to $3,000 or more — a figure that underscores why early diagnosis is critical.

How often should coolant be flushed to prevent overheating problems?

Conventional green coolant should be flushed every 2 years or 30,000 miles. Extended-life OAT and HOAT formulations — orange, pink, and yellow types — are rated for 5 years or 50,000 miles. After any overheating incident, our team recommends an immediate flush regardless of coolant age, since the thermal event accelerates corrosion inhibitor breakdown and may have introduced scale or combustion residue into the passages. Following manufacturer intervals consistently is the single most effective preventive measure against premature cooling system failure.

Final Thoughts

A car that overheats at idle but remains stable on the highway is communicating a precise and actionable diagnosis — one that almost always resolves with a cooling fan repair or coolant service rather than a catastrophic engine replacement, provided the warning is acted on without delay. Our team recommends starting with the two-minute checks first: confirm the coolant level and listen for fan activation at operating temperature. From there, schedule a cooling system pressure test at the nearest opportunity and work through the six causes in the order presented here — beginning with the inexpensive and progressing only as far as the evidence requires.

About Sarah Whitfield

Sarah Whitfield is a diagnostics and troubleshooting specialist who spent ten years as an ASE-certified technician before joining the editorial team. She specializes in OBD-II analysis, electrical gremlins, and the kind of intermittent problems that make most owners give up.

Get some FREE car parts & gear.. Or check out the latest free automotive manuals and build guides here.

Disable your ad blocker to unlock all the hidden deals. Hit the button below 🚗