by Diego Ramirez
You're running your hand across a freshly washed hood and you feel that rough, gritty texture telling you the wash didn't fix the problem. If you've been wondering about clay bar vs iron remover and which one to reach for first, you're asking exactly the right question. Both products remove contamination that washing alone can't lift, but they work through different mechanisms and target entirely different types of particles embedded in your paint.
Getting the sequence right between these two products determines whether your wax, sealant, or ceramic coating actually bonds to a clean foundation. If you skip one step or use them in the wrong order, you risk dragging iron particles across your clear coat or sealing debris beneath your protection layer. If you want to keep your car's paint gloss looking its best long-term, this decontamination step is where every other product you use gets its foundation.
Contents
The confusion about these two products usually starts with assuming they do the same job, but they actually target completely different types of paint contamination through completely different processes.
A clay bar works by physically shearing embedded particles from your clear coat as it glides across a lubricated surface. It doesn't rely on chemistry — it uses mechanical contact to pull contaminants that have bonded to the paint and won't respond to regular washing. You can find top-rated options for every budget in our best clay bars guide. Clay bar is most effective against:
After claying, your paint should feel smooth like glass under a bare hand, and that tactile difference is your confirmation that the mechanical decontamination worked as intended.
Iron remover is a chemical decontamination product that targets ferrous contamination specifically, dissolving iron-based particles through a reactive process rather than physical force. When you spray it on, the product turns purple or dark red as it reacts with embedded iron particles, and that color change is your visual confirmation that contamination was present. According to Wikipedia's overview of automotive washing and detailing, ferrous contamination from brake dust is one of the primary accelerators of clear coat degradation on highway-driven vehicles. Iron remover is designed to reach:
For a detailed look at how iron contamination forms and what it does to your paint over time, our guide on removing iron fallout from car paint walks through the full process step by step.
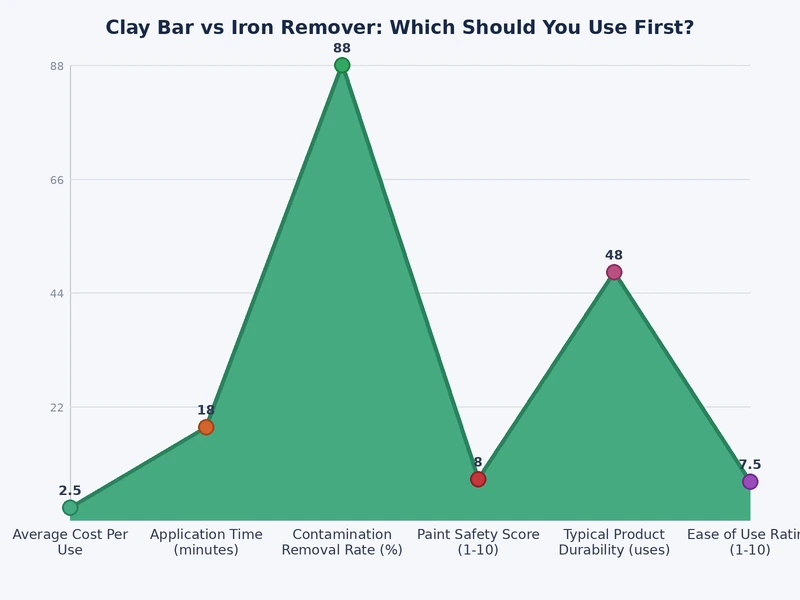
Both products are affordable compared to professional detailing service rates, and knowing the price tiers upfront helps you buy smart without overspending on more product than you need.
If you're new to paint decontamination and want to test the process before committing to premium products, entry-level options work well for a first-time deep clean:
Stepping up to mid-range products typically means a better formula, more coverage per bottle, and a finer clay grade that reduces marring risk on sensitive paint. Here's how the pricing tiers stack up across both categories:
| Product Type | Price Range | Coverage per Use | Best For |
|---|---|---|---|
| Entry clay bar (100g) | $10–$18 | 1 full car | Beginners, casual detailers |
| Mid-range clay bar (200g) | $20–$35 | 1–2 full cars | Enthusiasts, seasonal detailers |
| Professional clay bar kit | $35–$60+ | 2–4 full cars | Detail shops, frequent detailers |
| Entry iron remover (16 oz) | $10–$20 | 1–2 full cars | First-time users, light contamination |
| Mid-range iron remover (32 oz) | $20–$35 | 2–4 full cars | Regular detailers, heavier use |
| Professional iron remover (gallon) | $40–$70+ | 8–12 full cars | Detail shops, multi-vehicle owners |
If you're detailing more than two vehicles per year, mid-range products pay for themselves within a single season because the cost per application drops considerably at that tier.
You don't always have time for a full two-step decontamination process, and knowing which product gives you the biggest visible improvement helps you prioritize when your schedule is tight.
Iron remover is your fastest visible win — spray it on, wait three to five minutes, and watch the purple reaction spread across contaminated areas of your paint. That color change is immediate feedback that the chemistry is working, and it requires no hand pressure, technique, or specialized equipment to trigger. The before-and-after on light-colored paint after a single iron remover pass is striking enough that you'll immediately understand why this step belongs in your routine.
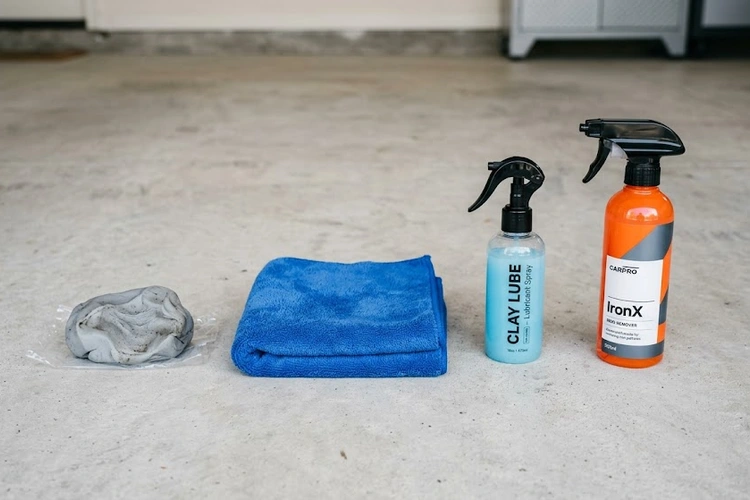
The plastic bag test is the fastest way to feel what claying actually does — slide a plastic-bag-covered hand across your paint before and after a clay session and compare the two textures. Before claying, you'll feel resistance and roughness; after claying, your hand glides like you're running it across polished glass. You can demonstrate this improvement on a single panel in under 20 minutes, and starting with the hood or roof — where contamination tends to be heaviest — gives you the most satisfying result fastest.
Having everything assembled before you start prevents mid-session interruptions and ensures you're not making compromises with the wrong materials at a critical moment in the process.
Before picking up a clay bar, gather everything on this checklist first:
Starting with a proper two-bucket car wash before claying removes loose surface dirt and significantly lowers your risk of dragging abrasive grit across your paint during the clay bar process.
Iron remover requires less equipment than clay, but a few specific items make the process safer and more effective:
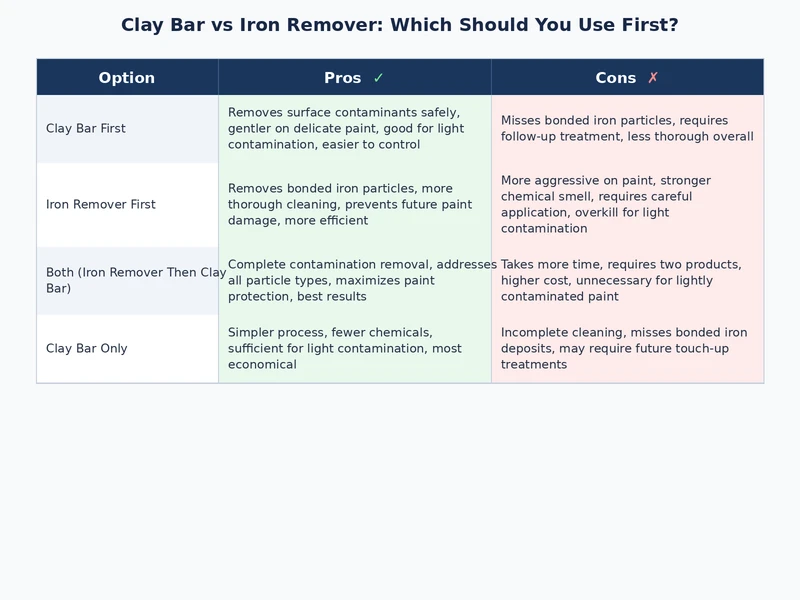
The most common question about these two products is which one to use first, and the answer is straightforward: iron remover always goes before the clay bar, without exception.
Here's the full decontamination process in the correct order from start to finish:
The reason iron remover goes first is that clay dragging over undissolved iron particles creates microscopic scratches across your clear coat with every single pass. If your paint has heavy old wax buildup sitting on top before you begin, our guide on removing old wax buildup from car paint covers how to clear that layer cleanly before you start the decontamination sequence.
These technique details separate a clean, scratch-free result from a frustrating one that leaves marring on your clear coat:
The right approach shifts depending on what the vehicle has been through and what you're trying to accomplish with the decontamination session.
A vehicle driven in stop-and-go urban traffic builds brake dust contamination quickly, especially on lower panels and around the wheel arches. In this situation, iron remover isn't optional — the ferrous contamination goes deeper than a clay bar can physically reach without the chemistry working first. Spray the lower panels and watch for the purple reaction to develop within a minute — that's a direct indicator of how much ferrous contamination is present, and it tells you precisely what your clay bar would have been dragging across without this step. Heavily contaminated daily drivers often need two iron remover passes before the color reaction diminishes enough to confirm that most of the iron has been dissolved and neutralized.
When you're preparing your car for sale, a full decontamination sequence is one of the highest-value steps you can take for the time invested. Buyers notice the way a properly decontaminated paint surface reflects light and feels under their hand, even when they can't articulate exactly what's different about it. A complete iron remover and clay bar treatment on a vehicle that hasn't been properly decontaminated in years often reveals gloss that the owner forgot the paint was capable of producing. If you're also working on an older vehicle with a delicate or aged clear coat, our guide on detailing a classic car without causing damage covers the gentler approach that older finishes require when you introduce chemical decontamination products.
These are the errors that experienced detailers see most often from people new to paint decontamination, and knowing them before you start protects your clear coat and your investment in both products.
You need both for a complete decontamination because they remove different types of contamination that neither product can address alone. Iron remover dissolves ferrous particles chemically through a reactive process, while clay bar mechanically lifts bonded surface debris that iron remover never touches. Using only one leaves your paint partially contaminated, which means any wax, sealant, or ceramic coating you apply afterward is bonding to a compromised surface rather than a truly clean one.
Iron remover can typically be used every three to six months, depending on how much brake dust and industrial fallout your vehicle accumulates from your driving environment. Vehicles in urban areas or near rail lines tend to need it more frequently than those driven primarily on rural roads. Clay bar is best used once or twice per year as part of a full detail, since repeated claying creates unnecessary wear on your clear coat over time, and most bars last through multiple full-car sessions before they're exhausted.
Yes, iron remover is highly effective on wheels and is actually where most vehicles show the most dramatic purple reaction, because brake dust accumulates in far greater concentrations on rim surfaces and inside wheel wells than anywhere on the body panels. Always check whether your specific iron remover formula is safe for coated, polished, or chrome alloy wheels before applying it, because some aggressive formulas can etch or stain certain wheel finishes if the product is left to dwell longer than the manufacturer recommends.
Apply iron remover first, follow with clay bar, and every protective layer you put on after that will finally bond to paint that's actually clean.
 |
 |
 |
 |

About Diego Ramirez
Diego Ramirez is a maintenance and care specialist who has been wrenching on cars since he was sixteen. He focuses on fluid changes, preventive care routines, paint protection, and the small habits that turn a five-year-old car into a fifteen-year-old car.
Get some FREE car parts & gear.. Or check out the latest free automotive manuals and build guides here.
Disable your ad blocker to unlock all the hidden deals. Hit the button below 🚗
| | | |