by Sarah Whitfield
Ever turned your steering wheel and heard a sharp, repeating click-click-click that wasn't there last week? A clicking noise when turning steering wheel is one of those symptoms that deserves your full attention — not because it always signals something catastrophic, but because every single cause gets worse the longer you wait. Catch it early and you're looking at a minor repair. Let it go, and you could face a steering failure at the worst possible moment.
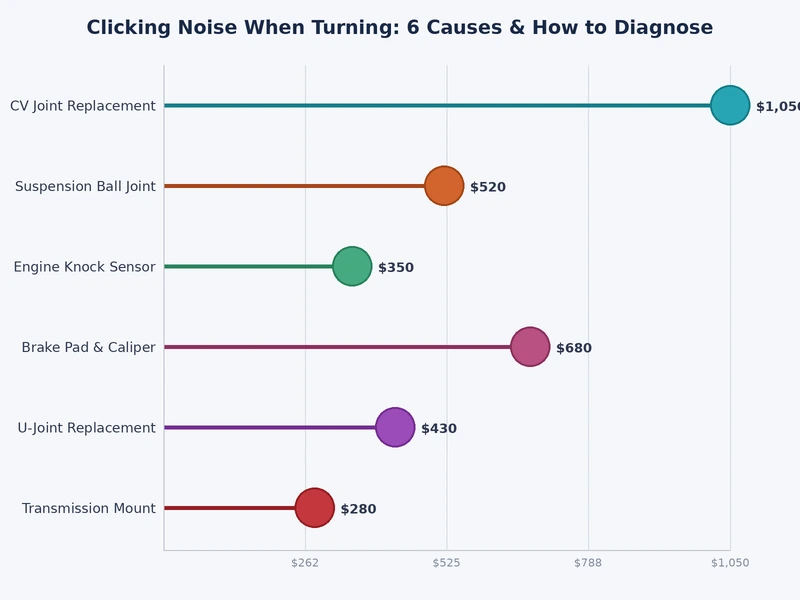
This guide covers all six common causes, walks you through a systematic diagnosis you can start in your own driveway, and breaks down what each fix realistically costs. Start with the most likely culprit — a worn CV joint — and work your way through the list.
Contents
Your front suspension and drivetrain are a network of joints, bearings, and fluid-filled chambers that absorb road shocks and translate your steering inputs into precise wheel movement. When any one of those components starts to wear, it announces itself — usually with a noise tied to a specific motion or load condition.
The main parts involved in steering-related noise are:
According to Wikipedia's overview of constant-velocity joints, CV joints are specifically engineered to transmit torque at a constant rotational speed regardless of the operating angle — which is precisely why they're so vulnerable when their protective rubber boots crack and grease escapes.
Not every noise from the front end points to the same component. The character of the sound tells you where to look first.
If your noise fits the "rapid click on turns" description, the CV joint is your first stop. If it's more of a single thud per steering input, start at the strut bearing and tie rod ends.
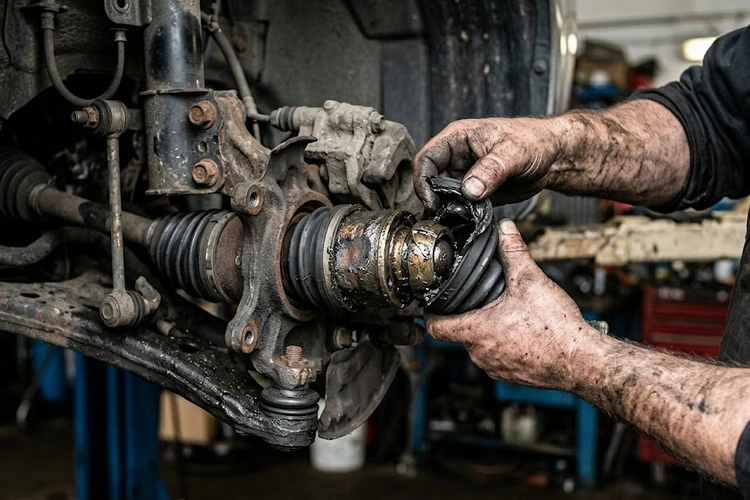
This is the number-one cause, and it has a very specific sound signature. CV joints are packed with grease and sealed inside a rubber boot. When the boot tears — from age, road debris, or a curb impact — the grease leaks out and contamination gets in. The joint wears unevenly, and clicking starts.
The click from a failing CV joint speeds up as you accelerate and gets louder the sharper you turn. Pulling out of a parking space with the wheel at full lock and hearing a rapid-fire clicking? That's a CV joint until proven otherwise. The outer CV joint (at the wheel end of the axle) fails far more often than the inner joint.
If you catch it at the boot stage, replacement is relatively inexpensive. Let the joint itself deteriorate, and you're looking at a full axle swap. See our CV joint replacement cost guide for a detailed breakdown of what to expect at the shop.
Pro Tip: Dark grease splattered on the inside of your wheel well is a dead giveaway that a CV boot has torn — inspect the joint before any clicking even begins.
The upper strut mount (also called the strut bearing plate or "top hat") allows the entire strut assembly to rotate as you turn the wheel. When this bearing wears out or the rubber mount deteriorates, steering produces a knock, click, or creak — typically at low speeds, when parking, or during slow U-turns.
Unlike the rapid click of a CV joint, strut bearing noise tends to be one distinct sound per steering input. You may also notice the steering wheel feels slightly notchy or heavier than usual on cold mornings. This wear pattern is most common on higher-mileage vehicles in climates with road salt, which accelerates corrosion of the bearing and mount hardware.
If the struts themselves are already showing signs of age — excessive bounce, nose-diving under braking — inspect the mount at the same service visit. They often need replacement together. Our article on bad shock absorber symptoms covers the full picture of what worn strut hardware looks and feels like.
Tie rod ends connect your steering rack to the front hubs. Each one contains a ball-and-socket joint that pivots with every steering input. Over time, the socket wears loose, creating play that manifests as a clicking or knocking sound during low-speed maneuvers and parking.
Worn tie rod ends also affect alignment. If the car drifts slightly, the steering feels vague on center, or your front tires show uneven edge wear, tie rod ends belong on your inspection list. Ignoring them long enough puts additional stress on the steering rack itself — a significantly more expensive repair than the tie rod ends would have been.
Ball joints handle both the vertical travel of your suspension and the lateral pivot of steering simultaneously — they're under load constantly. When they wear, you get a clicking or snapping sound that can closely mimic a CV joint. The key distinguishing factor: ball joint noise usually appears over bumps as well as during turns, not during turns alone.
This is a safety-critical component. A severely worn ball joint can separate from the knuckle under load, causing sudden and complete loss of steering control. Any perceptible play in a ball joint calls for immediate repair — not a "drive it a bit longer and see" situation.
Before you crawl under the car, spend 30 seconds on this one. A plastic hubcap or wheel cover that's lost a retaining clip will flex slightly during cornering and rattle against the wheel. The noise is typically random and inconsistent — it doesn't synchronize with wheel speed the way a CV joint click does.
Press firmly around the edge of each hubcap, or remove and reinstall them. If the clicking disappears on the next drive, you've found your answer at zero cost. It sounds obvious, but this simple check gets skipped far too often.
Hydraulic power steering systems use fluid to both lubricate internal components and provide steering assist. When the fluid is low or has degraded, the pump and steering rack can produce a groan, whine, or in some cases a rhythmic clicking under steering load — most pronounced at full lock with the engine running.
Pop the hood and check the power steering reservoir. It takes two minutes. Fluid that's dark brown or black instead of clear or light pink/red needs flushing. A low level points to a leak somewhere in the system that also needs addressing. If topping up the fluid doesn't resolve the noise, the pump or rack itself may be worn. For a deeper look at hydraulic steering problems, see our guide on power steering not working causes and fixes.
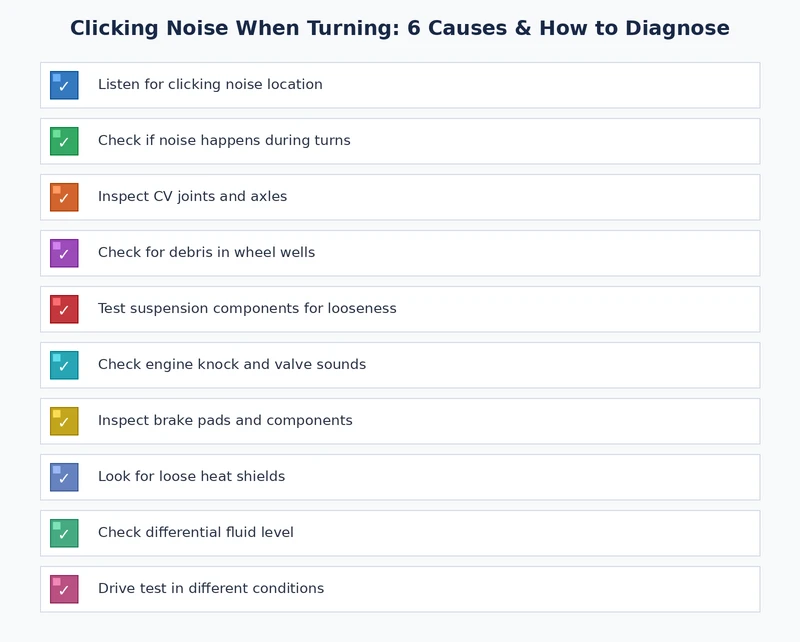
The conditions under which the clicking occurs give you your biggest diagnostic clue before you touch a wrench. Run these specific tests in an empty parking lot:
Diagnosing a steering noise alone is genuinely difficult. You're either focused on driving or focused on listening — rarely both at once. Bring a second person.
Warning: Never crawl under a vehicle supported only by a floor jack — use jack stands rated for your vehicle's weight every time, without exception.
You need to reproduce the noise deliberately and document when it appears. Note the following during your test drive:
With the engine off and parking brake set, visually inspect the front suspension:
For a thorough inspection of the joints and bearings, raise the front of the vehicle on jack stands and remove the wheels. This gives you a clear view of the CV boots, tie rod ends, and ball joint dust boots all at once.
With the vehicle safely elevated and the wheels off:
Any detectable play in the ball joint or tie rod end shake test is grounds for repair. These are load-bearing, safety-critical components — there's no acceptable margin of play in a worn ball joint.
If you've already replaced a component and the clicking noise when turning steering wheel comes back within a few months, something else is happening. Look for patterns that point to a secondary problem:
Preventing a repeat of the problem is straightforward if you stay consistent:
Some of these repairs are genuinely manageable for a home mechanic with basic tools. Others involve either specialty equipment or safety risk significant enough to make professional installation the right call every time. Here's an honest assessment:
| Repair | DIY Feasibility | Key Consideration |
|---|---|---|
| CV Axle (full replacement) | Moderate — doable at home | Requires axle nut socket and torque wrench; no alignment needed if nothing else disturbed |
| CV Boot Only | Moderate — time-consuming | Split boot kits eliminate axle removal; only viable if joint itself is still in good shape |
| Strut Bearing / Upper Mount | Difficult — professional recommended | Requires a spring compressor; dangerous without proper equipment; alignment check mandatory after |
| Tie Rod Ends | Moderate — alignment required after | Replacement is straightforward; skipping the post-repair alignment is a costly mistake |
| Ball Joints | Difficult — professional strongly recommended | Most require press-fit tools; safety-critical; improper installation is genuinely dangerous |
| Hubcap / Wheel Cover | Easy — no tools needed | Clip or screw retention only; takes minutes |
| Power Steering Fluid | Easy — 5-minute job | Locate the reservoir, check level, use the correct fluid specification for your vehicle |
CV axle replacement on a front-wheel-drive vehicle is a realistic weekend project with a floor jack, jack stands, and a basic socket set. Ball joints and strut mounts are a different story — the tools alone (a spring compressor, ball joint press) cost more than a single repair at an independent shop, and the consequences of getting it wrong are severe. Know the difference before you start.
The figures below reflect typical independent shop pricing — parts plus labor. Dealership rates run 20–40% higher. DIY costs reflect parts only.
The cost calculus is straightforward: a torn CV boot caught during routine inspection costs $100–$250 to repair. The same axle, run dry until the joint disintegrates, costs $350–$700 to replace — and if the damaged axle throws a vibration that goes unaddressed, it can accelerate wear on the transmission output seal or wheel bearing, adding hundreds more to the bill.
Act on the noise early. A clicking noise when turning steering wheel is your car giving you a head start on what's coming. Use it.
 |
 |
 |
 |

About Sarah Whitfield
Sarah Whitfield is a diagnostics and troubleshooting specialist who spent ten years as an ASE-certified technician before joining the editorial team. She specializes in OBD-II analysis, electrical gremlins, and the kind of intermittent problems that make most owners give up.
Get some FREE car parts & gear.. Or check out the latest free automotive manuals and build guides here.
Disable your ad blocker to unlock all the hidden deals. Hit the button below 🚗
| | | |