by Sarah Whitfield
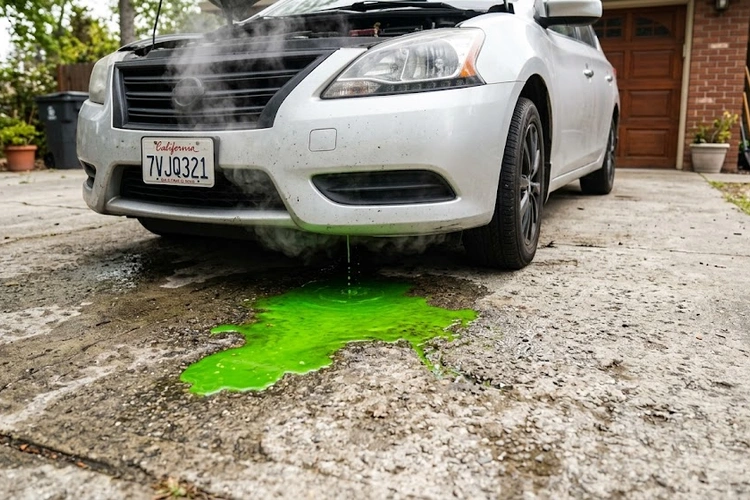
Cooling system failures account for roughly 40% of all engine-related roadside breakdowns, according to AAA fleet data — and a puddle of coolant leaking under car is the earliest warning sign most people walk right past. The color, texture, and exact position of that puddle carry more diagnostic information than most people realize. Catch it early and the repair is often a $15 hose clamp. Miss it and the same leak can produce a warped head, a cracked block, or a seized engine within a single commute.
Our team has tracked hundreds of these escalations in the shop. The pattern is consistent: the faster the identification, the lower the bill. This guide covers every common cause, shows how to separate a coolant puddle from other fluid leaks in seconds, and walks through the step-by-step diagnostic process our team relies on. We also give an honest assessment of stop-leak additives — including exactly when they help and when they make things significantly worse.
Contents
Not every puddle under a car signals a coolant problem. Our team regularly sees engine oil, brake fluid, transmission fluid, and plain AC condensate misidentified as coolant. Getting the identification wrong means chasing the wrong repair entirely. For a detailed look at oil-based puddles specifically, our guide on oil puddles under a car covers every common source and what each one means.
The table below shows the key differences at a glance:
| Fluid | Common Colors | Texture | Smell | Action Required |
|---|---|---|---|---|
| Coolant / antifreeze | Green, orange, pink, blue, yellow | Slick, slightly viscous | Sweet, syrupy | Diagnose immediately — do not overheat |
| Engine oil | Amber to black | Thick and oily | Burnt, acrid | Monitor closely — schedule repair |
| Brake fluid | Clear to pale yellow | Thin and slippery | Mildly chemical | Critical — do not drive |
| Transmission fluid | Red to dark brown | Thin and oily | Slightly sweet or burnt | Schedule prompt inspection |
| AC condensate | Clear water, no color | Watery, no residue | None | Normal — no action needed |
| Power steering fluid | Clear to reddish | Thin and oily | Slightly burnt | Inspect pump and lines |
Puddle location narrows the diagnosis significantly before any tools come out:
The sweet, almost candy-like odor of ethylene glycol is the single fastest identifier. That smell distinguishes coolant from every other fluid under the hood. It also signals a serious toxicity risk — ethylene glycol is acutely toxic to pets and wildlife even in small amounts, so cleaning up puddles from driveways and garage floors matters beyond the mechanical concern.
AC condensate is clear, odorless, and leaves zero residue on pavement. If the puddle carries any color or sweetness at all, it is not condensation. Our team consistently encounters vehicles where the owner dismissed early coolant puddles as AC water — sometimes for weeks — before the temperature gauge spiked. By that point the repair cost had frequently tripled or worse.
The rag test settles it instantly: press a white cloth into the puddle. AC water disappears cleanly. Coolant leaves a visible stain. Our team also checks for smoke coming from under the hood alongside any sweet smell — that combination almost always confirms coolant contacting a hot engine surface rather than an oil-related issue.
Any non-clear puddle with a sweet smell is a coolant problem until proven otherwise — our team's rule is that no amount of wishful thinking changes that diagnosis.
Assuming coolant is always green leads to missed diagnoses on a wide range of modern vehicles. Manufacturers use distinctly different formulas:
Any of these colors found in a puddle means coolant leaking under car. Checking the color in the overflow reservoir confirms which formula is in the system and prevents mixing errors during the top-off or flush process.
These conditions require pulling over at the first safe opportunity and shutting the engine off — not driving to the next exit:
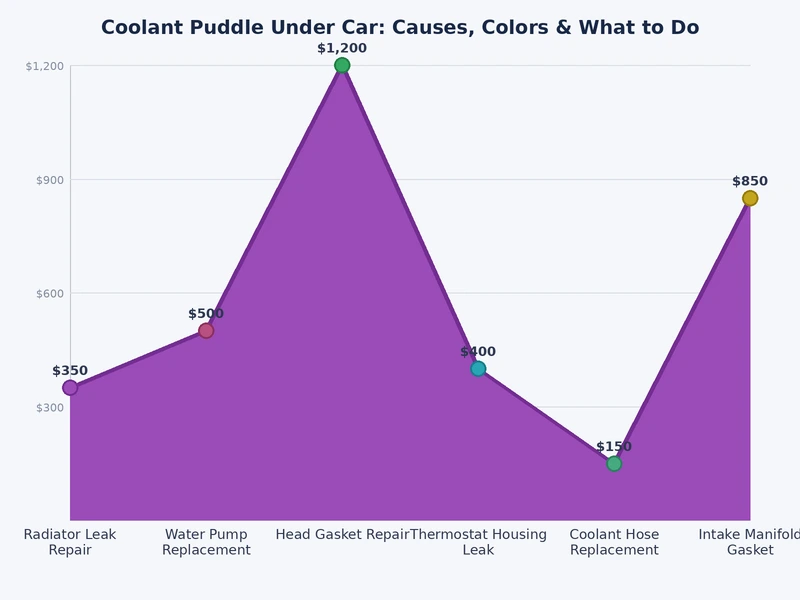
Driving an overheating engine risks head warpage, cracked block, and seized pistons — all in the $1,500–$6,000+ repair range. Our team has also seen ignored coolant leaks lead directly to water mixing into engine oil, which is a head gasket failure symptom that develops when coolant intrudes into oil passages under sustained heat stress.
Short-distance driving to a repair shop is generally acceptable when all of the following are true:
In these situations, our team recommends topping the reservoir to the MAX mark with distilled water as a short-term measure and scheduling a shop visit within 48 hours. Do not use tap water — mineral content accelerates internal corrosion.
Never remove the radiator cap on a warm engine — the system runs at 13–16 PSI and scalding coolant will eject instantly at full pressure.
Our team always starts here — these checks require zero tools and take under five minutes:
A hand-pump cooling system pressure tester costs $30–$50 at any auto parts store and eliminates most guesswork. The process our team uses:
This method finds leaks that are dry at rest but open under operating pressure. Our team considers it the most efficient single DIY leak-detection step available.
Coolant leaks follow predictable failure patterns. Knowing which component failed before touching a wrench changes the entire repair strategy — and the repair cost.
UV dye kits are the most reliable way to find leaks that aren't dripping at rest. Our team uses them on virtually every coolant leak job where the source isn't immediately obvious from the visual check.
The most preventable cause of coolant leaks is degraded antifreeze that turns acidic over time and corrodes the system from the inside. Our team's recommended service intervals:
Our team also recommends reviewing the serpentine belt condition at every coolant service. On many front-wheel-drive platforms, belt failure can disable the water pump, causing immediate coolant circulation loss even with a full reservoir.
Rubber hoses degrade from heat, coolant chemistry, and ozone exposure. Our team's inspection checklist:
Also worth checking is the condition of the exhaust system — a simultaneous exhaust and coolant issue at high mileage often points to a single failed head gasket rather than two separate unrelated problems.
Stop-leak products are among the most debated items in cooling system repair. Our team's position is clear: they fill a specific, narrow role — and using them outside that role creates new problems. For a full breakdown of the leading products on the market, our guide on best radiator stop-leak products covers the top-rated options with detailed assessments.
Stop-leak particles seal micro-gaps of roughly 0.5mm or less by agglomerating at the leak point under pressure. Anything larger than that bleeds the additive straight through without forming a seal. The mechanism only works on static surfaces — it cannot seal a leak on a rotating shaft.
Our team's standard recommendation: diagnose the source first. Use stop-leak only if the source is confirmed to be a type it can actually seal. Using it as a substitute for diagnosis consistently leads to larger repair bills downstream.
Short-distance drives to a repair shop are acceptable when the reservoir stays above the MIN mark, the temperature gauge holds steady, and there is no steam or cabin odor present. Our team recommends topping off with distilled water and booking a repair within 48 hours. Any temperature gauge movement toward the red means pulling over immediately — continued driving risks a blown head gasket or seized engine.
The primary base compound in most antifreeze formulas, ethylene glycol, produces a distinctively sweet, syrupy odor. That smell is the fastest single identifier for a coolant leak and sets it apart from oil, brake fluid, and AC condensate. It also signals a serious safety concern — ethylene glycol is highly attractive to animals but acutely toxic even in small ingested quantities, which is why cleaning up any coolant spill from paved surfaces matters.
A coolant leak that leads to sustained overheating can cause head warpage, seized pistons, or a hydrolocked cylinder — all conditions that prevent starting. Our team has also documented cases where a leaking heater core allowed coolant to pool near firewall electrical connectors, triggering no-start fault conditions. For a full diagnosis of no-start scenarios, the guide on car cranks but won't start covers every major cause with step-by-step troubleshooting.
A puddle the size of a quarter today is an engine replacement bill tomorrow — find it cold, fix it fast, and never mistake sweet-smelling fluid for anything harmless.
 |
 |
 |
 |

About Sarah Whitfield
Sarah Whitfield is a diagnostics and troubleshooting specialist who spent ten years as an ASE-certified technician before joining the editorial team. She specializes in OBD-II analysis, electrical gremlins, and the kind of intermittent problems that make most owners give up.
Get some FREE car parts & gear.. Or check out the latest free automotive manuals and build guides here.
Disable your ad blocker to unlock all the hidden deals. Hit the button below 🚗
| | | |