by Diego Ramirez
Misaligned wheels wear tires up to 25% faster, according to tire industry data. A standard tire set costs $400–$800. Misalignment silently burns through that investment before most drivers notice. Learning how to check wheel alignment at home is one of the most cost-effective maintenance habits a car owner can build. Proper wheel alignment — the angle at which tires contact the road — affects tire life, fuel economy, and handling directly. Many drivers discover problems only after noticing unusual tire wear patterns, a sign that damage has already set in. The checks in this guide take under 30 minutes and require no shop equipment.
Contents
Professional alignment machines use laser sensors and computerized readouts. Home checks rely on simpler tools. The results are less precise but enough to catch major problems before they destroy tires.
Vehicles that have been parked for long periods can develop alignment drift from suspension settling or flat-spotted tires. Reviewing how to maintain a car that sits unused for months covers related suspension and tire issues worth addressing before performing any alignment check.
Three methods cover the core alignment checks. Each targets a different alignment angle. Running all three produces a complete picture of the vehicle's alignment condition.
Tire wear is the most accessible alignment indicator. It records months of alignment history. Inspect all four tires before touching a tape measure.
Correct tire pressure before diagnosing alignment. Pressure errors mimic alignment symptoms. According to NHTSA tire guidance, most passenger vehicle tires require 32–35 PSI. Check the driver-side door jamb sticker for the vehicle's specific rating.
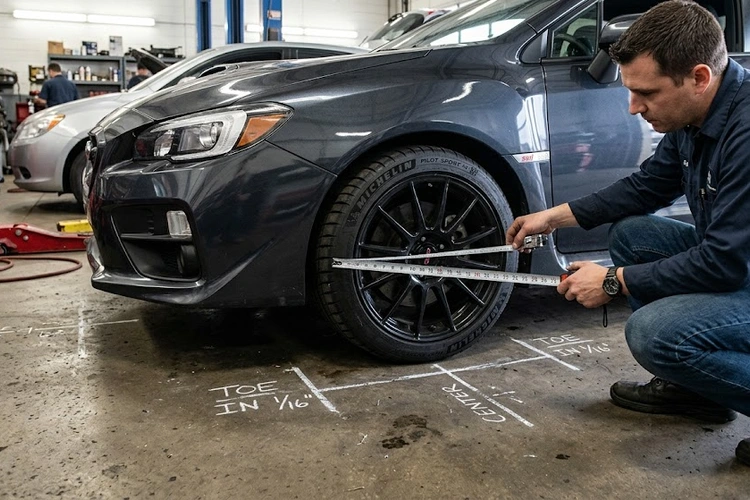
The string method creates a straight reference line to assess whether the front and rear wheels on each side track in a consistent plane.
Pro tip: Use a second person to hold the string taut at both ends. A sagging line introduces measurement error and produces false readings.
Toe refers to whether the front edges of the tires point inward (toe-in) or outward (toe-out) when viewed from above. It is the most common alignment problem on front-wheel-drive vehicles and the one most accessible to home correction.
Toe adjustments are made at the tie rod ends — the threaded rods connecting the steering rack to the wheel hub. This is within reach for experienced home mechanics using basic hand tools. Camber and caster corrections, however, require professional equipment and are not candidates for driveway repair.
Alignment does not drift randomly. Specific events and conditions cause measurable changes. Knowing the triggers reduces unnecessary shop visits and prevents missed problems.
A single hard pothole strike can throw front toe alignment off by 1/4 inch or more. That amount of misalignment produces noticeable tire wear within 5,000 miles of driving.
Home methods detect obvious problems. Professional machines measure all four wheels simultaneously to within 0.01 degrees. The table below summarizes the key differences.
| Factor | Home Check | Professional Alignment |
|---|---|---|
| Measurement accuracy | ±1/8 inch (approximate) | ±0.01 degree (computerized) |
| Angles measured | Toe (front), basic camber | Toe, camber, caster — all 4 wheels |
| Adjustment capability | Toe only via tie rod | All adjustable angles |
| Time required | 20–40 minutes | 30–60 minutes at a shop |
| Equipment cost | $0–$50 | $75–$150 at most shops |
| Best use case | Diagnosing problems, minor toe correction | Full correction after suspension work or collision |
A professional four-wheel alignment costs $75–$150 at most independent shops. Dealerships often charge $150–$200 or more. Home checks cost nothing beyond basic tools most garages already have. The home check is not a substitute for professional alignment after major suspension work or collision repair. It functions as a diagnostic tool — useful for confirming whether a shop visit is warranted before spending money.
Keeping steering components in good working order extends the time between professional alignments. Regular fluid maintenance, including power steering fluid flushes, reduces internal steering rack wear that accelerates toe drift over time.
Drivers regularly misattribute alignment symptoms to other causes. Vibration gets blamed on tires. Pulling gets blamed on road crown. Recognizing specific patterns narrows the diagnosis and avoids unnecessary repairs.
A car that drifts consistently left or right on a straight, level road almost always has a toe or camber problem on the front axle. Road crown — the slight slope built into most roads for drainage — causes minor drift but not a sustained pull. Test on a flat parking lot to isolate alignment from road conditions.
Wear patterns are the most reliable long-term alignment indicator. Check them at every oil change interval. Run a hand across each tread — feathering is often felt before it is seen.
Premature tire wear from alignment issues is a common issue flagged during vehicle inspections. Buyers and professional inspectors check tire shoulders closely. Correcting alignment before preparing a car for sale reduces negotiation friction and improves resale value.
Most manufacturers recommend checking alignment every 12,000 miles or once per year. Any hard impact — potholes, curb strikes, or minor collisions — warrants an immediate check regardless of mileage or time since the last service.
No. Home checks detect major toe misalignment and obvious camber issues. Professional computerized alignment measures all three angles on all four wheels to within 0.01 degrees and is required after any suspension component replacement, collision repair, or when camber or caster corrections are needed.
Toe alignment is the inward or outward angle of the tires when viewed from above. Incorrect toe causes feathered tread wear and reduces tire life by 15–25%. It is the most common alignment problem on front-wheel-drive vehicles and the only angle routinely corrected by home mechanics via tie rod adjustment.
Yes. Research from tire manufacturers indicates that misaligned wheels increase rolling resistance, reducing fuel economy by up to 10% in severe cases. Correcting alignment is one of the most straightforward ways to recover lost miles per gallon without mechanical upgrades.
Short-term driving with minor misalignment is not immediately dangerous. Sustained misalignment progressively destroys tires, reduces braking stability on uneven surfaces, and strains tie rod ends and suspension bushings. Correction should not be deferred more than a few thousand miles once misalignment is confirmed through inspection or measurement.
 |
 |
 |
 |

About Diego Ramirez
Diego Ramirez is a maintenance and care specialist who has been wrenching on cars since he was sixteen. He focuses on fluid changes, preventive care routines, paint protection, and the small habits that turn a five-year-old car into a fifteen-year-old car.
Get some FREE car parts & gear.. Or check out the latest free automotive manuals and build guides here.
Disable your ad blocker to unlock all the hidden deals. Hit the button below 🚗
| | | |