by Joshua Thomas
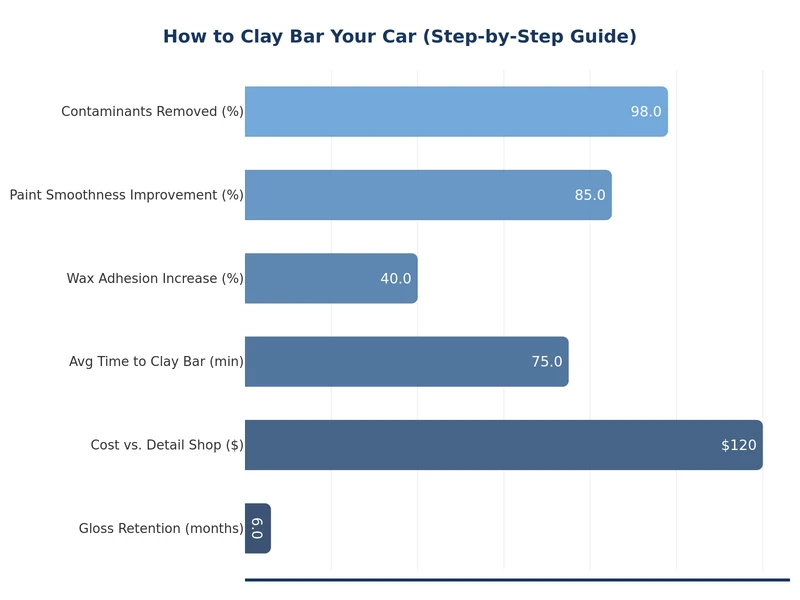
Learning how to clay bar a car is one of the most rewarding detailing skills you can master. Clay barring removes bonded contaminants — industrial fallout, tree sap, brake dust, and road grime — that washing alone cannot touch. The result is paint so smooth it feels like glass, and a surface that holds wax or sealant far better. If your paint feels rough or gritty after washing, it's time to clay. This guide walks you through every step, from choosing the right clay bar to finishing with protection.
Clay barring fits naturally into a full paint correction routine. Once you've clayed the surface, follow up with a good wax application — check out our guide on how to wax a car by hand to complete the process. If oxidation is also a concern, you may want to address that first with our guide on how to remove oxidation from car paint.
Contents
A clay bar is a malleable, engineered resin compound designed to shear bonded surface contaminants off paint, glass, and metal without scratching. Unlike a wash mitt that only removes loose dirt, clay reaches beneath the surface layer of grime and grabs particles that have physically embedded into the clear coat.
According to Wikipedia's article on car detailing, paint decontamination is a key preparatory step before polishing or coating. Skipping it means any subsequent wax or ceramic coating bonds to contamination rather than clean paint — reducing durability and shine.
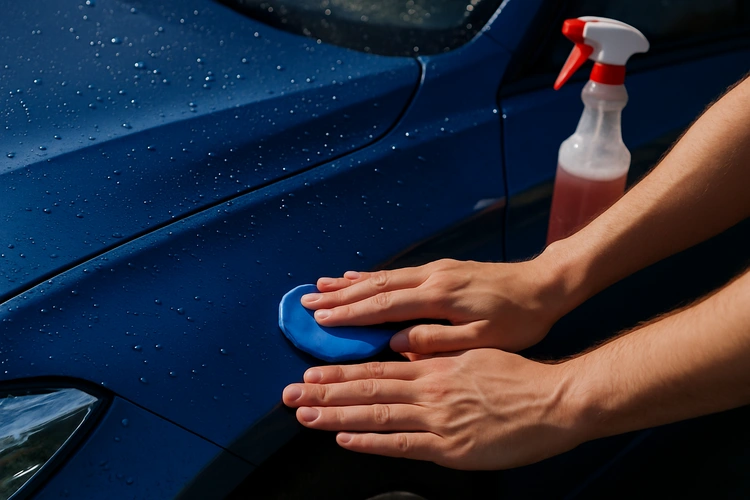
As you drag lubricated clay across paint, the bar's slightly abrasive surface shears and absorbs contaminants. You feel this as resistance and hear a faint scratching sound at first. As the surface clears, the clay glides more smoothly — that smoothness is your tactile feedback that the area is clean.
Clay bar your car when:
| Item | Purpose | Notes |
|---|---|---|
| Clay bar kit | Remove bonded contaminants | Fine, medium, or heavy grade |
| Clay lubricant / detail spray | Lubricate surface while claying | Do not use plain water |
| Two-bucket wash system | Pre-wash the vehicle | One wash, one rinse bucket |
| Microfiber wash mitt | Initial wash | Clean and grit-free |
| Microfiber drying towel | Dry panels after washing | Waffle-weave recommended |
| Spray bottle | Apply lubricant to panels | Fine mist nozzle preferred |
| Paint sealant or wax | Protect bare paint after clay | Apply within 24 hours |
Clay bars come in three grades. Most passenger cars need fine or medium grade. Heavy grade is reserved for neglected paint with severe contamination and should be used carefully as it carries more marring risk.
Our dedicated best clay bars guide covers top-rated options across all grades with side-by-side comparisons to help you choose.
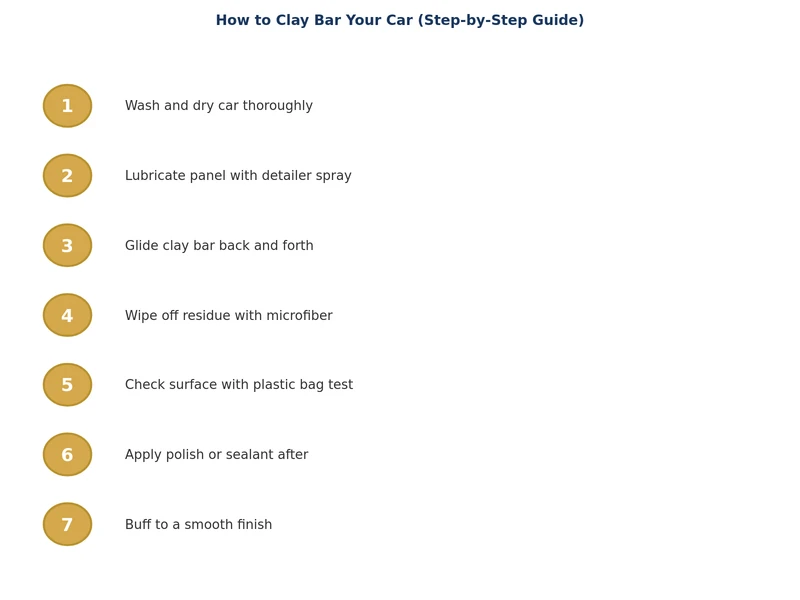
Follow these steps in order. Skipping the wash or lubrication stage is the single biggest cause of clay-induced scratches.
Clay barring a dirty car grinds loose grit into the paint. Perform a full two-bucket wash, rinse completely, and dry the vehicle before you touch the clay. Work in the shade or indoors — direct sun dries lubricant too fast.
Break off roughly one-third of the clay bar. Knead it in your palms until warm and pliable, then flatten it into a disc about the size of your palm. This gives you maximum contact area and control. Store the unused portion in the original container sealed shut.
Mist a generous amount of clay lubricant over a section roughly 40 x 40 cm (about 16 x 16 inches). The surface must stay wet throughout — clay dragged on a dry surface will leave marring. Keep your spray bottle in your non-dominant hand and re-mist frequently.
With light pressure — let the weight of your hand do the work — move the clay bar in straight, overlapping passes. Work horizontally first, then vertically if needed. You will feel and hear resistance at first. When the clay glides silently, that section is clean. Fold and re-knead the clay every few panels to expose a clean face. Discard the clay immediately if dropped; it cannot be fully cleaned after picking up floor debris.
Immediately after claying each section, wipe off the lubricant residue with a clean microfiber towel. Use gentle, straight passes. Buff lightly until clear. Run your fingertips (in a plastic bag for sensitivity) across the surface — it should feel as smooth as glass. If still rough, repeat the clay step on that area.
Freshly clayed paint is porous and unprotected. Apply wax, paint sealant, or ceramic coating within 24 hours. Do not leave bare paint exposed to the elements. This is the step that locks in your work and gives the finish lasting depth.
| Grade | Best For | Marring Risk | Passes Needed |
|---|---|---|---|
| Fine / Mild | Well-maintained paint, light fallout | Very low | 1–2 passes per section |
| Medium | Average daily driver, moderate contamination | Low–moderate | 2–3 passes per section |
| Heavy / Aggressive | Neglected paint, heavy industrial fallout | Moderate–high | 3+ passes; polish after |
| Clay mitt / pad | Fast full-car decontamination | Low (with proper lube) | Single pass usually sufficient |
Even experienced detailers make these errors. Knowing them before you start saves your paint.
Clay barring is a prep step, not a finishing step. Here is the recommended sequence for a complete paint refresh:
With contaminants gone and protection applied, your paint will repel water, resist bird droppings, and look dramatically deeper. Clay barring once or twice a year keeps your clear coat in peak condition for years.
For most daily drivers, once or twice a year is sufficient. If you park outside, live near industrial areas, or notice rough paint texture after washing, clay more frequently. Regular washing with quality car shampoo reduces contamination buildup between clay sessions.
Clay barring with proper lubrication carries very little risk of scratching. The most common cause of clay-induced marring is insufficient lubricant or pressing too hard. Always keep the surface wet, use light pressure, and work in straight lines to minimize any risk.
Yes. Freshly clayed paint is clean but unprotected. You should apply wax, a paint sealant, or a ceramic coating within 24 hours. Leaving bare paint exposed accelerates oxidation and negates much of the benefit of the clay bar treatment.
Purpose-made clay lubricant or a quality quick detailer spray are the best options. Diluted car wash shampoo also works in a pinch. Never use plain water alone — it lacks the slip needed to prevent clay from dragging and marring the paint surface.
Yes. Clay bars work safely on glass to remove road film, water spots, and tar. Use caution on plastic trim — porous plastics can absorb clay residue. Avoid claying matte paint finishes, as the abrasion can alter the texture and sheen of the surface.
Discard it immediately. Even on a smooth garage floor, a dropped clay bar picks up grit that embeds in the clay and will scratch your paint on the next pass. The cost of a replacement clay bar is far less than repairing scratched clear coat.
 |
 |
 |
 |
About Joshua Thomas
Joshua Thomas just simply loves cars and willing to work on them whenever there's chance... sometimes for free.
He started CarCareTotal back in 2017 from the advices of total strangers who witnessed his amazing skills in car repairs here and there.
His goal with this creation is to help car owners better learn how to maintain and repair their cars; as such, the site would cover alot of areas: troubleshooting, product recommendations, tips & tricks.
Joshua received Bachelor of Science in Mechanical Engineering at San Diego State University.
Get some FREE car parts & gear.. Or check out the latest free automotive manuals and build guides here.
Disable your ad blocker to unlock all the hidden deals. Hit the button below 🚗
| | | |