by Diego Ramirez
I pulled into a parking lot after spending two hours washing and waxing my car, and a stranger walking past glanced at it and asked if the plastic bumper trim had always been that grey. It had not — I had just ignored it during every wash for two years straight. That embarrassing moment is what finally pushed me to learn how to clean exterior car plastic trim the right way, and the results were almost instant.
Exterior plastic trim — the dark or black pieces covering bumpers, side moldings, mirror housings, door handles, and wheel arch surrounds (the flared plastic panels around your wheel wells) — takes more abuse than almost any other part of your car's exterior. UV radiation, road film, and temperature swings break down the surface faster than paint, turning rich black plastic into a chalky, faded grey that makes even a freshly washed car look neglected. Getting it back takes the right products and a consistent process, but once you have that down, keeping it there requires very little effort. If you also want to keep all your painted surfaces sharp between wash days, our guide on how to maintain car paint gloss between washes covers the bigger picture.
When you are ready to shop for something to restore seriously faded trim, our roundup of the best plastic restorers will help you pick a product that actually lasts.
Contents
Before you touch the trim, get the right products on hand. Using the wrong cleaner — especially anything with harsh solvents or high alkalinity — strips the surface and accelerates fading rather than preventing it. Here is exactly what works and why each item earns its spot in your kit.
You do not need expensive detailing equipment for this. These basics handle the vast majority of trim cleaning jobs without any specialized gear at all.
| Product Type | Best For | Avoid When | How Long It Lasts |
|---|---|---|---|
| All-purpose cleaner (diluted) | Cutting road grime and old residue before other products | Using as a standalone fix on bare faded trim with no follow-up | Single wash session |
| Dedicated trim cleaner | Light maintenance washes and pre-restorer surface prep | Trim is severely chalky and needs actual penetration, not cleaning | 1–2 weeks |
| Penetrating trim restorer | Oxidized, chalky, or deeply faded plastic surfaces | Applying over dirty, wet, or sun-heated trim panels | 2–6 months |
| UV protectant spray | Maintenance coat after every clean or restoration | Using as a standalone fix for trim that is already visibly faded | 4–8 weeks |
Applying a restorer to trim that only needs a wash is overkill and a waste of product. Washing heavily faded trim without restoring it leaves you with clean, still-grey plastic that looks almost as bad as before you started. Matching your approach to your trim's actual condition saves you real time and money.
Your trim only needs a quick clean when:
In this case, scrub with diluted APC, rinse clean, dry with a microfiber towel, and apply a light coat of UV protectant. That is the entire job, and it should take under ten minutes per panel.
Reach for the restorer when:
Faded trim is not ruined — it can almost always be recovered with a quality penetrating restorer and patience. According to the Wikipedia article on ultraviolet radiation, UV light breaks down polymer chains at a molecular level, which is exactly why surface-only coating products fail quickly while penetrating oil-based restorers last months longer by replacing what UV has destroyed.
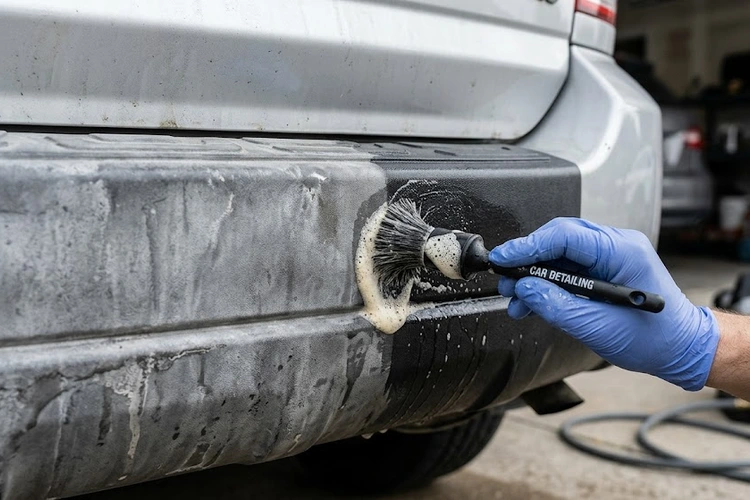
This is the core process for how to clean exterior car plastic trim thoroughly, whether you are doing routine maintenance or a full restoration. Follow the steps in order — skipping the prep stage is the single most common reason people are disappointed with their results.
If your car tends to collect heavy environmental fallout — tree sap, pollen, mineral deposits — during the wash, our two-bucket car wash method guide shows you how to stop your tools from cross-contaminating clean surfaces with the grime you just scrubbed off the trim.
Always apply plastic restorer in the shade — direct sunlight causes it to cure on the surface before penetrating, leaving a sticky, dust-attracting film instead of the clean, lasting finish you are after.
Reading your trim before reaching for a product saves you from using the wrong one and accidentally making the problem harder to fix afterward. Here is what the most common conditions actually signal and how to respond to each one correctly.
This is the most common situation — the trim is not faded, just coated in road film, dried-up product residue, and accumulated dust that has been sitting since the last wash. The fix is a thorough scrub with diluted APC, a clean rinse, and a fresh coat of UV protectant. If your whole car has been sitting through a rough season and every surface shows it, our guide on how to maintain your car in winter walks through a protective routine you can follow before each cold season to dramatically reduce the catch-up work you have to do in spring.
Deeply faded trim has lost its surface oils and the outer polymer layer has oxidized beyond what a simple cleaner can address. Here is what consistently works:
If the trim is cracked, brittle, or physically warped beyond surface damage, no restorer on the market will fix it — replacement is the only real answer at that point, and no amount of product application will change that outcome.
Cleaning exterior car plastic trim is not complicated, but a handful of very common errors undo all your work and sometimes leave the trim in worse shape than it was before you started.
If you are cleaning your car because you are about to list it for sale and want every panel looking its best, trim condition is consistently one of the first things buyers notice when they get close to the car — our guide on how to detail and prepare your car for sale covers every exterior surface you need to address before handing over the keys.
Clean it every time you wash your car, which for most drivers means every two to four weeks. Apply a UV protectant after each clean, and reapply a penetrating restorer every two to three months if your trim was previously faded. High-UV climates and daily outdoor parking require more frequent protection to stay ahead of oxidation.
A diluted all-purpose cleaner is safe on both surfaces, but never apply a plastic restorer or trim dressing to painted panels — most trim products leave an oily film on paint that requires a degreasing step to remove. Always apply trim-specific products with an applicator pad and use painter's tape to protect adjacent painted surfaces first.
Apply a UV protectant spray after every wash and park in covered or shaded spots whenever possible. Consistent UV protection extends the life of a fresh restorer application from a few weeks to several months. Trim that gets regular maintenance never needs heavy restoration because oxidation never has a chance to build up into a real problem.
Yes, in most cases it works well. Even very chalky, deeply faded trim responds strongly to a penetrating restorer applied in two or three thin coats over several hours. Results on very old plastic may not hit factory-black perfection, but the improvement is consistently dramatic and worth the effort. The only trim that cannot be restored is trim that is cracked, warped, or physically damaged beyond the surface.
 |
 |
 |
 |

About Diego Ramirez
Diego Ramirez is a maintenance and care specialist who has been wrenching on cars since he was sixteen. He focuses on fluid changes, preventive care routines, paint protection, and the small habits that turn a five-year-old car into a fifteen-year-old car.
Get some FREE car parts & gear.. Or check out the latest free automotive manuals and build guides here.
Disable your ad blocker to unlock all the hidden deals. Hit the button below 🚗
| | | |