by Diego Ramirez
White car paint stays bright with a pH-neutral shampoo, a two-bucket wash system, and a consistent schedule — that's the core of it. The longer answer is about executing every step correctly so the finish stays white instead of fading to a chalky, yellowed mess over time.
White is the most popular car color in the world, accounting for roughly 25% of new vehicles sold. It reflects heat, tolerates minor swirl marks better than dark colors, and looks striking when clean. But it amplifies specific problems — water spots, bird dropping stains, and oxidation are all far more visible on white than on silver or grey. Knowing how to clean white car paint correctly stops those issues before they become expensive paint correction jobs. A solid starting point for choosing the right products is the best car wash soaps and shampoos roundup, which covers pH-safe options suited specifically to white and light-colored finishes.
Contents
Equipment matters more than most people realize. Washing white paint with the wrong tools creates swirl marks and fine scratches that no shampoo can undo. Getting the kit right makes every wash safer and faster.
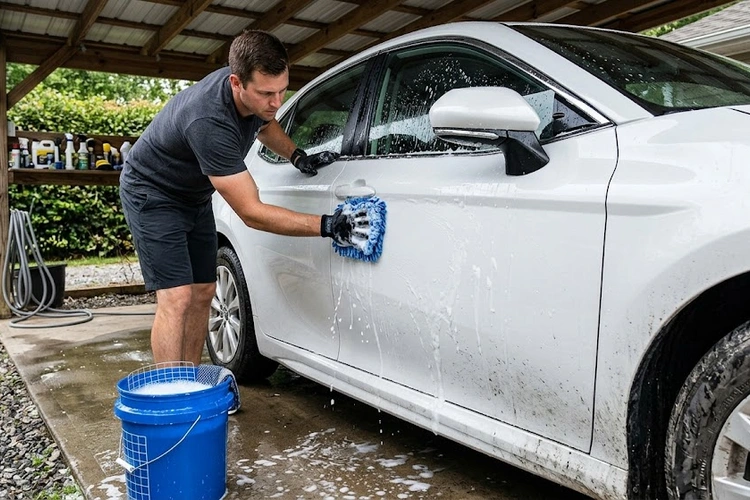
A pH-neutral car shampoo is non-negotiable. Dish soap and household cleaners strip wax, break down paint sealants, and leave the clear coat exposed and vulnerable. A purpose-made car shampoo provides enough lubrication to lift dirt off the surface without attacking existing protection.
Two buckets are required for safe washing — one for the shampoo solution, one for rinsing the wash mitt. Grit guards placed at the bottom of each bucket trap dirt particles so they don't transfer back onto the mitt and drag across the clear coat. This is the two-bucket method, and it's the single most effective change anyone can make to prevent swirl marks on white paint.
A microfiber wash mitt is the right tool for the wash stage. Sponges trap dirt particles against the paint surface and drag them across the clear coat with every pass. A microfiber mitt encapsulates particles and holds them away from the surface. It's a small upgrade with a significant long-term impact on paint clarity.
A foam gun or foam cannon is optional but genuinely useful. It coats the car in a thick layer of diluted shampoo before contact washing begins, softening and loosening heavy contamination so the mitt has less work to do. No pressure washer is required for a basic foam gun — a standard garden hose works fine.
Pro tip: Grit guards cost $5–$10 each and prevent more swirl marks than any premium shampoo upgrade. One in each bucket is the best cheap investment in white paint care.
A large waffle-weave microfiber drying towel absorbs fast and doesn't drag across the surface. Chamois cloths are outdated for modern clear-coat finishes — they're less gentle and more likely to create fine surface marks when used on dry or lightly damp paint.
A clay bar handles bonded surface contaminants that shampoo simply can't remove — industrial fallout, rail dust, embedded tree sap residue, and road film that's worked its way into the clear coat. White paint shows these deposits as a rough, gritty texture under a fingertip. Running a clay bar over the surface twice a year keeps the paint smooth and ready to hold wax or sealant evenly. For help choosing between decontamination methods, the guide on clay bar vs. iron remover breaks down when each tool is the right call.
Not every car that picks up road dust needs a full bucket wash. But letting contamination sit too long always makes the job harder and riskier for the paint surface.
Washing every one to two weeks in normal driving conditions is the right cadence for white paint. After heavy rain, wash as soon as possible. Rain carries airborne pollutants and acidic deposits that dry onto white paint as visible water spots. After driving near construction zones, quarries, or areas with dense tree cover, washing promptly prevents iron fallout and sap from bonding permanently.
Bird droppings are the most urgent situation of all. Their uric acid begins etching clear coat within hours in warm weather. Any visible droppings on white paint need to be addressed the same day — not at the next scheduled wash. Tree sap carries the same urgency: it hardens quickly and becomes exponentially more difficult to remove after the first 24 hours.
Light surface dust doesn't demand a full bucket wash. A dedicated quick detailer spray applied with a clean microfiber cloth removes dust safely between scheduled washes. The key word is dedicated — dry wiping white paint with any unlubricated cloth is guaranteed to scratch. Even a clean-looking cloth dragged across a dry surface deposits fine swirls into white paint that accumulate visibly over time.
Washing in direct sunlight or on paint that's hot to the touch should be avoided. Shampoo and water evaporate before rinsing under those conditions, baking soap residue and mineral spots onto the surface. Early morning or late afternoon in a shaded area produces consistently better results.
Warning: Never wipe bird droppings off a dry surface. Soak the area first with detailer spray or water for at least 30 seconds — dry removal grinds the material into the clear coat and causes scratches that require polishing to fix.
This is the sequence that produces consistent, scratch-free results on white paint. Every step exists for a reason — skipping them cuts corners that show up over months as dullness and swirling.
Start with a full rinse from top to bottom using a hose or pressure washer on a wide fan spray pattern. This removes loose dirt and grit before any contact with the surface. A pressure washer should stay at least 12 inches from the paint — a tight, concentrated stream at close range strips clear coat and forces water under door seals and trim.
If using a foam gun, apply the foam layer now and allow a two-to-three minute dwell time. The foam breaks down road film and loosens contamination so the wash mitt encounters less resistance. On white paint, this step is particularly valuable because light-colored surfaces show abrasion from contact washing more readily over time. For orange-brown iron fallout dots that appear on white paint near brake-heavy roads, a dedicated iron fallout remover used before washing dissolves those particles chemically without any scrubbing.
Fill the first bucket with shampoo at the manufacturer's specified dilution. Fill the second with clean rinse water. Load the wash mitt and start at the roof, working downward panel by panel. Lower body panels carry the heaviest contamination from road spray and brake dust — saving them for last prevents dragging that grit up across cleaner upper surfaces.
Work in straight, overlapping lines across each panel. Never scrub in circular motions. Circles create swirl marks — less visible on white than on black, but still present, and they scatter light in a way that makes the finish look flat instead of glossy over time. After every panel, dunk the mitt into the clean rinse bucket, squeeze it out thoroughly, then reload with soapy water before moving on.
Wheels and wheel arches should be washed last, using a separate dedicated mitt or brush. Brake dust, road tar, and heavy contamination from wheels should never contact the same mitt used on painted body panels.
Rinse from the top down with a strong, sheeting flow of water. Immediately follow with the microfiber drying towel — don't let white paint air dry under any circumstances. Air drying leaves water spots every single time, especially in areas with hard water. Lay the towel flat across the panel and drag it toward the body rather than pressing and lifting. Flip to a fresh dry section of the towel every couple of passes to avoid pushing water back onto the surface.
White paint is unforgiving when it comes to surface staining. These are the most common offenders and the correct approach for each one.
For bird droppings, soak the spot with a dedicated dropper remover or a quality detailer spray for a full 30 seconds before touching it. Then gently lift the softened material with a damp microfiber cloth using zero scrubbing pressure. Automotive clear coat is typically only 40 to 60 microns thick — the uric acid in bird droppings etches through that layer faster than most people expect, especially in summer heat. After removal, inspect the area in direct sunlight. A slight etch mark indicates the clear coat was affected and will need a light polishing compound to restore the gloss.
Tree sap responds well to a dedicated sap remover. Isopropyl alcohol at 70% concentration works as a field substitute — apply directly to the sap, let it sit for 20 seconds, then wipe gently with a microfiber cloth. After removing sap, rewax or re-seal that panel. Solvents strip protection from the surrounding area.
Dry mud should never be touched. It acts like coarse sandpaper against the paint surface — each particle is a potential scratch. Soak any mud-covered panels completely before making contact. A pressure washer on a wide fan spray pattern or a strong hose flow directed at the mud deposits handles this stage without risk. The detailed guide to removing mud stains from car paint covers the most stubborn cases, including baked-on red clay and dried road spray.
Persistent road film that survives a regular shampoo wash responds to a traffic film remover (TFR) diluted to the product's specified ratio. TFR applied at full strength on painted surfaces is too aggressive. Always dilute it, and always follow with a full rinse and a protective wax or sealant application.
Three main washing approaches are used on white cars. Each has a specific role. Using the wrong method for the level of soiling is a primary source of paint damage over time.
| Method | Best For | Scratch Risk on White | Time Required | Ongoing Cost |
|---|---|---|---|---|
| Two-Bucket Hand Wash | Weekly / biweekly maintenance | Very low (with proper technique) | 30–45 min | $0 after initial kit |
| Foam Cannon + Contact Wash | Heavily soiled or post-trip paint | Very low | 45–60 min | $0 after setup |
| Waterless Wash | Light dust between full washes only | Medium (on dirty paint) | 15–20 min | $1–$2 per use |
| Rinseless Wash | Water-restricted environments | Low (with correct dilution) | 20–30 min | Very low per use |
| Automatic (brushless) | Quick clean when time is short | Medium over time | 5–10 min | $8–$20 per visit |
The two-bucket hand wash is the correct default for regular white paint maintenance. It's thorough, scalable to any level of soiling, and costs nothing ongoing after the initial kit purchase. Leading with a foam cannon pass on heavily contaminated vehicles adds an extra safety margin before any mitt contact.
Automatic brushless washes aren't catastrophic for white paint in a genuine emergency, but the soft-cloth systems most automatic washes use accumulate grit and contamination between vehicles. Regular automatic wash use introduces fine swirling into white paint over months. Under overcast light it looks acceptable. Under direct afternoon sun it looks distinctly flat and hazy — a result of hundreds of shallow scratches scattering light across the surface.
Pro insight: Swirl marks on white paint from repeated automatic washing become obvious under raking sunlight — what looks fine under artificial lighting reveals itself immediately outdoors. Prevention through hand washing is far cheaper than correcting it later.
White has a strong reputation in the detailing world. Some of it is genuinely earned. Some of it is overstated. Here's the unvarnished assessment.
White is the most forgiving color for surface imperfections. Swirl marks, fine scratches, and the aftermath of paint correction work are far less visible on white than on black or deep metallics. This translates directly to lower maintenance costs over years of ownership — white cars simply need less polishing work to look good.
Touch-up paint blends more naturally on white than on any color-matched metallic or pearl finish. Chips and minor dings are cheaper and easier to address cosmetically. In hot climates, white also reflects solar radiation more effectively than dark colors — a parked white car's interior runs measurably cooler, which matters for leather, electronics, and overall cabin comfort.
White also reveals contamination immediately. Bird droppings, sap, and iron fallout are visible at a glance on a white surface, which prompts faster action before etching begins. On dark-colored cars, the same damage can sit unnoticed until it's already worked through the clear coat.
Yellowing and oxidation are the primary long-term threats to white paint. UV exposure degrades the clear coat over time, and without regular waxing or sealing, the surface develops a chalky, yellowed appearance. This is most pronounced on older vehicles with single-stage paint and on cars stored outdoors year-round without protection.
Water spots are highly visible on white — the grey-white mineral rings left by evaporating hard water stand out clearly against the bright surface. Regions with high-mineral water sources make this worse. A hydrophobic ceramic coating or quality synthetic sealant dramatically reduces spotting by causing water to sheet off rather than bead and evaporate in place.
Lower body panels on white cars also show brake dust and road spray clearly as grey-brown discoloration. Cars parked near industrial areas or heavy traffic accumulate iron fallout faster on white simply because it's more visible — regular washing prevents buildup before it bonds to the surface.
A complete white paint cleaning setup doesn't require a serious investment. The gear is affordable, the ongoing cost for home washing is effectively zero, and the protection products pay for themselves by reducing how often professional correction is needed.
This covers the full two-bucket system: a quality pH-neutral shampoo, two buckets with grit guards, a microfiber wash mitt, and a large drying towel. Adding a basic quick detailer spray for between-wash maintenance and a clay bar kit for semiannual decontamination brings the total to around $75–$80. This kit handles everything needed for consistent, scratch-safe washing and decontamination of white paint.
The upgrade adds a foam gun compatible with a garden hose, a dedicated iron fallout remover, and a quality synthetic paint sealant. These products extend the life of the clear coat and reduce how hard each wash needs to work. A synthetic sealant at this tier lasts four to six months. Applied twice a year, the annual protection cost works out to roughly $25–$40 — less than one automatic car wash per month.
Professional hand washes run $30–$60 per visit depending on vehicle size and location. A full detail with clay bar, machine polish, and wax is $150–$350. Ceramic coating by a certified installer runs $500–$2,000 or more depending on the product tier and vehicle size. Ceramic coatings last two to five years and dramatically reduce maintenance effort — water sheets completely off white paint, and most contamination rinses away without contact washing. For white paint owners who park outdoors year-round, a ceramic coating is a strong long-term investment.
Cleaning removes what's on the paint. Protection determines how fast it gets dirty again and how well the clear coat holds up between washes. Both halves are required to keep white paint looking bright for years rather than months.
Carnauba wax delivers a warm, glassy look and reasonable water-beading behavior but lasts only four to eight weeks. Synthetic paint sealants last three to six months and offer better UV and chemical resistance — a more practical choice for daily drivers that get regular exposure to sun and rain. Ceramic coatings last two to five years from a single application and provide the strongest hydrophobic protection available without a professional paint protection film.
For white paint specifically, always use clear or transparent products. Tinted waxes designed for black or dark cars will leave a grey or brown residue on white paint that dulls the finish and is difficult to remove completely. Check the label before purchasing — appropriate products are usually marked "all-color," "light paint," or simply "clear." Colored enhancer waxes are strictly for dark paint.
A spray wax or quick detailer applied after every full wash maintains the protection layer without adding meaningful time to the routine. Some spray waxes are formulated for wet application — spray onto the panel immediately before the drying towel pass and wipe both product and water off together. This approach takes roughly 30 extra seconds per panel and extends the protection interval significantly. The best quick detailer sprays roundup covers formulas specifically tested for no hazing or residue on white and light-colored paint, which is a real concern with some budget detailers.
Winter is the hardest season for white paint. Road salt leaves grey deposits along lower body panels and wheel arches. In regions where roads are treated with brine or rock salt, weekly washing is necessary rather than optional — salt that dries on white paint is both visually obvious and chemically aggressive toward the clear coat and underlying metal. A paint sealant applied before the first cold snap gives the surface a meaningful chemical barrier going into the difficult months. The guide on maintaining a car in winter covers the full cold-weather protocol, including underbody rinsing and protective prep that goes alongside exterior paint care.
Summer brings increased UV exposure, tree pollen, and heavier bird activity near parked cars. Wax degrades noticeably faster in summer heat — reapplying every five to six weeks rather than eight is the right adjustment for cars parked outdoors. A paint sealant or ceramic coating holds up better in heat than carnauba wax and is worth considering for year-round outdoor parking situations.
 |
 |
 |
 |

About Diego Ramirez
Diego Ramirez is a maintenance and care specialist who has been wrenching on cars since he was sixteen. He focuses on fluid changes, preventive care routines, paint protection, and the small habits that turn a five-year-old car into a fifteen-year-old car.
Get some FREE car parts & gear.. Or check out the latest free automotive manuals and build guides here.
Disable your ad blocker to unlock all the hidden deals. Hit the button below 🚗
| | | |