by Joshua Thomas
Leather seats are one of the most desirable upgrades in any vehicle, but they demand consistent care to stay soft, supple, and crack-free. Knowing how to condition leather car seats correctly is the single most important skill for any leather interior owner. Skip it long enough and you'll face cracking, fading, and permanent stiffness that no product can fully reverse. The good news: proper conditioning takes under an hour and protects your investment for months. This guide walks you through every step, from choosing the right product to building a long-term maintenance routine. For a curated list of top-rated products, see our guide to the best leather cleaner and conditioner.
Contents
Leather is a natural material made from animal hide. Even after tanning and finishing, it retains microscopic pores that absorb and release moisture. In a car interior, heat, UV radiation, sweat, and cleaning products constantly strip away the natural oils that keep those fibers flexible. Once the oils are gone, the leather dries out, hardens, and eventually cracks.
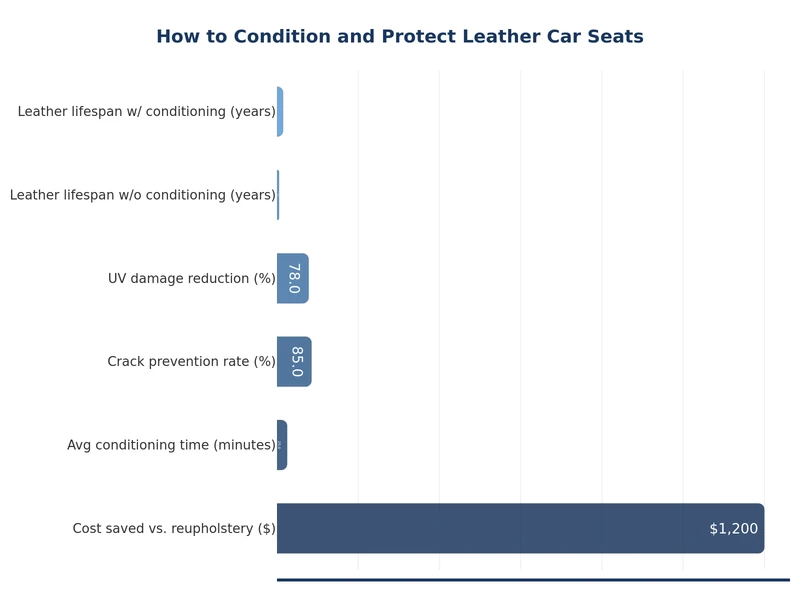
Parked in direct sunlight, the surface of a car seat can exceed 150°F. At these temperatures, UV rays break down the dye and finish layers while heat draws moisture out of the leather fibers. The result is fading, surface cracking, and a rough texture that gets progressively worse with each season. Conditioning replenishes the lost moisture and creates a barrier that slows this cycle.
Replacing a cracked leather seat can cost hundreds to thousands of dollars at a professional upholstery shop. Even a professional reconditioning service runs $150–$300 per session. Spending fifteen minutes with a quality conditioner every few months costs a fraction of that and prevents the damage entirely. If you want to combine leather care with a full interior refresh, our guide on how to detail a car interior covers the complete process from start to finish.
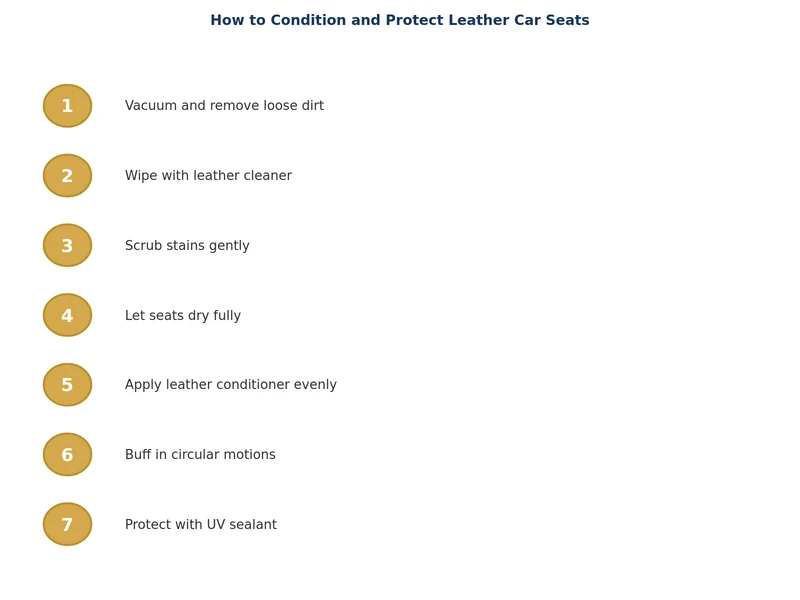
Learning how to condition leather car seats properly takes less time than most people think. The key is preparation — a conditioner applied to dirty leather locks in grime and can cause uneven absorption. Follow these steps in order for the best result.
Vacuum the seats thoroughly, paying attention to seams and crevices where crumbs and dust accumulate. Spray a pH-neutral leather cleaner onto a microfiber cloth — never directly onto the seat — and wipe in small sections using gentle circular motions. Use the soft-bristle brush to work the cleaner into textured grain and stitching. Wipe away residue with a dry cloth and allow the leather to dry completely before moving on. Rushing this step is the most common conditioning mistake.
While you're at the interior, check the door panels too. Our step-by-step tutorial on how to clean car door panels covers leather, vinyl, and fabric surfaces side by side.
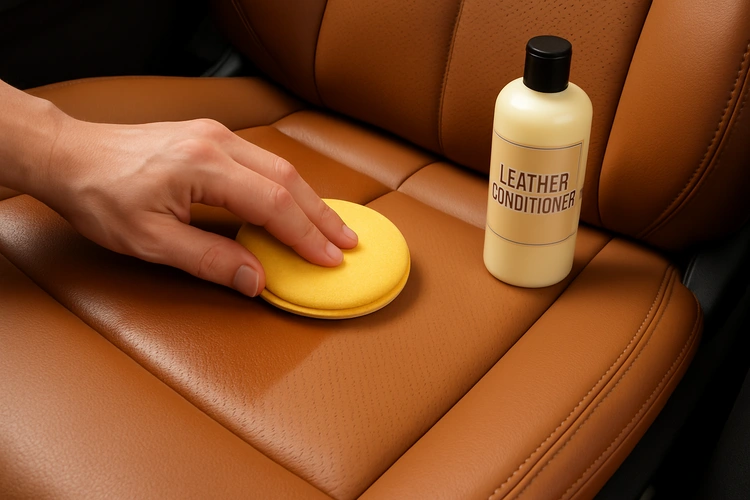
Apply a small amount of conditioner — about the size of a quarter — onto your applicator pad. Work it into the leather using slow, overlapping circular strokes. Cover one section at a time: seat bottom, seat back, headrest. Allow the conditioner to absorb for five to ten minutes, then buff away any excess with a clean microfiber cloth. The leather should feel noticeably softer but not greasy. If it feels tacky, you've applied too much — buff harder or wipe away the excess.
For perforated leather, use less product and keep strokes light to avoid pushing conditioner into the holes, which can cause discoloration over time.
Not all leather conditioners are equal, and using the wrong product can cause more harm than good. Some contain petroleum distillates that temporarily soften leather but degrade the finish layer over time. Others use silicone to create a slick surface that looks conditioned but does nothing for the underlying fiber structure.
Leather conditioners come in three primary formats: creams, lotions, and sprays. Creams offer the deepest penetration and are best for dry or older leather. Lotions are lighter and easier to apply evenly, making them ideal for regular maintenance. Sprays are convenient for quick touch-ups but rarely provide enough product concentration for genuinely neglected leather.
Use the table below to compare the key criteria when selecting a conditioner for car leather seats.
| Criterion | What to Look For | What to Avoid |
|---|---|---|
| Base ingredients | Natural waxes, lanolin, neatsfoot oil alternatives | Petroleum distillates, mineral oil |
| pH level | pH 4–6 (slightly acidic, matches leather) | Alkaline formulas above pH 8 |
| UV protection | UV blockers or UV inhibitors listed on label | No UV protection in sun-exposed climates |
| Finish effect | Matte or satin finish that matches OEM leather sheen | High-gloss silicone sheen (slippery, surface-only) |
| Compatibility | Labeled safe for coated/finished automotive leather | Products meant for unfinished or aniline leather only |
| Dye safety | Color-safe, dye-neutral formula | Products that alter or darken light-colored leather |
A general rule is to condition leather seats every three months, or four times per year. However, the right frequency depends on your climate and how hard the interior works. In hot, dry, or high-UV environments — such as the southwestern United States — condition every six to eight weeks. In mild, shaded climates with moderate temperatures, every four months may be sufficient.
A simple test: rub a few drops of water onto the leather surface. If the water beads up and rolls off, the leather still has adequate protection. If it soaks in quickly, it's time to condition. Carry out this test after every car wash to track where the leather stands.
Conditioning restores; protection prevents. After conditioning, take a few extra steps to extend how long that treatment lasts and reduce how often you need to repeat it.
UV rays are the fastest route to premature leather failure. A conditioner with built-in UV inhibitors helps, but you can go further with a dedicated leather protectant spray applied as a topcoat. A windshield sunshade is one of the most cost-effective tools available — it can drop interior temperatures by 30–40°F on a hot day, dramatically slowing UV and heat damage. If your car sits outside for long periods, a sunshade should be part of every park.
Park in shade or a garage whenever possible. If you live somewhere with extreme seasonal shifts, consider removable seat covers during the hottest months — they absorb the abuse so the leather doesn't have to. If moisture is ever an issue (wet clothes, kids with drinks, pets), dry any spills immediately with a clean cloth. Allowing moisture to sit in seams can cause mold and mildew that is much harder to address than dryness. For musty odors that have already set in, read our guide on how to remove mildew smell from car.
Condition leather car seats every three months as a standard routine. In hot, sunny, or dry climates, increase frequency to every six to eight weeks. Use the water-bead test — if water soaks into the surface instead of beading, it's time to condition regardless of how much time has passed.
No. Household oils like olive oil, coconut oil, and baby oil are not designed for automotive leather. They can temporarily soften the surface but degrade the protective finish over time, attract dust, and turn rancid. Use a conditioner specifically formulated for finished automotive leather.
Yes, always clean before conditioning. Applying conditioner over dirty leather traps grime beneath the surface, causes uneven absorption, and can lock in stains. Use a pH-neutral leather cleaner and allow the seats to dry fully before applying any conditioner.
Apply a cream or lotion conditioner to a foam applicator pad and work it into the leather in small sections using slow circular strokes. Allow it to absorb for five to ten minutes, then buff away excess with a clean microfiber cloth. Work in the shade and cover all surfaces including bolsters, seat backs, and headrests.
Conditioning can reduce the appearance of minor surface dryness and shallow cracks, but it cannot fully repair deep cracks or splits. For significant damage, a leather repair kit or professional restoration is needed before conditioning. The best use of conditioning is prevention — addressing dryness before cracks ever form.
No. A conditioner replenishes moisture and oils inside the leather fibers to keep them flexible. A protectant creates a surface barrier against UV rays, spills, and stains. They serve different functions and many detailers use both: condition first to nourish, then apply a protectant as a topcoat for lasting defense.
 |
 |
 |
 |
About Joshua Thomas
Joshua Thomas just simply loves cars and willing to work on them whenever there's chance... sometimes for free.
He started CarCareTotal back in 2017 from the advices of total strangers who witnessed his amazing skills in car repairs here and there.
His goal with this creation is to help car owners better learn how to maintain and repair their cars; as such, the site would cover alot of areas: troubleshooting, product recommendations, tips & tricks.
Joshua received Bachelor of Science in Mechanical Engineering at San Diego State University.
Get some FREE car parts & gear.. Or check out the latest free automotive manuals and build guides here.
Disable your ad blocker to unlock all the hidden deals. Hit the button below 🚗
| | | |