by Joshua Thomas
A cracked car dashboard is more than a cosmetic problem. It distracts you while driving, signals neglect to potential buyers, and will deepen with every cycle of heat and cold if left alone. Knowing how to fix a cracked car dashboard at home saves hundreds of dollars compared to professional interior repair and is well within reach for any DIYer. Most cracks form gradually from UV exposure, extreme temperatures, and aging plastic — and most can be reversed with the right products and a few hours of work.
Dashboards are typically made from vinyl over foam, hard ABS plastic, or a combination of both. The repair approach depends on material type and crack severity. Before you start, pair this guide with our article on how to protect your car interior from UV damage — UV protection is the single most effective way to stop cracks from returning once you've fixed them.
Contents
Dashboard surfaces absorb intense sunlight through the windshield all day. UV rays break down the plasticizers in vinyl and ABS plastic, leaving the material brittle and prone to splitting. According to the U.S. Environmental Protection Agency, UV-A radiation penetrates glass and continues degrading surfaces even on overcast days. This is why most cracks appear on the top face of the dashboard — the area with the highest sun exposure.
Repeated heating and cooling cycles cause plastic to expand and contract. Over years, this micro-movement creates hairline fractures that gradually widen. Older dashboards that have never been conditioned are especially vulnerable because their plastic has lost nearly all natural flexibility. Even minor temperature swings can split an already brittle surface.
Gather everything before you begin. Stopping mid-repair to hunt for a product can ruin adhesion and leave an uneven finish.
Product quality matters here. Our guide to the best dashboard cleaners covers top-rated conditioners and prep sprays that work well alongside repair kits to ensure strong adhesion and a clean finish.
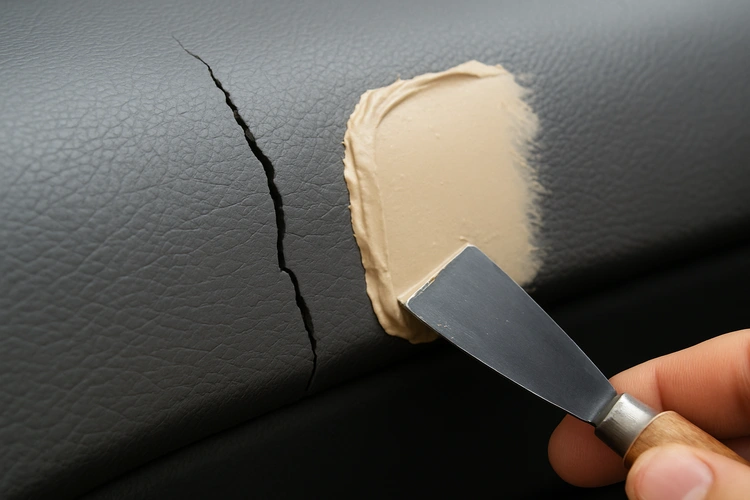
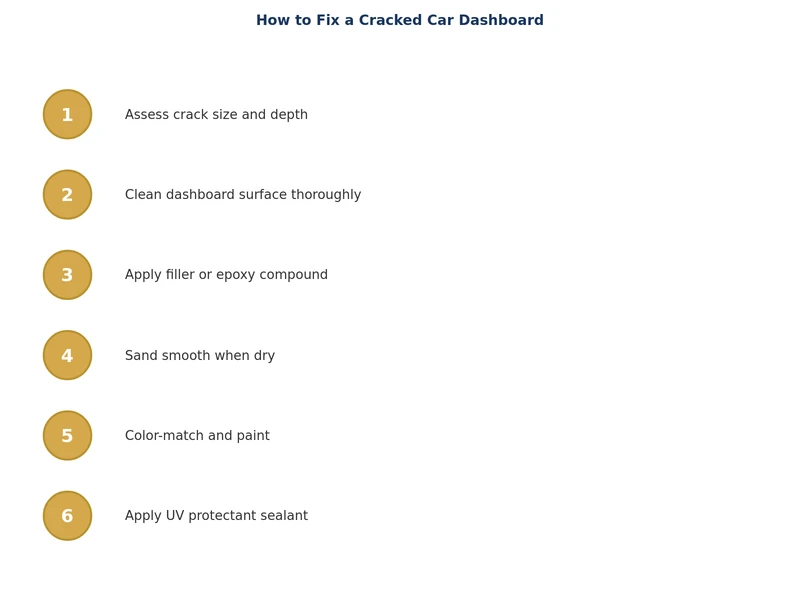
Wipe the entire cracked area with isopropyl alcohol on a microfiber cloth. Remove all dust, skin oils, wax, and protectant residue. Any contamination will prevent the filler from bonding properly. Let the surface dry for at least 10 minutes before touching it again.
Use 400-grit sandpaper to lightly scuff the edges of the crack. This removes sharp ridges and creates a mechanical key for the filler to grip. Wipe away sanding dust with a dry cloth. Be conservative — you only need to roughen the edges, not remove surrounding material.
Squeeze a small amount of vinyl or plastic filler into the crack using the flexible spreader included in most kits. Press the filler firmly into the crack and slightly overfill — the material shrinks a little as it cures. For deep or wide cracks, build up the repair in two thin layers rather than one thick pass. Thin coats cure more evenly and minimize shrinkage voids. Allow each layer to cure for 20–30 minutes.
Once fully cured, sand the filled area with 800-grit sandpaper using light circular motions until the patch is flush with the surrounding surface. Check by running a clean fingertip across the repair — you should feel no ridge or bump. Wipe away all dust before moving to the next step.
Most dashboards have a textured grain rather than a glassy smooth finish. Heat a grain texture pad with a heat gun to around 150°F, then press it firmly onto the filled area for several seconds. The pad transfers a matching texture to the filler, blending the repair with the surrounding surface. Most repair kits include multiple grain patterns — choose the one that most closely matches your dashboard.
Apply trim paint or vinyl dye in short, even passes from about 8 inches away. Let each coat flash dry before applying the next — two to three coats usually achieves a solid color match. Finish the repair with a UV protectant spray to seal the surface and protect against future degradation. Allow everything to cure for at least two hours before touching the area.
Not all cracks require the same approach. Use this table to choose the right method for your situation.
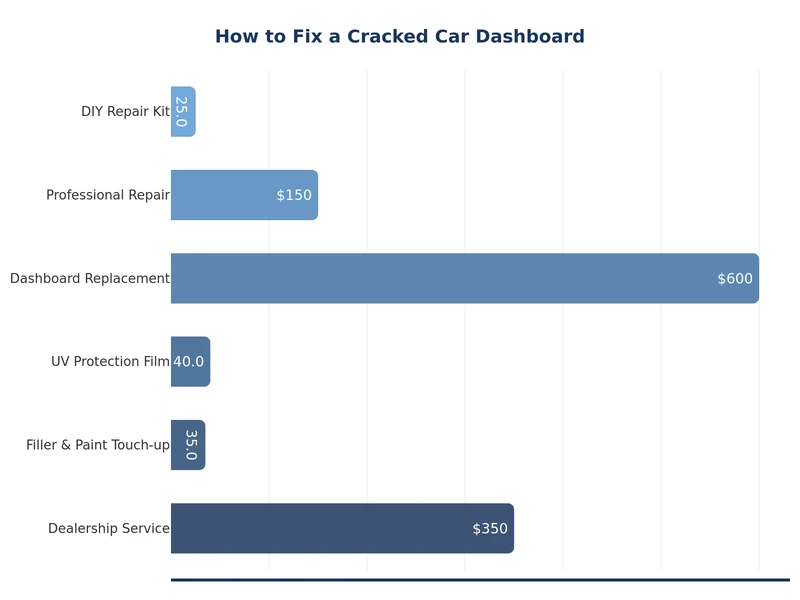
| Method | Best For | Avg. Cost | Difficulty | Expected Lifespan |
|---|---|---|---|---|
| Vinyl filler kit | Hairline to medium cracks in vinyl | $15–$40 | Beginner | 3–5 years with UV care |
| Plastic adhesive + filler | Deep cracks in hard ABS plastic | $20–$50 | Intermediate | 4–6 years |
| Dashboard cap overlay | Extensive cracking across the whole surface | $150–$350 | Beginner | 7–10 years |
| Full dashboard replacement | Structural damage or crumbled foam | $300–$1,200+ | Advanced | Lifetime of vehicle |
A repaired dashboard is still vulnerable without addressing the root cause. Consistent preventive habits extend the life of both the repair and the surrounding material significantly.
A reflective sunshade placed inside the windshield when parked can reduce dashboard surface temperature by 30–40°F. This single habit makes more difference than any protectant product. Fold-out accordion shades are inexpensive and easy to store in the door pocket.
A silicone-free UV protectant applied every four to six weeks keeps plastic and vinyl supple. Avoid oil-based protectants that leave a greasy sheen — they attract dust and can cause windshield glare. If you're conditioning other interior surfaces at the same time, the products recommended in our guide on how to clean vinyl car seats are compatible with dashboard surfaces and safe for all interior plastics.
Garage or shaded parking dramatically slows plastic degradation. If outdoor parking is unavoidable, orient the vehicle so the windshield faces away from the strongest afternoon sun when possible.
Some dashboards are genuinely beyond patch repair. If cracking covers more than 30% of the surface, if underlying foam has crumbled and no longer provides support, or if large sections of vinyl have completely separated from the substrate, a repair kit will not hold long-term.
Dashboard cap: A molded plastic overlay that snaps directly over the existing dashboard. No surface prep beyond cleaning. Costs $150–$350 and installs in under an hour. A practical solution when the structure is intact but the surface is too far gone to repair.
Full replacement: OEM or aftermarket dashboards restore a factory look. This is a multi-hour job involving console disassembly, but it is the most durable outcome. Worth considering on a vehicle you plan to keep long-term.
If you are working on multiple repairs in one session, the prep-fill-finish workflow used here is very similar to the method covered in our guide on how to repair a windshield chip yourself — tackling both in one afternoon keeps prep materials warm and speeds the overall process.
Yes. Most hairline to medium cracks in vinyl or plastic dashboards can be repaired at home using a dashboard repair kit available at any auto parts store. The process requires no special equipment beyond sandpaper, a heat gun or hair dryer, and basic patience. Deep structural damage or widespread cracking may warrant a dashboard cap or professional repair instead.
A properly executed filler repair lasts three to six years when maintained with regular UV protectant application and sun protection. Skipping UV care is the most common reason repairs fail early — the filler can re-crack if the surface is not kept conditioned and protected from direct sunlight.
UV radiation breaking down plasticizers in the vinyl or plastic is the leading cause, followed by repeated heat and cold cycles that cause the material to expand and contract. Lack of conditioning accelerates both processes. Dashboards in hot, sunny climates or vehicles parked outdoors without sunshades are at highest risk.
Standard comprehensive and collision auto insurance policies generally do not cover cosmetic interior wear such as dashboard cracking. Some policies with interior coverage riders may partially cover damage, but cracking due to UV and age is almost always classified as normal wear and tear, which is excluded from most policies.
Flexible vinyl repair compounds designed specifically for automotive interiors are the best choice for most dashboards. Look for kits that include grain texture pads and color-matched dyes. Rigid body fillers like Bondo are not suitable for dashboards because they cannot flex with temperature changes and will re-crack quickly.
Yes — light sanding with 400-grit sandpaper along the crack edges is necessary to remove sharp ridges and create a rough surface the filler can bond to. Without this step, the filler sits on a smooth surface and peels away. After filling and curing, a final pass with 800-grit sandpaper brings the repair flush before texturing and painting.
 |
 |
 |
 |
About Joshua Thomas
Joshua Thomas just simply loves cars and willing to work on them whenever there's chance... sometimes for free.
He started CarCareTotal back in 2017 from the advices of total strangers who witnessed his amazing skills in car repairs here and there.
His goal with this creation is to help car owners better learn how to maintain and repair their cars; as such, the site would cover alot of areas: troubleshooting, product recommendations, tips & tricks.
Joshua received Bachelor of Science in Mechanical Engineering at San Diego State University.
Get some FREE car parts & gear.. Or check out the latest free automotive manuals and build guides here.
Disable your ad blocker to unlock all the hidden deals. Hit the button below 🚗
| | | |