A driver in Phoenix once parked their decade-old sedan in a covered garage, thinking the leather interior was protected. Six months later, the driver's seat had hairline cracks running across the bolster — caused by low humidity and years of neglected conditioning. It's a scenario that plays out in millions of vehicles every year. Learning how to fix cracked leather car seats before the damage spreads is one of the most cost-effective interior repairs a vehicle owner can make — often costing under $50 in materials versus $300–$800 for professional reupholstery.
Cracked leather is not just cosmetic. Cracks expose the foam substrate underneath to moisture, body oils, and UV radiation, accelerating structural breakdown. Left untreated, surface cracks become tears, and tears require panel replacement. Early intervention — cleaning, filling, and conditioning — can restore seats to near-original condition and add years of usable life.
This guide covers the full repair spectrum: from quick surface fixes that take under an hour to deep-crack restorations requiring color matching and multiple cure cycles. All skill levels are addressed.
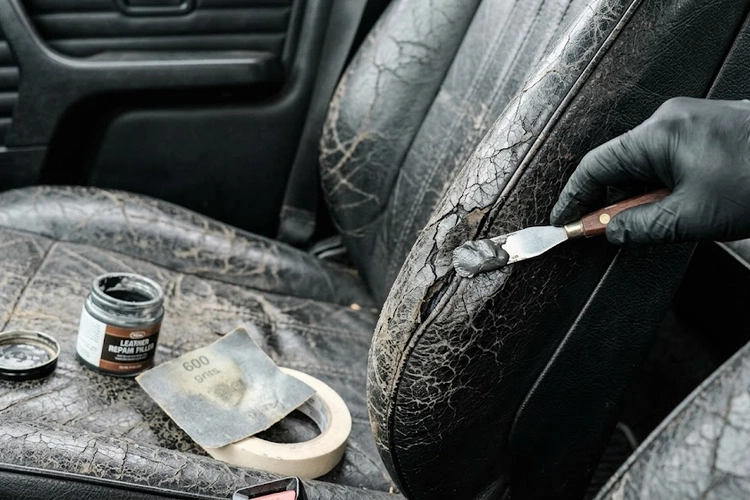
Figure 1 — Surface cracks on a leather driver's seat bolster — one of the most common interior wear points in high-mileage vehicles.
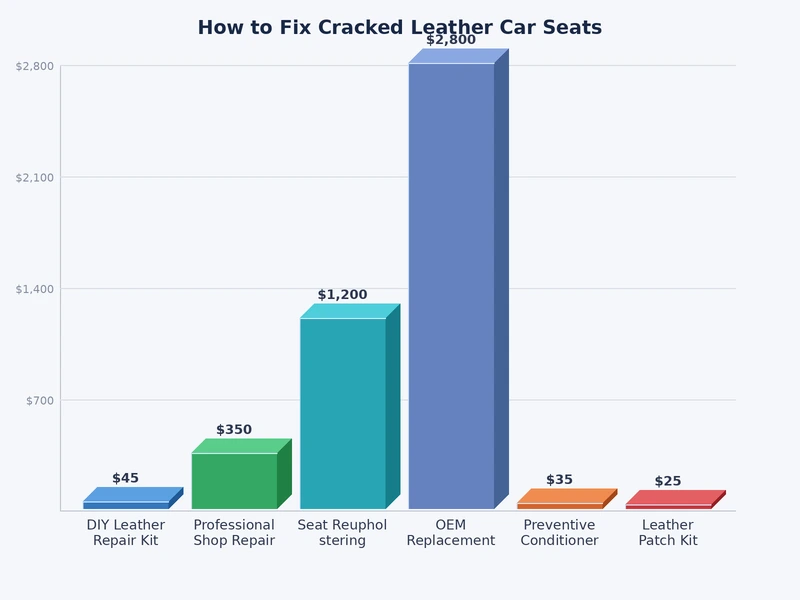
Figure 2 — Repair difficulty, estimated cost, and time investment by crack severity level.
Beginner Fixes vs. Advanced Repairs: Knowing the Difference
Not every cracked leather seat requires the same approach. Misdiagnosing severity is the most common mistake — and it leads to wasted product, poor results, or permanent discoloration. Before purchasing anything, classify the damage.
Assessing the Damage Level
Run a fingernail lightly across the affected area. Three outcomes are possible:
Surface crazing — Fine network of shallow cracks. The leather surface (called the topcoat or finish layer) is breaking down, but the hide beneath is intact. This is the easiest and cheapest fix.
Moderate cracking — Cracks are visible and slightly raised at the edges. The hide may be starting to dry out. Requires filler and re-dyeing.
Deep structural cracking — Cracks extend through the hide, edges curl upward, and foam may be visible. Requires multiple filler passes, subpatch reinforcement, and full color restoration. Professional help is worth considering at this stage.
Damage Level
Visual Signs
DIY Difficulty
Estimated Cost
Time Required
Surface Crazing
Fine network of hairline cracks, no raised edges
Easy
$15–$35
1–2 hours
Moderate Cracking
Visible cracks, slight edge lift, some discoloration
Leather filler (also called leather repair compound)
Flexible palette knife or plastic spreader
Grain pad or texture mat (to emboss filler before it cures)
Leather dye or colorant matched to the original seat color
Leather finish/sealer (water-based, flexible)
Heat gun or hair dryer
Fine-grit sandpaper (400–600 grit)
Isopropyl alcohol (70%) for deglazing
How to Fix Cracked Leather Car Seats: Step-by-Step
This process applies to moderate cracking — the most common scenario for vehicles 5–10 years old. Adjust depth of effort based on the damage level identified above.
Step 1 — Clean the Leather
Repairing over dirty leather guarantees poor adhesion and a visible repair. This step is non-negotiable.
Vacuum the seat surface with a soft brush attachment. Remove all loose debris from cracks.
Apply a pH-neutral leather cleaner to a microfiber cloth — never spray directly onto leather.
Work in small circular sections, using light pressure. Do not scrub aggressively.
Wipe clean with a dry microfiber cloth.
Allow the leather to dry completely — at least 30 minutes in open air.
Apply 70% isopropyl alcohol to a clean cloth and wipe the repair zone. This step removes the existing finish layer (deglazing) so filler adheres properly. Skip this step and the filler will peel within weeks.
For a thorough interior prep routine, the methods outlined in the truck interior detailing guide translate directly to passenger cars and cover leather prep in the context of a full interior clean.
Step 2 — Fill the Cracks
Apply a small amount of leather filler to the palette knife.
Press the filler firmly into the crack, working it in at an angle to eliminate air pockets.
Wipe away excess with a damp cloth — filler should be flush with, not raised above, the surrounding leather surface.
Allow to dry per manufacturer instructions (typically 20–30 minutes at room temperature, or 5–10 minutes with a heat gun on low).
Sand lightly with 400-grit sandpaper. The goal is a smooth, level surface — not bare leather.
For deep cracks: repeat 2–3 times, building up thin layers rather than one thick application. Thick single-pass applications crack during curing.
While the final layer is still slightly tacky, press a grain pad (a textured silicone mat) against the surface for 10–15 seconds to emboss the leather grain pattern into the filler. Without this, the repaired area will look visually flat and different from the surrounding leather.
Step 3 — Color Match and Apply Dye
Color matching is where most DIY repairs fail. The repair looks great from six feet away and wrong from six inches. A few rules that professional leather technicians follow:
Always test dye on an inconspicuous area — under the seat or on the rear-facing side of a bolster — before applying to the repair zone.
Apply dye in thin layers (3–5 passes) rather than one heavy coat. Heavy single-coat applications crack when the leather flexes.
Use a sea sponge or airbrush for blending — foam applicators leave streaks on leather.
Feather the dye 2–3 inches beyond the repair zone to avoid a hard edge.
Allow each layer to dry fully (5–10 minutes) before applying the next.
Many leather repair kit manufacturers — including Leather Magic, Leather New, and Fibrenew — offer color-matching services. Submit a photo and a small leather sample (from under the seat) for precise custom mixing.
Step 4 — Seal and Condition
Apply a water-based, flexible leather finish/sealer over the dyed area. This protects the colorant and gives the surface its original sheen level (matte, semi-gloss, or gloss).
Allow to cure fully — most finishers require 24 hours before the seat sees regular use.
Once cured, apply a quality leather conditioner across the entire seat panel — not just the repair zone. This prevents future cracking by restoring oils that keep the hide supple.
Long-Term Strategy: Preventing Cracks from Coming Back
Fixing cracked leather car seats is a temporary victory without a consistent maintenance plan. Leather is a natural material that loses moisture over time through oxidation and UV exposure. Replacing that moisture on a regular schedule is the only reliable prevention.
Conditioning Schedule
Every 3 months — Apply leather conditioner to all leather surfaces.
After any deep cleaning — Conditioning is mandatory after any use of cleaner or isopropyl alcohol, which strip surface oils.
Before winter storage — Cold and low humidity accelerate leather drying. A thorough conditioning session before extended garage storage is especially important. The winter car maintenance guide covers this in broader context.
After long sun exposure — UV radiation breaks down the leather's topcoat faster than almost any other factor.
Managing Environmental Factors
Use a windshield sunshade — Parked-car temperatures can reach 160°F (71°C) on sunny days. A reflective sunshade cuts cabin temperature by 40–60°F and dramatically reduces UV exposure to the dashboard and front seat.
Park in shade or covered structures — Consistent sun exposure is the single largest driver of leather cracking in warm climates.
Tint windows — High-quality ceramic tint blocks up to 99% of UV radiation without significantly reducing visible light.
Avoid silicone-based products — Products like Armor All Leather Protectant leave a slick silicone film that temporarily looks good but actually repels conditioning oils over time. Use lanolin- or beeswax-based conditioners instead.
If the vehicle is also being prepared for resale, the steps in the car sale preparation guide integrate leather care into the broader process of maximizing resale value.
Real-World Repair Scenarios
Two representative cases illustrate how the same principles apply differently depending on severity.
Light Surface Cracking
A 2016 Honda Accord with black leather seats and 78,000 miles. The driver's seat bolster shows fine network cracking — classic surface crazing from UV exposure in a Phoenix, Arizona climate. No filler required.
Clean with pH-neutral cleaner. Allow to dry.
Apply leather conditioner — three thin coats over 24 hours, buffing lightly between each.
After the third coat, the crazing is significantly reduced. The leather has re-absorbed oils and the surface is smooth to the touch.
Total cost: $28 in product. Time: 90 minutes spread across one day.
This is the outcome most owners can achieve with light surface damage. The window closes fast — surface crazing becomes moderate cracking within one to two seasons if left untreated.
Deep Structural Cracks
A 2012 Toyota Camry with tan leather, 140,000 miles. The driver's seat has multiple cracks across the center cushion with visible foam substrate. Several cracks are 4–6 inches long with curled edges.
Clean, deglaze, and allow full drying.
Apply adhesive backer (sub-patch material) under the curled edges using a palette knife to re-bond lifting leather to the foam.
Apply leather filler in four passes — two to fill depth, one to level, one final cosmetic pass with grain texture.
Sand between passes with 600-grit paper.
Apply custom-mixed tan leather dye in four layers, airbrushed for blending.
Apply matte leather finish sealer. Cure 24 hours.
Condition entire seat with leather conditioner.
Total cost: $85 in product. Time: 6 hours over two days.
Result: Cracks are invisible from normal seating position. Close inspection reveals slight texture variation — acceptable for a daily driver.
Common Myths About Leather Seat Repair
Misinformation is widespread in automotive forums. Several widely repeated claims about fixing cracked leather car seats are simply wrong.
Myth: Vaseline fixes cracked leather. Petroleum jelly clogs leather pores, attracts dirt, and accelerates surface breakdown over time. It does not penetrate the hide. Avoid it entirely.
Myth: Any conditioner works. Silicone-heavy conditioners create a surface film but do not moisturize the hide. Lanolin, neatsfoot oil, or beeswax-based products penetrate and actually condition. Read the ingredient list.
Myth: Leather filler lasts forever. Even the best repairs have a lifespan. High-stress areas (seat bolsters, driver's seat center) will require re-treatment every 2–4 years depending on use and climate.
Myth: Vinyl repair kits work on leather. Vinyl and leather have fundamentally different chemical properties. Vinyl repair kits do not bond properly to leather substrates and will fail quickly. Use leather-specific products only.
Myth: Professional repair always beats DIY. For light-to-moderate cracking, a careful DIY repair using quality materials routinely outperforms quick professional jobs. The difference is product quality and patience, not professional training.
Myth: Once leather cracks, it's ruined. Surface and moderate cracking is fully reversible with proper technique. Even deep cracks can be cosmetically restored to an acceptable level without replacement.
Quick Wins: Fast Improvements Without a Full Repair Kit
For owners who want visible improvement without committing to a multi-hour repair, several fast interventions deliver meaningful results in under an hour.
Condition immediately — A single application of quality leather conditioner on lightly cracked seats often produces visible improvement within 30 minutes as the leather re-absorbs oils and surface crazing becomes less pronounced.
Clean first, always — Dirty leather looks worse than it is. A thorough cleaning with a pH-neutral product removes built-up grime from crack edges that makes damage appear more severe. Many owners are surprised at what reveals itself.
Use a leather recoloring balm — Products like Leather Honey or Tarrago Leather Color Balm are hybrid conditioner-colorants. They don't replace a proper dye job, but they minimize visual contrast between cracked and intact areas temporarily.
Apply a heat gun — carefully — Very light heat (low setting, held 8–10 inches from the surface, constant motion) softens leather and allows minor surface crazing to partially close. This is a temporary measure, not a fix, but useful before selling a vehicle.
Even careful repairs encounter problems. Most failures trace back to a handful of root causes.
Filler Peeling or Lifting
Cause: Insufficient deglazing before application. The existing finish layer prevented adhesion.
Fix: Remove the failed filler with fine sandpaper. Re-deglaze with 70% isopropyl alcohol. Allow full dry time (minimum 15 minutes). Reapply filler in thin layers.
Prevention: Never skip the deglazing step. The leather surface should feel slightly rough and absorbent before filler goes on.
Cause: Filler applied too thick in a single pass.
Fix: Multiple thin passes are mandatory. If a thick pass has been applied and is already dry, sand it down to a thin layer and build back up correctly.
Color Mismatch After Dyeing
Cause: Stock kit colors rarely match aged leather exactly. Original seat color has shifted over years of UV exposure.
Fix: Mix colorants. Most repair kits include base colors that can be blended. Test extensively on hidden areas. Accept that a small visible repair zone is preferable to a large mismatched panel.
Prevention: Send a leather sample to a professional color-matching service before starting. Fibrenew and Leather Magic both offer this. The $15–$25 cost prevents a frustrating redo.
Cause: Dye applied unevenly or in too few layers.
Fix: Light sanding with 600-grit paper to smooth dye, then additional thin layers to blend. A damp sponge can help soften hard edges before sanding.
Frequently Asked Questions
Can genuinely cracked leather be fully restored to its original appearance?
Surface and moderate cracking can be restored to near-original appearance with proper filler, color matching, and sealing. Deep structural cracks where the hide has split completely can be made cosmetically acceptable but will show slight texture variation under close inspection. The key variables are crack depth, color match accuracy, and repair technique quality — not the age of the vehicle.
How long does a leather seat repair typically last?
A properly executed repair on low-stress seat areas lasts 3–5 years. High-stress areas like driver's seat bolsters and seat center cushions see more flexing and friction, and may require touch-up at 2–3 years. Regular conditioning after the repair extends durability significantly by keeping the surrounding leather supple and reducing stress on the repair boundary.
Is it worth repairing leather seats on a high-mileage vehicle?
Yes, with conditions. If the vehicle will be driven for 2+ more years and the cracking is moderate or surface-level, repair cost ($35–$80 DIY) is well below even a single professional seat panel replacement ($200–$400). If the vehicle is being prepared for sale, a clean leather repair improves perceived value by more than the repair cost in most cases. Skip the repair only if the damage is deep structural cracking across multiple panels on a vehicle nearing end of life.
Next Steps
Inspect all leather seat surfaces under bright light today. Classify each damaged area as surface crazing, moderate cracking, or deep structural cracking using the criteria in this guide.
Purchase the correct product tier for the damage level identified — do not buy a full repair kit if conditioning alone will resolve the issue.
Clean and deglaze all repair zones before any product application. This single step determines whether the repair holds or fails within weeks.
Apply leather conditioner to the entire seat after any repair — not just the patched area — and schedule quarterly conditioning going forward.
Install a windshield sunshade and consider ceramic window tint to address the root UV cause, preventing the next round of cracking from developing.
Diego Ramirez is a maintenance and care specialist who has been wrenching on cars since he was sixteen. He focuses on fluid changes, preventive care routines, paint protection, and the small habits that turn a five-year-old car into a fifteen-year-old car.