by Joshua Thomas
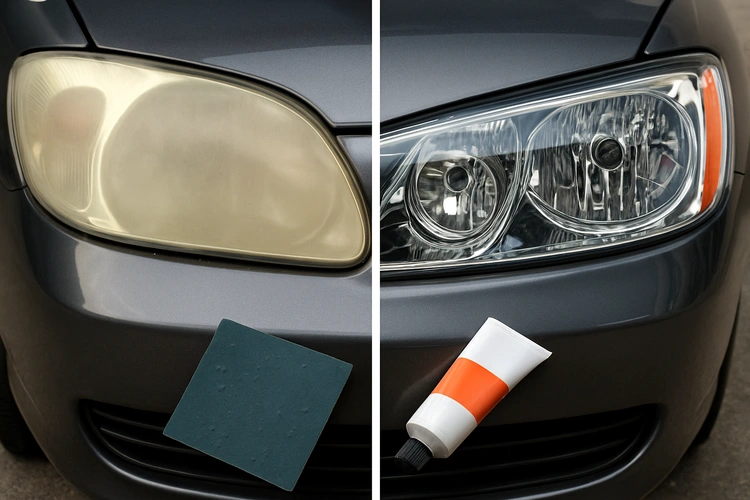
Foggy, yellowed headlights reduce your nighttime visibility by up to 80% — and they make an otherwise clean car look years older. Learning how to fix foggy headlights at home is one of the most satisfying and cost-effective DIY car care tasks you can do. Whether your lenses are lightly hazy or severely oxidized, the same fundamental process applies. A dedicated headlight restoration kit makes the job easier, but you can also get strong results with sandpaper and polish you may already own.
Modern headlight lenses are made from polycarbonate plastic coated with a thin UV-protective layer. Over time, sun exposure breaks down that coating, allowing polycarbonate to oxidize and turn opaque. The process is similar to what happens to faded paint — if you've ever tackled oxidation on car paint, the chemistry here is nearly identical. This guide covers everything from causes to full step-by-step restoration.
Contents
The primary cause of foggy headlights is UV oxidation. Polycarbonate plastic is highly susceptible to ultraviolet radiation. Manufacturers apply a protective coating at the factory, but it wears away within several years — especially in sunny climates or if the car sits outdoors. Once that coating degrades, UV rays attack the plastic directly, forming a yellowed, chalky layer on the surface.
UV is the main culprit, but a few other factors speed up the process:
You don't need a lot of equipment. Here's what to gather before you start:
Alternatively, an all-in-one headlight restoration kit includes most of these items pre-matched for the task. Kits from brands like Meguiar's, 3M, and Sylvania are widely available and take the guesswork out of selecting grits and compounds.
This process works on lenses ranging from lightly hazy to heavily yellowed. Severely damaged lenses may need to start at 400 grit; mild cases can skip straight to 1500 grit.
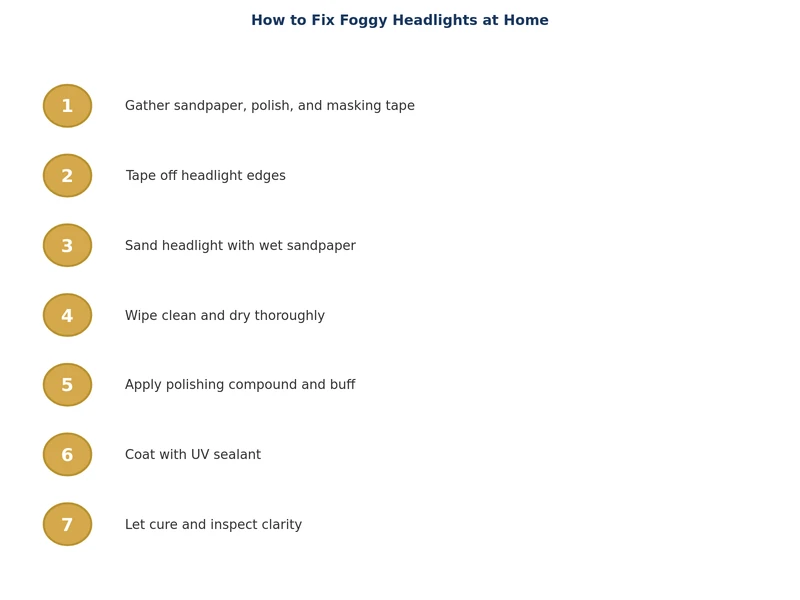
Wash both headlights thoroughly with car wash soap and water. Remove all road grime, bugs, and wax. Dry completely with a microfiber cloth. Apply masking tape around each lens to protect the paint — especially important if you're using an orbital polisher. Any polish or compound that lands on automotive paint can cause micro-scratches.
Wet sanding removes the oxidized layer. Soak your sandpaper in water for a few minutes before use. Work in straight, overlapping strokes — never circles at this stage. Keep the surface wet by spraying frequently. Progress through the grits in order:
After each grit, wipe dry and inspect. The lens will look milky white at this point — that's normal. You're removing material, so use light and even pressure.
Apply a small amount of plastic polishing compound to a clean microfiber cloth or foam applicator pad. Work it into the lens using firm circular motions. This step restores clarity by removing the fine scratches left by the finest sandpaper. The technique here is similar to hand polishing painted surfaces — consistent pressure and overlapping passes yield the best results. Wipe away residue and inspect the lens in direct light. Repeat if needed.
This is the most important and most skipped step. Without UV protection, your freshly restored lenses will re-oxidize within months. Apply the included sealant (or a dedicated headlight coating) according to package directions. Most require 1–2 thin coats with a cure time in between. Keep the car out of rain for at least an hour after application.
Not sure which approach is right for your situation? This table breaks down the most common methods by cost, effort, and how long results last.
| Method | Approx. Cost | Difficulty | Result Quality | Longevity |
|---|---|---|---|---|
| Toothpaste (DIY hack) | $0–2 | Easy | Mild improvement only | 2–4 weeks |
| Bug spray (DEET trick) | $0–5 | Easy | Temporary, can damage lens | Days to weeks |
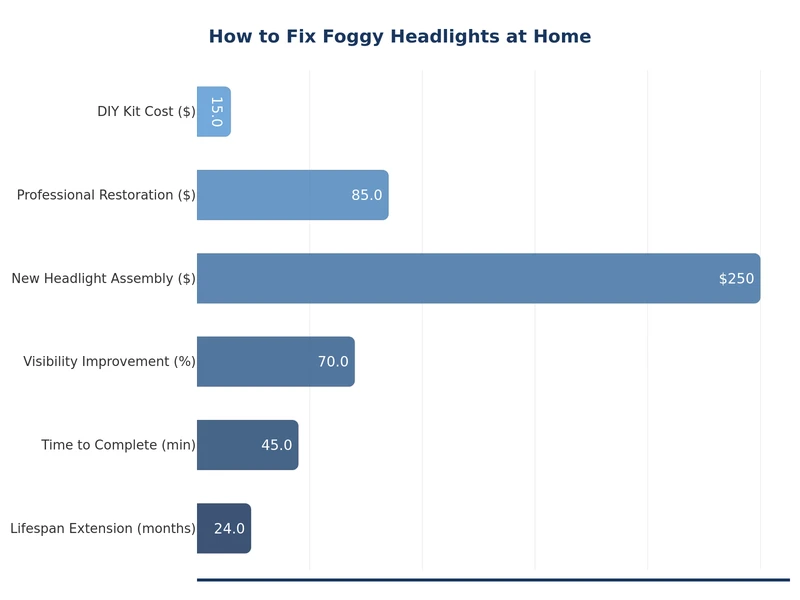
| Sandpaper + compound (DIY) | $10–20 | Moderate | Very good | 1–2 years with sealant |
| All-in-one kit | $20–40 | Moderate | Excellent | 2–3 years |
| Professional service | $50–150 | None (drop off) | Excellent | 1–3 years |
| Lens replacement | $100–400+ | Moderate–Hard | Like new | 5–10+ years |
For most vehicles with moderate to heavy oxidation, the sandpaper-and-kit approach offers the best balance of cost, results, and durability. Toothpaste and similar hacks may offer a quick visual improvement but do nothing to address the oxidized layer underneath.
Results depend almost entirely on the UV sealant you apply. Without any protection, lenses begin to re-haze within 3–6 months. A quality spray sealant extends results to 1–2 years. Nano-ceramic coatings — similar to those used in full ceramic coating applications — can protect headlights for 3 years or more. Parking in a garage or shaded area also dramatically slows re-oxidation. The lens itself is only as durable as its outermost protective layer.
Once you've restored your headlights, a little maintenance goes a long way:
Headlight oxidation often appears alongside other UV-related damage. If you notice faded trim, dull paint, or a compromised clear coat, it's worth addressing those at the same time. Our guide on fixing peeling clear coat covers a parallel repair process that uses many of the same tools and materials.
Toothpaste provides a very temporary improvement by acting as a mild abrasive on the surface. It does not remove the oxidized layer and offers no UV protection, so results typically fade within weeks. For lasting clarity, use wet sandpaper followed by a polishing compound and UV sealant.
Most DIY restorations take 45 minutes to 2 hours per vehicle, depending on the severity of oxidation and whether you're using an orbital polisher or working by hand. Allow additional cure time after applying the UV sealant before driving in rain.
Restoration is worth it in the vast majority of cases. A quality restoration costs $20–40 in materials and lasts 2–3 years. Replacement lenses typically cost $100–400 or more per side. Restoration makes sense unless the lens is cracked, deeply pitted, or the internal reflector is damaged.
The most common reason is skipping or skimping on the UV sealant step. Without a fresh UV-protective coating, the polycarbonate begins oxidizing again almost immediately. Always apply a dedicated headlight sealant or coating as the final step, and reapply it annually.
Yes — an orbital polisher with a foam pad significantly speeds up the polishing step and produces more consistent results than hand polishing. Use low to medium speed to avoid overheating the plastic. Keep the pad moving at all times and avoid sustained contact in one spot.
In many states and countries, severely degraded headlights can fail a vehicle safety inspection because they reduce light output below legal minimums. If your lights look significantly dimmer than normal or project a scattered beam pattern, restoration is not just cosmetic — it may be required to pass inspection.
 |
 |
 |
 |
About Joshua Thomas
Joshua Thomas just simply loves cars and willing to work on them whenever there's chance... sometimes for free.
He started CarCareTotal back in 2017 from the advices of total strangers who witnessed his amazing skills in car repairs here and there.
His goal with this creation is to help car owners better learn how to maintain and repair their cars; as such, the site would cover alot of areas: troubleshooting, product recommendations, tips & tricks.
Joshua received Bachelor of Science in Mechanical Engineering at San Diego State University.
Get some FREE car parts & gear.. Or check out the latest free automotive manuals and build guides here.
Disable your ad blocker to unlock all the hidden deals. Hit the button below 🚗
| | | |