by Joshua Thomas
A flaking, bubbling finish is one of the most frustrating things a car owner can face. Learning how to fix peeling clear coat before it spreads can save you hundreds — sometimes thousands — of dollars compared to a full professional respray. The clear coat is the transparent protective layer sitting on top of your car's color coat, and once it starts to fail, UV rays, moisture, and road grime attack the paint beneath it directly. Acting quickly is essential.
Whether you're dealing with a small patch on the hood or peeling across an entire door panel, this guide walks you through every option — from a budget DIY repair to knowing when it's time to call a professional. For the best products to use, see our roundup of the best automotive clear coat products available today.
Contents
Clear coat doesn't fail randomly. According to the U.S. Environmental Protection Agency, UV radiation is the single biggest enemy of automotive finishes. Prolonged sun exposure breaks down the polymer bonds in the clear coat, causing it to oxidize, crack, and eventually flake off. Other common culprits include:
Run your fingernail across the edge of a peeling area. If the flake lifts easily and the paint beneath looks dull but intact, a DIY repair is viable. If the base coat is also damaged or rust has formed underneath, you're looking at a more extensive fix — possibly a full panel respray.
Small patches under 6 inches in diameter are the easiest to repair yourself. Large areas covering most of a panel are harder to blend invisibly without professional equipment.
Gathering everything before you start prevents costly mid-job interruptions. For a DIY clear coat repair you'll need:
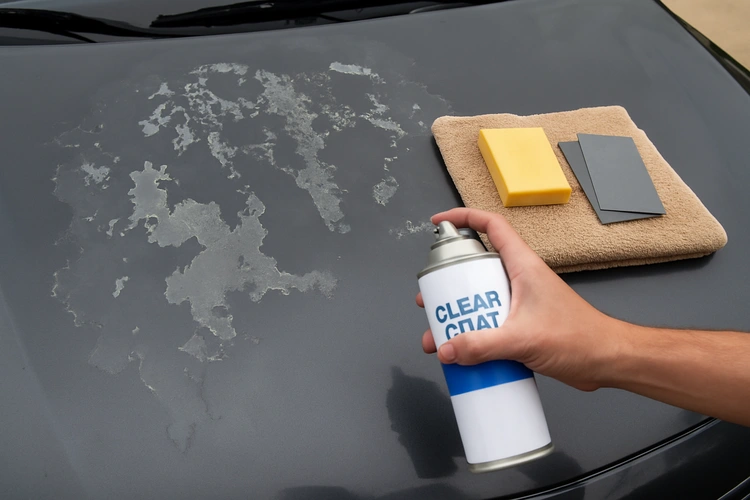
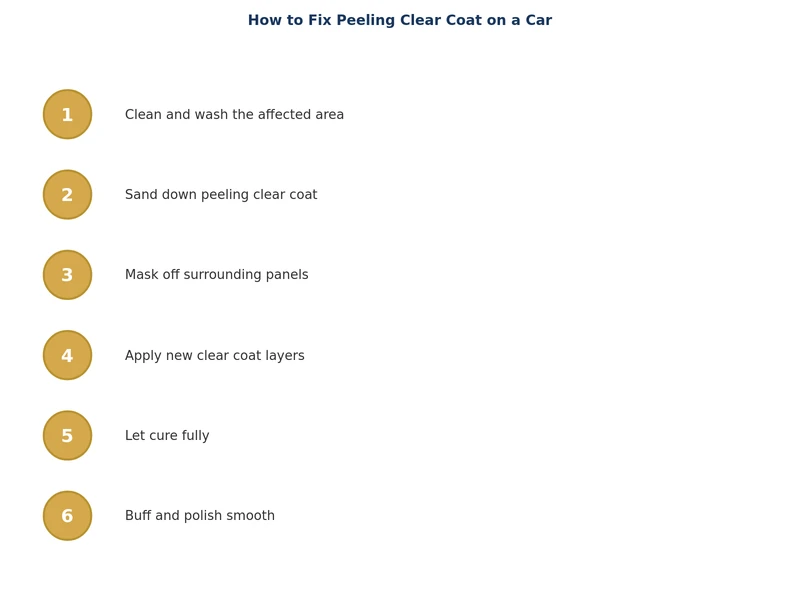
Wash the affected panel thoroughly with automotive soap and water. Rinse completely and dry with a clean microfiber towel. Then wipe the area down with isopropyl alcohol on a fresh microfiber cloth to remove any wax, polish, or grease residue. Contaminants left on the surface will prevent the new clear coat from bonding properly.
Mask off the surrounding panels and glass with tape and plastic sheeting. Overspray on adjacent panels creates more work and can damage unaffected paint.
This is the most critical step. Using 400-grit wet/dry sandpaper, carefully sand away all loose and lifting clear coat. Your goal is a smooth, feathered edge — not a hard cliff — between the peeled area and the intact surrounding finish. Abrupt edges will show through the new coat as a visible ring.
Once the loose material is gone, progress through 800 and then 1500-grit paper, wet-sanding to smooth the entire repair area. Wipe clean with a tack cloth between grits. The final sanded surface should feel uniformly dull and slightly rough — that texture gives the new clear coat something to grip.
Shake the aerosol can for at least two minutes. Apply in thin, overlapping passes from about 10–12 inches away. Three to four light coats produce far better results than one heavy coat — thick coats run, sag, and trap solvents that cause the new finish to crack later.
Allow each coat to flash off (become touch-dry) for 5–10 minutes before applying the next. The final coat should appear uniformly glossy with no dry-spray texture. Let the repair cure for at least 24 hours — ideally 48 — before moving on to polishing.
For maximum durability, consider a 2K aerosol clear coat (two-component urethane). These use a catalyst cartridge that activates a chemical hardener, producing a finish nearly as tough as professional spray-gun work.
Once fully cured, wet-sand the repaired area with 2000-grit paper, then 3000-grit, using light pressure and plenty of water. This levels any orange peel texture in the new clear coat and begins to blend the repair into the surrounding paint.
Apply rubbing compound with a foam pad (by hand or dual-action polisher) to remove the fine sanding marks. Follow up with polishing compound to restore deep gloss. Finish with a coat of quality carnauba wax or paint sealant to protect the repair. For tips on the broader polishing process, our guide on how to polish a car by hand covers the full technique in detail.
How you approach the repair should depend on the size of the damage, your skill level, and your budget. Here's a realistic breakdown:
| Repair Option | Best For | Estimated Cost | Result Quality | Skill Required |
|---|---|---|---|---|
| Aerosol clear coat (DIY) | Small patches, <6 inches | $20–$60 | Good with practice | Beginner–Intermediate |
| 2K aerosol clear coat (DIY) | Small–medium areas | $30–$80 | Very good | Intermediate |
| Spray gun + clear coat (DIY) | Full panel repairs | $100–$250 (equipment) | Excellent | Advanced |
| Body shop spot repair | Medium damage areas | $150–$500 | Excellent | None (professional) |
| Full panel respray | Severe or widespread peeling | $300–$900 per panel | Factory quality | None (professional) |
| Full car respray | Multiple panels failing | $1,500–$5,000+ | Factory quality | None (professional) |
For most single-panel damage caught early, a DIY repair with a quality 2K aerosol is the sweet spot between cost and result. If the damage spans multiple panels or the base coat is compromised, professional repair will give a better color-matched, seamless result.
Once you've completed the repair, protecting your investment is straightforward but requires consistency.
UV exposure is the primary cause of clear coat breakdown. Park in a garage or under a carport whenever possible. If outdoor parking is unavoidable, a quality car cover rated for UV protection makes a significant difference over time.
Automated brush car washes are hard on clear coat. Hand washing using the two-bucket method — one bucket for soapy water, one for rinsing your mitt — dramatically reduces the fine scratches that accumulate into surface damage over time. Our guide to how to wash a car properly explains the full process. After washing, always dry with a soft microfiber towel rather than letting water air-dry, which leaves mineral deposits.
A layer of carnauba wax or a synthetic paint sealant sits on top of the clear coat and absorbs the initial UV and chemical damage that would otherwise degrade the finish. Apply every three to four months — more frequently if the car is parked outdoors. Ceramic coating offers longer-term protection (2–5 years) and is worth considering after a fresh repair.
Bird droppings, tree sap, and industrial fallout are acidic and begin etching clear coat within hours. Remove them promptly. Clay barring your paint once or twice a year removes embedded contamination before it causes lasting damage — see our complete clay bar guide for the full technique.
DIY clear coat repair has real limits. Consider professional repainting when:
A professional body shop can repaint a single panel for $300–$900 and blend it into adjacent panels so the color matches seamlessly. For widespread failure across the entire vehicle, a full respray may ultimately be more cost-effective than patching panel by panel.
Yes, for small to medium areas. You can sand away the failing clear coat, feather the edges, and apply fresh aerosol or 2K clear coat over the prepared surface. The repair won't be invisible on close inspection, but it stops the damage from spreading and protects the base coat. Larger areas spanning most of a panel are very difficult to repair invisibly without professional equipment.
A properly applied 2K aerosol clear coat repair can last 3–5 years or longer, especially if you protect it with regular waxing and avoid prolonged sun exposure. Standard aerosol repairs typically hold for 1–2 years. The longevity depends heavily on surface preparation — the cleaner and better-feathered the sanded area, the longer the new coat will bond.
Start with 400-grit to remove all loose and lifting material, then progress through 800 and 1500-grit to smooth and feather the edges. After applying new clear coat and letting it cure fully, wet-sand with 2000 and then 3000-grit to level the surface before polishing. Using too coarse a grit during finishing leaves scratches that show through the final polish.
Standard comprehensive and collision policies do not cover paint degradation from UV exposure or age — this is considered normal wear and tear. If the clear coat was damaged in a covered collision or by a specific covered event (such as hail), the repair may be claimable. Check your policy and deductible amount, as a single-panel repair often costs less than a typical deductible.
Even newer vehicles can experience premature clear coat failure due to thin factory application, improper curing during manufacturing, or exposure to harsh conditions like industrial fallout, road salt, or repeated use of brush car washes. Damage to the paint film — such as deep scratches or chips left unrepaired — allows moisture to get under the clear coat, causing it to lift and peel from the edges of the breach.
For small spot repairs, a quality 2K aerosol rattle can is more than adequate and much easier to use. A spray gun gives better control, finer atomization, and a more even film for larger areas — but requires compressor equipment, proper spray technique, and a clean environment. Most DIYers achieve excellent results with a 2K aerosol on patches up to half a panel in size.
 |
 |
 |
 |
About Joshua Thomas
Joshua Thomas just simply loves cars and willing to work on them whenever there's chance... sometimes for free.
He started CarCareTotal back in 2017 from the advices of total strangers who witnessed his amazing skills in car repairs here and there.
His goal with this creation is to help car owners better learn how to maintain and repair their cars; as such, the site would cover alot of areas: troubleshooting, product recommendations, tips & tricks.
Joshua received Bachelor of Science in Mechanical Engineering at San Diego State University.
Get some FREE car parts & gear.. Or check out the latest free automotive manuals and build guides here.
Disable your ad blocker to unlock all the hidden deals. Hit the button below 🚗
| | | |