by Diego Ramirez
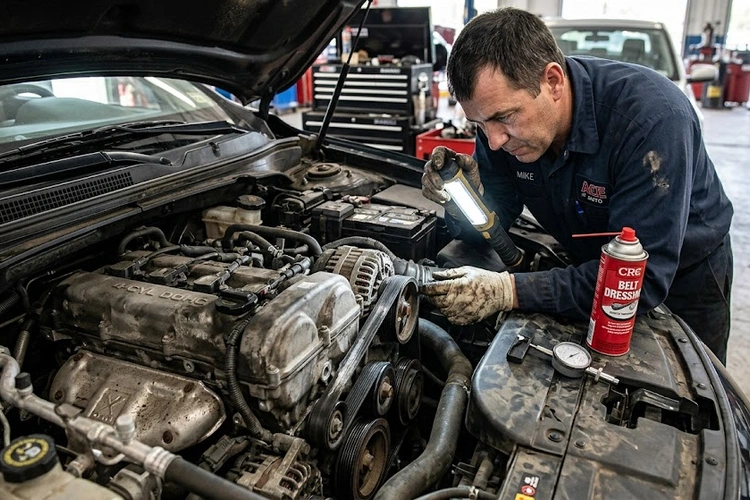
What causes that sharp, high-pitched whine from beneath the hood the instant an engine turns over? In the majority of cases, the culprit is a worn, glazed, or misaligned serpentine belt — and knowing how to fix a squeaky serpentine belt is one of the most valuable diagnostic skills in any home mechanic's repertoire. The repair spectrum is broad: it ranges from a five-minute tension adjustment to a full thirty-minute belt swap, and our team has worked through both ends of that spectrum across dozens of vehicles. A squeaking belt rarely resolves on its own. Left unaddressed, it signals impending failure of the entire accessory drive system — the same system powering the alternator, power steering pump, air conditioning compressor, and cooling fan. Our experience confirms that early intervention is consistently the more economical path.
The signs of a bad alternator frequently overlap with serpentine belt symptoms, making accurate diagnosis the first and most critical step. Before reaching for any tool, our team recommends listening closely to the squeak's behavior — whether it appears on cold starts, under load, or continuously — because each pattern points to a distinct underlying cause.
Contents
Accurate diagnosis separates a ten-dollar fix from an unnecessary two-hundred-dollar repair. Our team emphasizes this point above all others: the squeak itself is a symptom, not a cause, and the underlying cause determines the correct remedy. Misidentifying a failing idler bearing as a worn belt leads to parts expenditure without resolution — a pattern our team encounters regularly on second-opinion inspections.
Sound behavior under different operating conditions provides the most reliable diagnostic data available without specialized equipment. Our experience across a wide range of domestic and import vehicles has produced a consistent diagnostic pattern:
According to the Wikipedia entry on serpentine belts, modern single-belt accessory drive designs replaced multi-belt systems precisely because they are easier to inspect and service — a fact that makes accurate diagnosis more accessible to home mechanics than it was a generation ago.
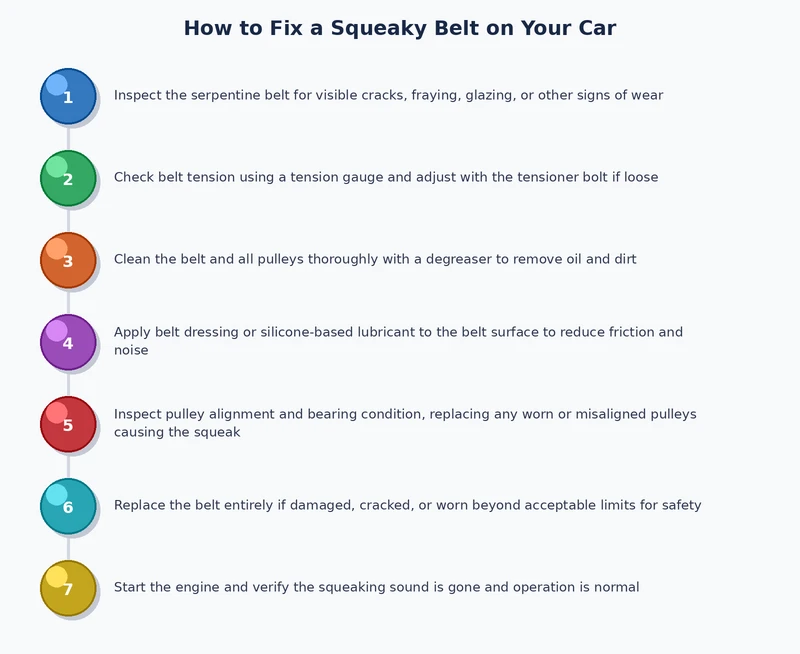
Once the sound pattern is characterized, a visual inspection confirms the diagnosis. The engine must be off and fully cooled before anyone touches the belt or pulleys. Our inspection sequence follows this order:
A misaligned idler pulley is responsible for more persistent belt squeaks than a worn belt itself — always rotate and inspect every pulley before ordering replacement parts.
Proper tooling eliminates improvisation errors. Our team maintains a dedicated serpentine belt service kit for precisely this reason — the wrong wrench size on an automatic tensioner bolt can round the fastener, converting a simple job into a lengthy extraction procedure that adds an hour and additional parts cost.
When replacement is indicated, our team strongly recommends sourcing OEM-equivalent or Gates/Dayco/Continental-branded components. Off-brand belts frequently exhibit shorter service intervals and higher susceptibility to glazing under repeated heat cycling — a pattern confirmed across multiple vehicle platforms in our experience.
| Fix Type | Estimated Part Cost | Difficulty Level | Longevity of Fix | Best Application |
|---|---|---|---|---|
| Belt dressing spray | $5–$12 | Minimal | Days to weeks | Temporary cold-start noise suppression only |
| Manual tensioner adjustment | $0 | Low | Months (spring-dependent) | Older vehicles with adjustable alternator mounts |
| Serpentine belt replacement | $25–$80 | Low to moderate | 4–7 years / 60–100k miles | Glazed, cracked, or age-expired belts |
| Tensioner assembly replacement | $45–$120 | Moderate | Full service life | Depleted spring tension or noisy tensioner bearing |
| Full accessory drive service | $120–$300 | Moderate to high | Full service life | High-mileage vehicles with multiple worn components |
The distinction between a beginner-level intervention and a full component replacement is not merely one of skill — it is one of informed decision-making rooted in diagnostic accuracy. Our team applies a consistent branching logic: if the belt is less than four years old and shows no visible structural damage, tension correction or pulley realignment is attempted first. If the belt surface shows physical degradation beyond thirty percent of the ribbed face, replacement proceeds without delay.
Most modern vehicles use an automatic spring-loaded tensioner, leaving no manual belt adjustment available. On these systems, a squeaking belt that passes visual inspection typically indicates a tensioner spring approaching end-of-life. The spring loses elasticity gradually; our team has documented tensioners that pass a static press test but fail under the dynamic rotational load of engine acceleration — exactly the condition that produces intermittent squeak at cold start.
On older vehicles equipped with manual tensioner slots and locking bolts — a design common through the mid-2000s — the adjustment procedure is systematic:
Pulley misalignment, when confirmed by straightedge inspection, requires loosening the affected pulley mounting bolt, correcting its seating plane with appropriate shims if necessary, and re-torquing to specification. Aftermarket pulleys are a frequent source of misalignment due to dimensional inconsistencies in casting — a strong argument for OEM sourcing on any pulley replacement.
Full belt replacement becomes mandatory under any of these conditions: visible glazing covering more than thirty percent of the ribbed face, cracking deeper than the rib grooves, missing rib segments, or a service interval exceeding the manufacturer's recommended replacement mileage. Most platforms specify 60,000 to 100,000 miles.
The replacement procedure demands methodical execution:
Vehicles that have been stored for extended periods present belt issues compounded by surface hardening from prolonged static loading. Our team's protocol for maintaining a car that sits unused for months includes serpentine belt inspection as a mandatory pre-drive step, and our findings consistently show that storage-induced belt set is underdiagnosed as a squeak source.
Belt dressing remains a contested product category in professional automotive circles. Our team's position is precise: it occupies a legitimate but narrow role, specifically suppressing cold-start squeak on a belt that is within its service life and shows no structural damage. Outside that specific use case, belt dressing is counterproductive and our team does not recommend it as a primary remedy.
Application method matters considerably. Our team applies belt dressing with the engine idling, directing a short burst — under two seconds — onto the ribbed face of the belt while maintaining safe clearance from all rotating components. A single application lasting more than two seconds risks slinging product onto the alternator windings or A/C compressor seals, creating secondary damage that compounds the original repair cost.
Applying belt dressing to a belt with a failing tensioner is the mechanical equivalent of adjusting tire pressure on a car with broken suspension — it quiets one symptom while the structural problem compounds underneath.
Our recommendation: use belt dressing as a one-time diagnostic tool and short-term bridge measure only. Any squeak that returns within two weeks of a dressing application confirms that component replacement — belt, tensioner, or pulley — is the correct and unavoidable path forward. Drivers who observe belt noise alongside dimming lights or sluggish electrical performance should review the signs of a bad alternator before proceeding, as the two failures frequently coexist and compound each other's symptoms.
Prevention is the highest-return investment in accessory drive maintenance. Our team's approach to long-term belt health rests on two pillars: structured inspection intervals and active awareness of the related systems that place load on the belt during normal operation.
The automotive industry consensus, supported by Gates Corporation's published service data, places visual serpentine belt inspection at every oil change interval and full tensioner inspection at every 60,000-mile service. Our team follows a stricter internal standard on vehicles operating in high-temperature environments or dusty conditions, inspecting at every 5,000 miles without exception.
The warning signs that merit immediate attention, regardless of interval:
Cold weather compounds serpentine belt squeak substantially. Rubber compounds lose measurable elasticity below 40°F, and a belt that performs adequately in summer will squeak consistently through every winter cold start if tension is borderline. Our team's comprehensive guide to car maintenance in winter addresses cold-weather accessory drive stress in the broader maintenance context, including the compounding effect of thickened power steering fluid on pump drag during cold start.
The serpentine belt does not operate in isolation. Every accessory it drives places rotational load on the belt assembly, and degradation in any of those accessories directly increases belt stress and accelerates wear. The systems most relevant to belt longevity are these:
Our team's broader preventive philosophy holds that no single component fails in isolation on a high-mileage vehicle. When addressing a serpentine belt squeak on any vehicle past 80,000 miles, our standard protocol is to inspect and pressure-test the cooling system, verify alternator output voltage under load, and assess power steering fluid condition simultaneously. This systems-level approach consistently reduces the likelihood of a return visit for a related failure within the following service cycle.
For vehicles where an aging charging system is a concurrent concern, keeping a reliable portable jump starter available provides a practical safety margin during the period between diagnosis and completed repair — particularly relevant on vehicles where the belt-to-alternator connection is already under stress.
Glazing — the hardening and smoothing of the belt's ribbed surface caused by sustained heat cycling and age — is the single most frequent cause. Glazing reduces friction between the belt and pulley grooves, producing the characteristic high-pitched slip squeak. A worn automatic tensioner that can no longer maintain adequate belt clamping pressure is the second most common underlying cause, and the two conditions frequently appear together on high-mileage vehicles.
No. A squeaking serpentine belt will not resolve without intervention. In most cases the noise diminishes temporarily as the belt warms and expands, restoring friction briefly — which leads many drivers to conclude the problem has resolved on its own. The underlying cause remains active, and the noise returns reliably on the next cold start or the next high-load operating condition.
For a brief period, driving is possible — but our team recommends addressing the issue within a few days of the first symptom. A squeaking belt is a belt under mechanical stress, and sudden belt failure disables power steering, battery charging, cooling, and air conditioning simultaneously. On vehicles where the serpentine belt also drives the water pump, belt failure causes rapid engine overheating within minutes of continued operation.
On most accessible engine layouts, belt replacement requires between twenty and forty-five minutes including tensioner and pulley inspection. Compact transverse engine bays with restricted tensioner access can extend the job to ninety minutes. Our team budgets an additional thirty minutes whenever replacing the tensioner assembly concurrently, which is the recommended practice on vehicles past 80,000 miles.
WD-40 provides momentary noise suppression but is not an appropriate treatment for serpentine belts. It functions as a light solvent and penetrating lubricant that temporarily softens the belt surface and can mask the squeak for a matter of hours. However, it accelerates rubber degradation and reduces the belt's friction coefficient, which increases slip under electrical or mechanical load. Proper belt dressing spray — silicone-based — is the appropriate chemical treatment when temporary suppression is warranted.
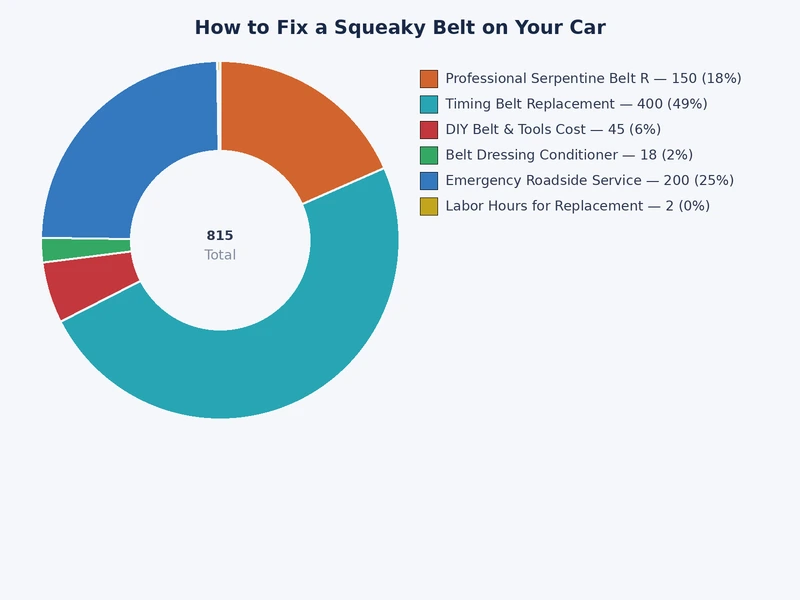
Shop labor and parts combined typically fall between $150 and $350 for a straightforward belt replacement, depending on vehicle make and regional labor rates. Adding a tensioner assembly replacement — which our team recommends on vehicles past 80,000 miles — brings the combined cost to $250–$500. This remains one of the more accessible DIY repairs given its straightforward procedure and the substantial savings achievable with home service.
Cold rubber exhibits reduced flexibility and a lower coefficient of friction than rubber at operating temperature. At low ambient temperatures, the belt cannot conform as precisely to pulley groove geometry, which increases surface slip. This is especially pronounced on vehicles where belt tension is marginally adequate — the belt performs within acceptable parameters at operating temperature but slips audibly at cold start until thermal expansion restores adequate contact pressure.
Our team's standard practice on vehicles past 80,000 miles is to replace the tensioner assembly and all idler pulleys concurrently with belt replacement. The labor involved is identical to a belt-only replacement since the belt must be removed regardless. Replacing only the belt while leaving worn pulley bearings in place consistently results in premature belt wear and a return of squeaking within months — defeating the purpose of the service entirely.
A serpentine belt that squeaks is not a nuisance to manage — it is a precise mechanical signal, and the cost of ignoring it is always higher than the cost of the repair it announces.
 |
 |
 |
 |

About Diego Ramirez
Diego Ramirez is a maintenance and care specialist who has been wrenching on cars since he was sixteen. He focuses on fluid changes, preventive care routines, paint protection, and the small habits that turn a five-year-old car into a fifteen-year-old car.
Get some FREE car parts & gear.. Or check out the latest free automotive manuals and build guides here.
Disable your ad blocker to unlock all the hidden deals. Hit the button below 🚗
| | | |