Dried mud sitting on your car's paint for just 24 hours can scratch the clear coat as effectively as 180-grit sandpaper — because mud carries sharp silica particles, mineral grit, and organic acids that bond chemically to your finish as they cure. If you want to properly remove mud stains from car paint without leaving swirl marks or scratching the clear coat, the method matters as much as the motivation. This guide walks you through every phase, from pre-soak to final dry, so you protect your paint instead of punishing it.
Mud looks harmless. It's not. The mistake most people make is treating it like ordinary dust or surface dirt. You grab a sponge, you scrub, and suddenly you're staring at swirl marks that catch the light at every angle. Done correctly, removing mud from your car's paint is a controlled, systematic process — and one you can master inside a single wash session.
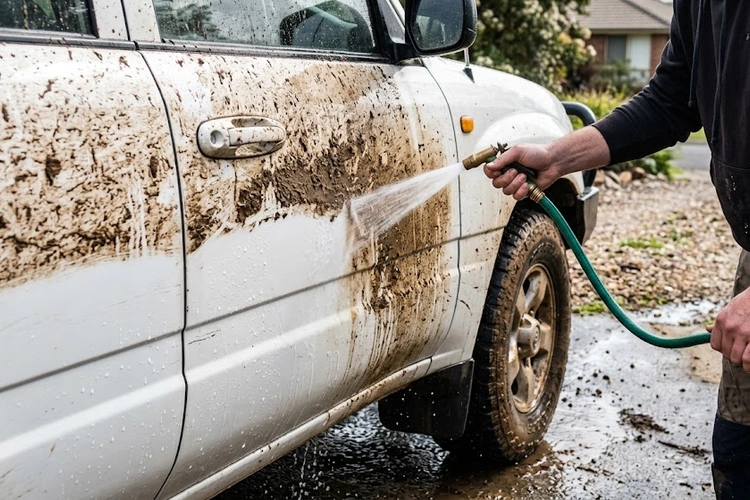
Figure 1 — A thorough pre-soak removes 70–80% of mud load before any contact washing begins, preventing scratches during the removal process.
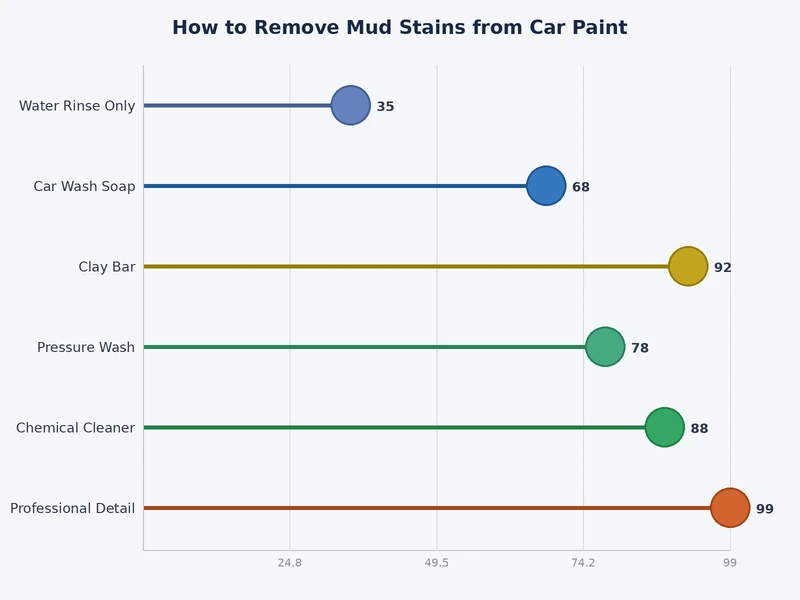
Figure 2 — Mud removal method comparison: effectiveness vs. paint-safety risk across six common approaches.
Why Mud Is More Destructive Than It Looks
Most people look at a mud-splattered car and see a cosmetic inconvenience. What's actually sitting on your paint is a compound of silica particles, clay minerals, iron compounds, organic debris, and dissolved road chemicals — a cocktail that actively attacks your clear coat as it dries and cures. Understanding what mud is made of changes how urgently you treat it.
What Mud Actually Contains
Road mud is especially aggressive because it isn't pure soil. It's a blend of:
Silica and quartz particles — rated 7 on the Mohs hardness scale; your clear coat sits at roughly 2–3. Those particles are harder than your paint.
Clay minerals — microscopic plate-like structures that create adhesive suction bonds to smooth surfaces as they dry
Iron compounds — shed from road surface wear and brake dust embedded in road spray runoff
Organic acids — decomposing leaves, bird droppings, and plant matter frequently mixed into roadside mud
Road salts and deicers — particularly damaging because they penetrate micro-chips and accelerate bare metal corrosion
Petroleum residue — oil and fuel film from road runoff that bonds to wax and sealant layers
That combination creates a compound that locks onto your clear coat both chemically and physically. Scrubbing it dry drags those abrasive silica particles across your finish. Even wiping with a microfiber cloth before proper soaking creates micro-scratches visible under direct lighting.
How Long Before Damage Starts
Time is your real enemy with mud. Here's what happens on a timeline:
0–2 hours: Mud is still wet, relatively easy to rinse off with proper pre-soak technique
2–4 hours in direct sunlight: Surface moisture evaporates, mud begins hardening and contracting against the paint
24 hours: Silicates form micro-adhesive bonds with the paint surface; standard rinse water alone no longer dislodges the residue
48+ hours: Iron compounds from road spray can begin oxidizing and staining the clear coat — stains that require a dedicated iron fallout remover to address, not just soap and water
The bottom line: the longer mud sits, the harder it is to remove safely. Act within the same day whenever possible. Every hour you wait in summer heat adds effort and risk to the removal process.
The Right Supplies for Removing Mud Stains from Car Paint
Using the wrong tools is how you turn a mud cleanup into a respray job. Every item on this list has a specific role in protecting your paint while removing contaminants. Improvising with paper towels, dish rags, or generic cleaners costs you more in the long run.
Essential Tools
Tool / Product
Purpose in Process
Why It Matters for Mud
Garden hose or pressure washer
Pre-soak and final rinse
Dislodges bulk mud without any contact; removes 70–80% of contamination before touch
pH-neutral car wash shampoo
Lubricated contact wash
Encapsulates abrasive grit so particles slide off instead of dragging across the surface
Two-bucket wash system
Separate wash and rinse water
Critical for muddy conditions — one bucket becomes contaminated within two panel passes
Grit guard inserts (x2)
Keeps buckets clean
Traps particles at the bottom; prevents reloading your mitt with abrasive debris
Microfiber wash mitt (deep pile)
Contact cleaning
Long pile fibers capture and hold grit away from the paint surface during wiping
Dedicated wheel brush + lug nut brush
Wheel and wheel well cleaning
Mud impacted in wheel well cavities and lug nut recesses requires dedicated bristle tools
Large microfiber drying towels (x2 minimum)
Post-wash drying
Eliminates water spots without dragging mineral residue across clean paint
Optional but Effective
Foam cannon or foam gun — adds a pre-wash dwell layer that softens mud on vertical surfaces before you touch anything
Quick detailer spray — useful post-wash for lifting any remaining light residue before it dries; the best quick detailer sprays are formulated to work safely on contaminated paint without dragging particles
Clay bar — for decontamination after washing when bonded silicates remain; soap doesn't remove bonded contamination, clay does
Iron fallout remover — when road mud has left visible brown or orange staining after the wash
Spray wax or paint sealant — rebuilds the protection layer that mud stripped during its time on the paint
Your shampoo choice carries more weight than most people give it. Diluted dish soap and all-purpose cleaners strip your existing wax or sealant and leave paint exposed to the next contamination event. Use a dedicated pH-neutral formula — the best car wash soaps and shampoos are specifically engineered to lubricate abrasive particles and encapsulate them, not just cut grease.
How to Remove Mud Stains from Car Paint: Step-by-Step
This is a three-phase process. Do not skip phases or combine steps to save time. Each phase protects the next, and skipping one multiplies your scratch risk significantly.
Phase 1: Pre-Soak
Park in shade — hot paint flash-dries your rinse water before it can work. If shade isn't available, work early morning or late afternoon to avoid surface temperatures above 90°F.
Never dry-brush or dry-wipe first — resist the urge to knock off loose mud chunks with your hand or a brush. Any contact on dry mud scratches.
Soak the entire car with your hose or pressure washer — start at the roof and work down. Let water dwell on heavily mudded areas for 2–3 minutes without touching anything.
Repeat the rinse pass — a second pass removes the mud that loosened during dwell time. You should see substantial mud runoff at this point.
Target wheel wells and rocker panels specifically — direct your rinse nozzle straight into wheel well cavities and along rocker panel seams. These are the highest mud concentration zones and need extended soak time.
Inspect before moving on — visible bulk mud still clinging after the second rinse means you need more dwell time, not contact washing. Extend the pre-soak, don't skip ahead.
At the end of Phase 1, you should have removed 70–80% of the total mud load without any contact at all. If you're still looking at substantial deposits, keep rinsing. Moving to Phase 2 too early is the most common mistake in the entire process.
Phase 2: Contact Wash
Fill both buckets — one with shampoo solution at the concentration the manufacturer specifies, one with clean rinse water only. Drop a grit guard in each.
Load your mitt from the wash bucket — squeeze gently to work suds deep into the pile fibers.
Wash top to bottom, always — roof first, then hood and trunk lid, then doors and quarter panels, then lower panels and rockers last. Lower panels are always the most contaminated.
Use straight-line strokes only — never circular motions. Straight lines deposit any scratches in a linear pattern that's far less visible than the swirl pattern caused by circular washing.
Rinse your mitt in the clean water bucket every 1–2 panel passes — squeeze it firmly against the grit guard to release trapped particles before reloading. This step is non-negotiable in muddy conditions.
Rinse each panel as you complete it — don't let shampoo dry on the surface. Work one panel at a time if it's a hot day.
Final full rinse top to bottom — one last pass over the entire car to remove all soap residue before drying.
Running a third dedicated bucket for wheels alone — separate from your body panel wash and rinse — eliminates cross-contamination between brake dust-loaded wheel grime and your paint panels; it's the detail pros use on every mud-covered vehicle without exception.
Phase 3: Rinse and Dry
Final rinse with low pressure, no nozzle — removing the spray nozzle lets water sheet off the surface in a wide flow rather than beading up. Sheeting water carries mineral deposits away; beading water deposits them as spots.
Dry immediately after rinsing — do not let the car air dry under any conditions. Mineral deposits in your water leave spots that need a separate correction step to remove. Our guide on how to dry a car without leaving water spots covers the full technique in detail.
Use at least two large microfiber drying towels — one to absorb bulk water, a fresh dry one to finish. Swap towels before they're saturated, not after.
Check all secondary mud traps — door handles, mirror bases, antenna bases, fuel door edges, and trim panel gaps. These areas trap mud that escapes the rinse phase and will streak when the car is next rained on.
Pro Techniques That Protect Your Paint While Cleaning
The three-phase process gets the mud off. These techniques keep your paint in clean, scratch-free condition while you do it — the difference between a detail-quality wash and a damage-causing one.
Temperature and Timing
Ideal surface temperature: 50–75°F (10–24°C) — below this, shampoo doesn't lather effectively and loses lubrication; above this, rinse water evaporates before you can dry the surface
Work in sections on hot days — spray a panel, wash a panel, rinse a panel immediately. Never soap the full car and then come back to wash it in summer heat
Cold-weather mud removal — if mud has semi-frozen to the surface overnight, pre-soak with warm water, not hot. Rapid thermal expansion in existing paint chips can crack them wider
Morning sessions beat afternoon sessions — lower air and surface temperatures, lower UV intensity, lower risk of flash evaporation creating spots mid-wash
Cloudy days are optimal — reduced solar heating keeps panel temperatures manageable throughout the wash process
Using a Pressure Washer Correctly
A pressure washer dramatically accelerates mud removal in the pre-soak phase and handles heavy wheel well deposits that a garden hose can't shift. But used incorrectly, it lifts paint chips, forces water into seams, and damages rubber trim. The full analysis is in our pressure washer vs garden hose guide — the core rules for mud removal:
Safe pressure range: 1200–1900 PSI — above 2000 PSI risks lifting paint at chip edges and forcing water under trim panels
Use a 25°–40° wide fan nozzle — never a zero-degree (red) nozzle on any painted surface
Maintain 12–18 inches of standoff distance from painted body panels at all times
Never aim at door seals, rubber trim, antenna bases, or window edges — high pressure forces water into gaps and creates interior moisture and mold problems
Keep the wand moving continuously — stationary application concentrates force on one spot and can lift paint or push water into panel seams
Use a turbo nozzle for wheel wells only — wheel well plastic liners and metal subframe components tolerate higher pressure than body paint
When to Remove Mud Right Away — and When to Wait
The instinct to wash mud off the moment you see it isn't always the right call. Timing matters, and half-measures cause more damage than doing nothing and waiting to do it right.
Act Immediately When:
The mud contains visible road salt or deicer residue (white crystalline streaks in the mud layer)
There's a rainbow sheen in the mud — indicating petroleum or chemical contamination from road runoff
The car is parked in direct sunlight and surface temperatures are climbing — heat accelerates bonding and drying dramatically
Mud has splashed onto a fresh wax job, paint sealant, or ceramic coating — these surfaces need to stay clean to maintain their protective properties
Visible organic matter is present — bird droppings, leaf debris, or plant matter mixed into the mud contains acids that activate faster in heat
You're in a hard water region — mud that dries with mineral-heavy water locked inside leaves silicate deposits that etch clear coat over time
When Waiting Actually Helps:
You're mid off-road session — washing halfway through a trail day and then driving back through the same conditions is pointless; wait until you're completely done
You have no proper tools available — a dry brush, paper towel, or quick wipe-down is always worse than a proper wash later; you're just scratching the paint earlier
Mud is wet but you have no shampoo — plain water alone moves wet mud but also smears particles across the surface without the lubrication needed to lift them clear; better to wait and do the full process correctly
Surface temperature is above 90°F — wash water evaporates too fast to be effective; wait for cooler conditions or work in shade
The governing rule: if you can execute the full three-phase process correctly right now, do it. If you can't, wait and do it right. Never attempt a half-wash on mud-covered paint.
Mud Removal Across Different Real-World Scenarios
The method stays consistent, but the scale, contamination level, and specific challenges shift depending on where the mud came from and how long it's been sitting.
After Off-Roading
Off-road mud is the most aggressive type you'll deal with. It's typically clay-heavy, deeply impacted into wheel well recesses and suspension components, and often contains rocks, leaf debris, and organic matter. After a trail run:
Start with a high-volume rinse — you need volume, not just pressure, to flush mud out of wheel wells, control arm recesses, and undercarriage cavities
Allow 5–10 minutes of pre-soak dwell time before any contact wash, especially on clay-heavy mud
Use a dedicated undercarriage rinse — impacted mud in suspension components causes accelerated wear and seized hardware over time if left untreated
Expect to use 2–3 wash mitts — off-road mud loads mitts so quickly that recycling them defeats the two-bucket system entirely
Follow the full wash with a clay bar decontamination pass on painted panels — trail mud bonds silicates and clay minerals to clear coat that soap cannot remove alone
Inspect door jambs, trunk jambs, and fuel door surrounds — these are often overlooked and retain mud that drips out later
Highway Mud Spray
Highway driving after rain throws rooster tails of road spray from passing trucks and vehicles. This mud is thin-consistency, wide-coverage, and often dries at highway speeds while you're still driving. It covers horizontal and vertical surfaces equally — including the roof and windshield — and carries a higher concentration of brake dust iron compounds than typical roadside mud.
Expect full-car coverage, not just lower panel contamination
Check windshield for tar compounds mixed into road spray — soap alone won't remove tar; use a dedicated tar remover on glass and paint before the main wash
A standard two-bucket wash with a foam pre-wash handles highway mud completely in most cases
If brown or orange staining remains after washing, the iron compounds have begun oxidizing — use an iron fallout remover spray before the contact wash on your next session
Dried-On Summer Mud
Dried mud in summer heat is the highest-risk removal scenario. The particles have fully dehydrated and contracted, creating micro-suction bonds against the paint surface. Your pre-soak phase carries the entire weight of this removal:
Extend your pre-soak dwell time to 5–7 minutes minimum — don't rush it
Re-wet every 60–90 seconds if your pre-soak starts to dry in the heat before you can rinse — maintaining wet contact is critical
A foam cannon is especially useful here — foam sits on vertical panels far longer than water, maintaining dwell time without running off
Do not attempt to peel or scrape dried mud flakes with your fingernail, a plastic card, or any rigid edge — even plastic-to-paint contact at that level will scratch through the clear coat
If mud refuses to loosen after an extended soak, apply a waterless wash spray and let it dwell — the lubricants penetrate faster than plain water in some formulations
Common Mistakes and Long-Term Paint Protection
Knowing the right process only gets you halfway. You also need to know the habits that silently destroy your paint one wash at a time — and what to do after the mud is gone to make the next removal easier.
Mistakes That Scratch Your Clear Coat
Dry wiping mud — the single most common cause of swirl marks on daily drivers. Dragging particles across dry clear coat creates scratches that require polishing to correct. Never touch mud dry.
Reusing a contaminated wash mitt without rinsing — one pass with a particle-loaded mitt causes more scratching than the mud itself. Rinse against your grit guard after every panel pass.
Circular washing motion — creates the classic swirl pattern visible in direct sunlight or artificial lighting. Use straight, overlapping lines only.
Using dish soap, all-purpose cleaner, or multi-surface spray — strips your entire protection layer and can leave paint chemically vulnerable to the next contamination event
Pressure washing from under 10 inches — concentrated high pressure at close range lifts paint at existing chip edges and forces water under trim pieces and weather seals
Single-bucket washing — rinsing your mitt in the same bucket you're washing from recirculates every collected particle back onto your paint with the next pass
Air-drying instead of hand-drying — every drop of water that evaporates on your paint leaves the mineral content behind as a deposit. Always dry immediately with microfiber.
Skipping the pre-soak phase because the mud "doesn't look that bad" — this is the most dangerous assumption. Thin, dried mud films are just as abrasive as thick deposits — they're just less visible before contact.
Keeping Your Paint Protected After Every Mud Wash
Once the paint is clean, you have a window to rebuild the protection layer that mud stripped or degraded. This step is what separates paint that ages well from paint that dulls, stains, and chips ahead of schedule.
Apply a spray wax or paint sealant after every mud wash — mud removal strips your protection layer faster than a normal wash because of abrasive particle contact during the process
Consider a ceramic coating for high-mud-exposure vehicles — ceramic creates a hydrophobic barrier that causes mud to bead and slide off rather than bond; post-mud cleanup becomes dramatically faster
Refresh your wax protection every 6–8 weeks if your vehicle regularly encounters muddy conditions — standard wax doesn't last long under repeated mud exposure
Run an iron fallout decontamination treatment every 3–4 months if you drive frequently on roads with heavy truck traffic — iron compounds accumulate in the clear coat between washes and cause permanent staining if left long-term
Install mud flaps — an inexpensive mechanical intervention that dramatically reduces how much mud reaches your rocker panels, lower doors, and rear quarter panels in the first place
Perform a clay bar pass every 6 months for vehicles that regularly encounter trail or road mud; bonded contamination that soap can't remove becomes a foundation for deeper staining if it's not decontaminated periodically
Paint protection isn't just cosmetic maintenance. A properly protected clear coat resists mud bonding, makes removal faster and safer, and extends the working life of your paint by years — reducing the risk of needing a panel respray from contamination damage alone.
Frequently Asked Questions
Can dried mud scratch car paint?
Yes, absolutely. Dried mud contains silica and quartz particles rated 7 on the Mohs hardness scale — your clear coat sits at roughly 2–3. Wiping, brushing, or scrubbing dry mud across paint drags those harder particles through the surface layer and creates scratches and swirl marks. According to Wikipedia's overview of automotive paint, modern clear coats are relatively soft polymer layers designed for gloss, not abrasion resistance. Always pre-soak mud completely before any contact.
Is it safe to use a pressure washer to remove mud from car paint?
Yes, at the correct settings. Stay within 1200–1900 PSI, use a 25°–40° wide fan tip, and keep at least 12 inches of standoff distance from painted panels. Never use a zero-degree nozzle on paint, and never hold the wand stationary on one spot. Pressure washing is most effective in the pre-soak phase to dislodge bulk mud — switch to a foam or low-pressure rinse for the contact wash and final rinse phases.
How long can mud sit on car paint before it causes permanent damage?
Bonding begins within 24 hours as silicates in the mud form micro-adhesive connections with the clear coat. After 48 hours, especially in heat and humidity, iron compounds from road spray can begin oxidizing and staining the clear coat permanently — stains that require iron fallout remover to lift, not just soap and water. Remove mud the same day whenever possible, and act within hours if the mud contains road salt or visible chemical contamination.
What is the best product for removing dried mud from car paint?
A pH-neutral car wash shampoo combined with a foam pre-wash stage delivers the best results. Foam applied with a foam cannon or foam gun dwells on vertical surfaces and softens dried mud before any contact washing begins, while the shampoo's surfactants lubricate remaining particles so they release without scratching. For bonded residue that survives the wash, a clay bar removes what soap can't — it's the correct next step, not scrubbing harder with the same mitt.
Does mud damage matte car paint differently than glossy finishes?
Yes. Matte paint has a deliberately rough micro-texture that traps mud particles in its surface grain more aggressively than a smooth clear coat does. Avoid any scrubbing pressure during contact washing on matte — use a very high-volume, low-pressure rinse and allow extended dwell time before any contact. Never apply standard wax or sealant after mud removal on matte paint; use a matte-specific protection product to maintain the surface texture without adding unwanted gloss.
The difference between a mud wash that scratches and one that doesn't comes down to one rule: soak longer, touch less, and never put anything on dry paint.
Diego Ramirez is a maintenance and care specialist who has been wrenching on cars since he was sixteen. He focuses on fluid changes, preventive care routines, paint protection, and the small habits that turn a five-year-old car into a fifteen-year-old car.