by Joshua Thomas
Learning how to remove scratches from car paint can save you hundreds of dollars in detailing or body shop fees. Whether the damage came from a stray shopping cart, a careless door swing, or road debris, most surface scratches are fixable at home with the right technique. Before reaching for your wallet, it's worth understanding what type of scratch you're dealing with — because the fix varies significantly by depth. For minor paint chips alongside scratches, see our guide on how to fix paint chips on your car for a complementary approach.
This guide walks you through identifying scratch severity, choosing the correct products, and executing a clean repair on your own driveway. With patience and the right materials, most scratches are fully reversible.
Contents
Modern car paint is layered — primer, base coat, and clear coat sit on top of bare metal. Automotive paint systems are engineered for durability, but they're not scratch-proof. Identifying which layer is damaged tells you whether a DIY repair is realistic.
These are the most common and the easiest to fix. Clear coat scratches appear as dull, white-ish lines that you can feel slightly with your fingernail but don't catch deeply. If your fingernail glides over the scratch without snagging, it's almost certainly clear coat only — an excellent candidate for scratch remover polish alone.
If the scratch reveals a different color underneath (the base coat or primer), the damage has penetrated through the clear coat. These require a more involved fix: light wet sanding followed by polishing, or a touch-up paint application. The repair is still DIY-friendly but takes more care.
When bare metal or gray primer is visible, the scratch is deep. Left untreated, exposed metal rusts quickly. These repairs are harder to make invisible at home. A professional body shop produces the most seamless result, though touch-up paint can stop rust progression while you decide on a long-term fix.
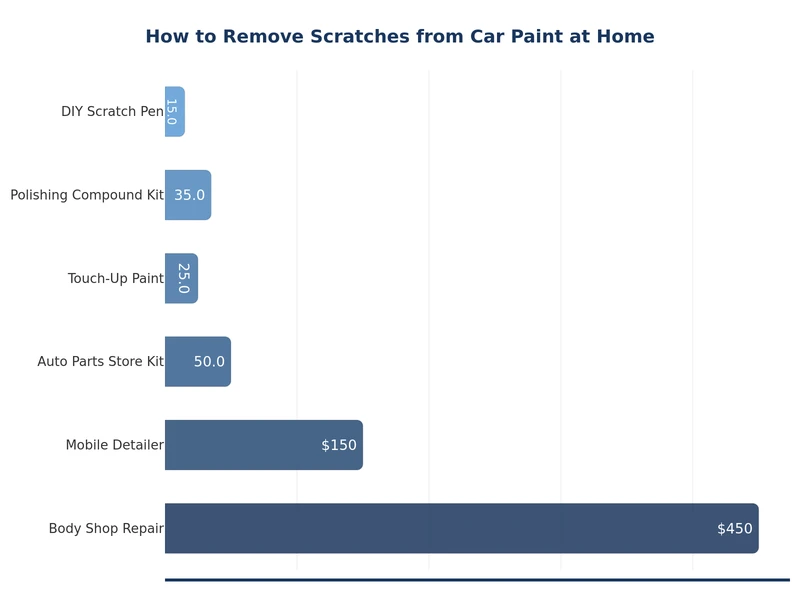
Using the right products makes the difference between a repair that lasts and one that looks worse. The table below summarizes what to have on hand based on scratch type. For a curated list of top-rated options, check out the best scratch removers for cars reviewed by our team.
| Scratch Type | Products Needed | Estimated DIY Cost | Difficulty |
|---|---|---|---|
| Clear coat only | Scratch remover, microfiber cloths, car wax | $10–$30 | Easy |
| Into base coat | Compound, 2000-grit sandpaper, polish, wax | $25–$60 | Moderate |
| Into primer | Touch-up paint, primer pen, clear coat spray, wet sandpaper | $30–$80 | Moderate–Hard |
| Down to metal | Rust converter, primer, touch-up paint, clear coat | $50–$120+ | Hard / Consider Pro |
Beyond products, you'll need: masking tape, a spray bottle of water, isopropyl alcohol (70%+), and adequate lighting. Work in shade — direct sun heats the panel and makes compounds dry too fast.
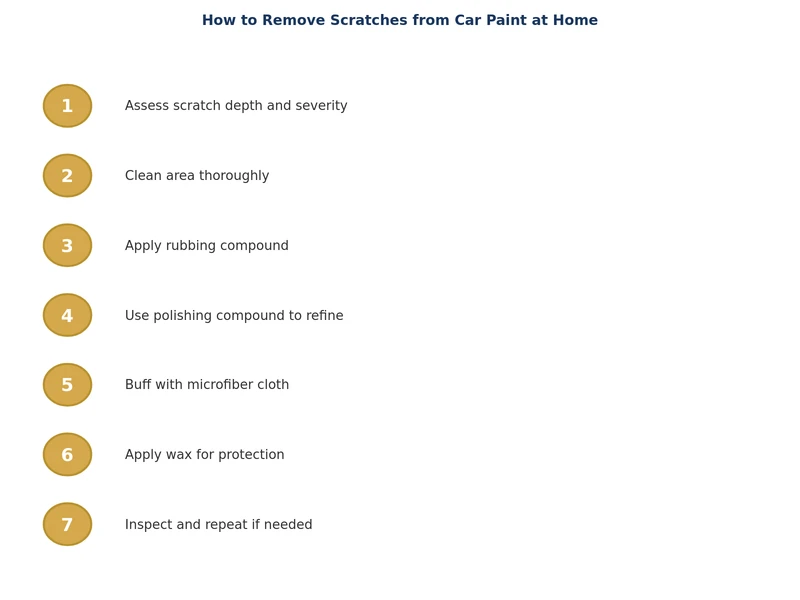
For clear coat scratches, the process is straightforward and takes about 30–45 minutes per panel. Follow these steps carefully and the scratch will often vanish completely.
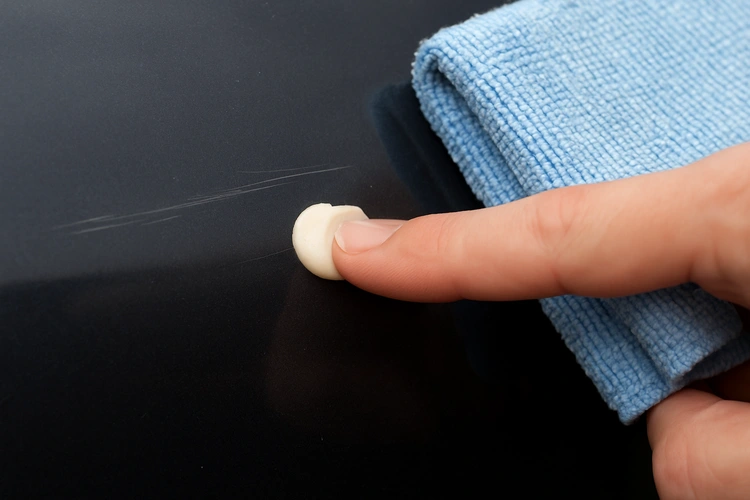
Wash the scratched panel thoroughly to remove dirt and grit. Any abrasive particle left on the surface during polishing will create new scratches. Once dry, wipe the area with isopropyl alcohol on a microfiber cloth to strip wax and oils. Inspect the scratch under bright light at a low angle — this reveals the full extent of the damage. Use masking tape to protect trim, rubber seals, and any edges where compound could stain.
Apply a small amount of scratch remover (about the size of a pea) to a foam applicator pad or clean microfiber cloth. Work in straight lines following the length of the scratch — not in circles. Apply moderate pressure and make 8–10 passes. The mild abrasives in the compound level the clear coat around the scratch, filling or blending the damaged area. Wipe off residue with a clean microfiber cloth and re-inspect. For stubborn scratches, repeat up to three times before moving to a heavier compound.
After the scratch is gone or minimized, follow up with a finishing polish to restore clarity and remove any haze left by the compound. Once the polish is buffed out, apply a coat of car wax or paint sealant over the repaired area. This restores gloss, blends the repair with surrounding paint, and adds a protective layer. If you want longer-lasting protection, consider a ceramic coating — our DIY ceramic coating guide covers the process in detail.
Scratches that cut into the color coat or primer require more than polishing. Two main approaches work for home repairs: touch-up paint and wet sanding.
Find your car's paint code (usually on a sticker inside the driver's door jamb) and order a matching touch-up paint pen or bottle. Clean and dry the area, then apply primer if the scratch reaches bare metal. Allow primer to cure fully — typically 30–60 minutes. Apply touch-up paint in thin layers, letting each layer dry before adding the next. Once the repair is level with the surrounding paint, apply clear coat in light passes. After 24 hours, wet sand lightly with 2000-grit paper, then polish to blend.
Wet sanding is effective for scratches that are mostly in the clear coat but too deep for polish alone. Soak 2000-grit (or finer) wet/dry sandpaper in water for 10 minutes. Wrap it around a small foam sanding block and sand the scratch using very light pressure in straight lines, keeping the surface wet throughout. Check progress frequently — you're removing just enough clear coat to level the scratch. Once level, follow with 3000-grit to refine, then polish and wax. This technique requires a careful hand; sand too aggressively and you'll cut through to the base coat. If you've dealt with paint damage before, the same caution applies when you restore faded car paint — light passes and frequent inspection are key.
Some scratches are beyond a practical DIY fix. If bare metal is exposed across a large area, rust has already started, the scratch is on a curved or body-line edge, or the damage covers multiple panels, a body shop will produce a far better result. Professional spot repairs for a single panel typically cost $150–$400 depending on size and paint complexity. A full respray is significantly more. That said, even for professional-bound damage, a DIY primer and touch-up coat can stop rust from spreading while you schedule the proper repair.
Repairing scratches is satisfying, but preventing them is better. A few consistent habits make a real difference:
Consistent protection and mindful parking keep your paint in showroom condition far longer than reactive repairs alone.
Toothpaste contains mild abrasives that can diminish very light clear coat scratches in a pinch, but it's far less effective than a dedicated scratch remover and can leave swirl marks if applied incorrectly. Use it only as a temporary solution and follow up with a proper polish.
Run your fingernail across the scratch. If it catches firmly and you can see bare metal or gray primer in the groove, the damage is deep. A professional repair will give the most seamless result for scratches at or below the primer layer, especially over large areas.
Quality scratch removers are safe for clear coat when used as directed. Apply with a clean microfiber cloth, use light-to-moderate pressure, and avoid going over the same spot excessively. Always test on a small, inconspicuous area first if you're unsure about a product.
A properly executed repair — compound, polish, and wax or sealant — can last years on clear coat scratches. The durability depends on the quality of products used and how well you protect the paint afterward. A ceramic coating over the repair significantly extends the result.
Many do, but results vary by scratch depth and kit quality. Kits that include a compound, polish, and applicator pads tend to perform well on light clear coat damage. Avoid kits that promise to fill deep gouges — those typically require proper touch-up paint and clear coat for a lasting fix.
Repair as soon as practical, especially if bare metal is exposed. Exposed steel begins oxidizing within days in humid conditions. Even a temporary coat of touch-up paint or clear coat spray buys time and prevents rust from spreading beneath the surrounding paint.
 |
 |
 |
 |
About Joshua Thomas
Joshua Thomas just simply loves cars and willing to work on them whenever there's chance... sometimes for free.
He started CarCareTotal back in 2017 from the advices of total strangers who witnessed his amazing skills in car repairs here and there.
His goal with this creation is to help car owners better learn how to maintain and repair their cars; as such, the site would cover alot of areas: troubleshooting, product recommendations, tips & tricks.
Joshua received Bachelor of Science in Mechanical Engineering at San Diego State University.
Get some FREE car parts & gear.. Or check out the latest free automotive manuals and build guides here.
Disable your ad blocker to unlock all the hidden deals. Hit the button below 🚗
| | | |