by Diego Ramirez
Parking lot incidents account for an estimated 1 in 5 vehicle damage events in the United States every year — and your plastic bumper absorbs almost every one of them. Shopping carts, concrete pillars, slow-speed fender contacts: the scratches pile up fast. Knowing how to remove scratches from a plastic bumper is one of the most practical car care skills you can have, because a shop visit for a single bumper scratch can cost you $150 to $600 you don't need to spend.
Here's the most important thing to understand upfront: not all scratches are equal. A surface scuff that barely disturbs the clear coat is a completely different problem than a deep gouge that cuts through to bare plastic. Fix it wrong, and you'll make it worse. Fix it right, and the repair can be virtually invisible.
This guide walks you through every method, from a quick heat gun trick for surface scuffs to a full sand-prime-paint repair for deep gouges. Before you stock up on supplies, browse our roundup of the best scratch removers for plastic surfaces — the right product makes every step easier.
Contents
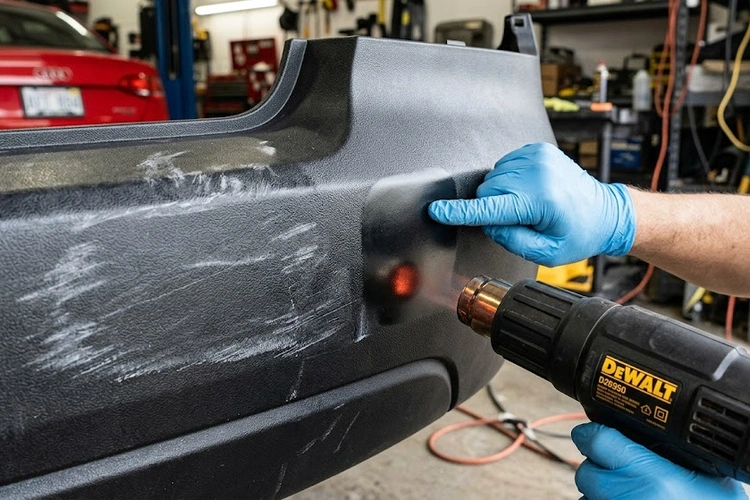
Not every bumper scratch calls for sandpaper and spray cans. A lot of common bumper scuffs — the kind from light contact with a parking curb or another car's rubber trim — sit entirely in the clear coat (the transparent protective layer on top of the color). These respond to heat or mild abrasion alone, and you can have them handled in under 30 minutes.
Plastic has memory. When it gets scuffed and deformed, gentle heat can coax it back toward its original shape. This works remarkably well on shallow surface scuffs — the kind that look worse than they really are.
Here's exactly what to do:
Before you try anything, do the fingernail test: drag your nail across the scratch. If it glides over without catching, you're dealing with a surface scuff that heat or polish can fix. If your nail catches in the groove, skip ahead to the full repair process.
Pro tip: Run your fingernail perpendicular across the scratch before reaching for any product. If it catches, you're past clear coat territory — heat alone won't cut it, and you need the full repair process below.
For scratches showing a color change — you can see gray or white plastic through the paint — a touch-up paint pen is your fastest fix. Find your car's color code on the sticker inside your driver's door jamb. It's a 3–6 character code that corresponds exactly to your factory paint. Order a pen with that code, not a "close enough" visual match. A wrong color match looks worse than the original scratch.
For scuffs with no color loss — just haziness or a dull patch — an automotive cutting or polishing compound will buff out the damage. Apply it with a clean microfiber cloth in small circular motions, then wipe clean and check your progress. Go light on plastic: too much abrasion removes the clear coat along with the scratch, and that creates a new problem.
When the damage goes past the clear coat — into the color layer or all the way to bare plastic — you need the full repair process. There are no shortcuts here that produce a result you'll be happy with. Take each step seriously, and the repair can be virtually invisible.
Categorize the scratch before you buy anything. There are three tiers:
Each tier requires different supplies and a different approach. Treating a deep gouge like a clear coat scratch means you'll be back at square one within weeks when the paint starts peeling. Get the diagnosis right before you open your wallet.
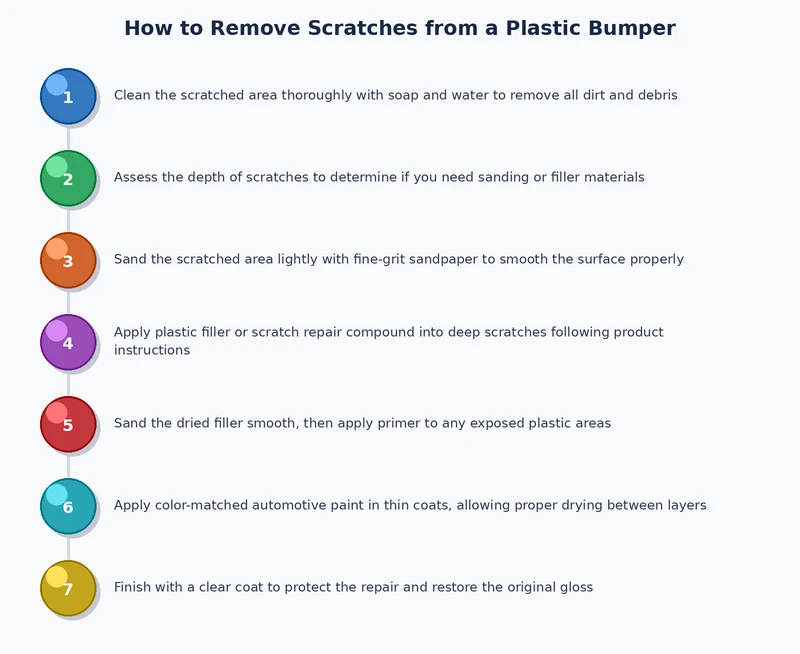
Clean the bumper thoroughly with soap and water, then wipe down the scratch area with isopropyl alcohol (70% or higher). Any wax, grease, or road film left behind will prevent primer and paint from bonding — so this step is non-negotiable.
For color coat scratches: wet-sand the scratch with 1500-grit sandpaper, keeping both the paper and surface wet throughout. Wet sanding stops the paper from clogging and prevents friction heat from distorting the plastic. Feather the scratch edges into the surrounding paint so there's no hard line where the damage stops. Wipe clean and let it dry fully before moving on.
For deep gouges: apply a flexible plastic body filler — not the same product you'd use on a metal panel. Bumpers flex under pressure, and a rigid filler cracks the first time your bumper takes any stress. Let the filler cure completely, sand flat starting with 220-grit and finishing with 400-grit, then apply a plastic adhesion promoter before priming. Skip the adhesion promoter and the primer will peel off in weeks.
Extreme heat makes fillers and primers cure unevenly, which causes cracking and bubbling. If you're working in a hot climate, check our guide on how to maintain your car in hot weather — several of those tips apply directly to exterior repair work where temperature control matters.
Apply automotive primer in two or three thin coats, letting each one flash off (dry to the touch) before adding the next. One thick coat will sag. Sand lightly with 400-grit between primer coats to keep the surface flat.
Match your exact color code and apply touch-up or rattle-can spray paint using the same thin-coat method. Hold the can 10–12 inches from the surface and use overlapping passes. Uneven coverage almost always comes from rushing this step — build up color gradually.
Finish with two or three coats of clear coat, let the whole repair cure at least 24 hours, then wet-sand with 2000-grit to knock down any orange-peel texture, and polish with a finishing compound to blend the repaired area into the surrounding paint.
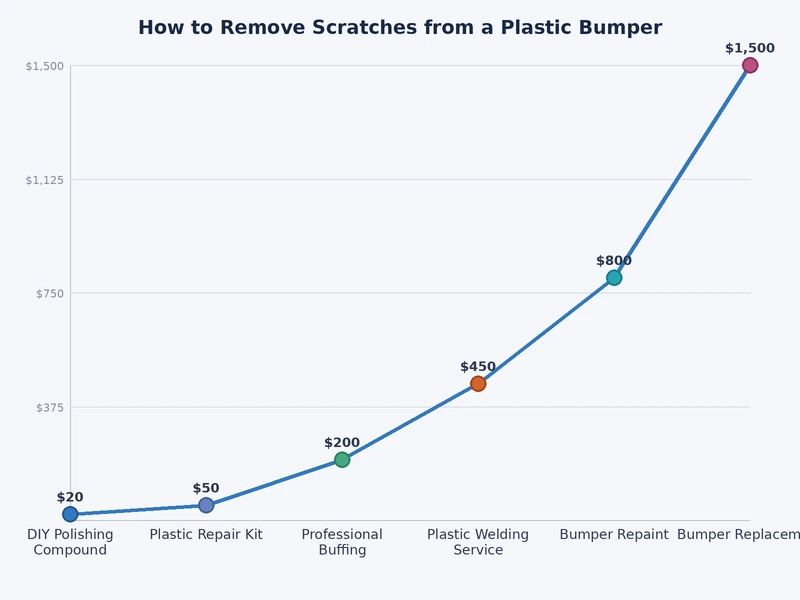
Here's a full breakdown of your options so you can figure out the right starting point before you spend anything:
| Method | Best For | Skill Level | Est. Cost | Time Required |
|---|---|---|---|---|
| Heat gun | Surface scuffs, deformed plastic | Beginner | $30–$60 (tool) | 10–20 min |
| Scratch pen / touch-up paint | Minor color coat scratches | Beginner | $10–$25 | 30–60 min |
| Cutting / polishing compound | Clear coat scratches and swirl marks | Beginner | $10–$30 | 20–45 min |
| Wet sand + primer + paint | Deeper color coat scratches | Intermediate | $50–$120 | 3–6 hours |
| Body filler + full repaint | Deep gouges, cracked plastic | Advanced | $80–$200+ | Full day |
| Professional body shop | Any damage level | N/A | $200–$600+ | 1–3 days |
The beginner methods at the top of that table are genuinely accessible — low learning curve, low stakes. The full repaint at the bottom is where most DIY attempts go sideways. Be honest about which row you're in before you start.
Warning: Never use a metal-rated body filler on a plastic bumper — it's rigid, and bumpers flex. It will crack within weeks of the repair. Always use a filler labeled specifically for plastic or flexible panels.
Be honest with yourself here. A bad DIY repair costs more to fix than the body shop would have charged in the first place. This isn't about whether you're capable in general — it's about whether the specific damage in front of you matches your experience level and tools.
Textured black plastic is the most forgiving material to work with. The heat gun method works extremely well on it, and the texture disguises minor surface variation, so even an imperfect repair looks fine from any normal viewing distance.
If you've had a recent impact and you're also noticing a suspension creaking noise afterward, or your car shudders when braking, have the full front end inspected before you focus on cosmetics. Those symptoms can point to alignment or structural issues that matter a great deal more than a scratch.
A professional bumper respray typically runs $200–$500 at most body shops, depending on your car's color and the extent of the damage. Weigh that honestly against your time, the cost of supplies, and the real risk of a repair you're not happy with.
Fixing the scratch you have right now is only half the job. Without some protection in place, you'll be back here in six months dealing with the same thing. The good news: long-term bumper protection doesn't have to be expensive, and most of it requires nothing more than habit changes.
Paint protection film (PPF) is the most effective option available. It's a clear adhesive film that absorbs light impacts and scuffs without transferring damage to your bumper — and most PPF products are self-healing, meaning light scratches disappear with heat exposure. Professional installation for a full bumper runs $200–$500, which is roughly the same as a single respray anyway. The math favors the film if you plan to keep the car.
Ceramic coatings don't provide the same impact absorption as PPF, but they create a hard, slick surface that makes scratches harder to leave and easier to clean off when they do happen. A quality ceramic coating lasts 2–5 years. Apply it after any scratch repair — the surface needs to be clean and fully cured before you coat it.
For unpainted black plastic bumpers, UV protectant spray is non-negotiable. UV exposure oxidizes unprotected plastic, turning it chalky and porous — and once oxidation sets in, scratches become far more visible and harder to fix. Just like catching battery terminal corrosion early before it spreads and causes electrical problems, treating plastic oxidation at the first sign of fading is always easier than dealing with it after it progresses.
Products help, but your parking and driving behavior is where most bumper damage originates. A few simple adjustments can dramatically cut your exposure:
While you're giving your car attention, it's worth checking underneath for anything unexpected — an oil puddle under the car near the front can indicate a seal issue worth catching early. If you're also dealing with a windshield fogging up inside or a musty smell from your AC, neither of those problems resolves on its own — they're worth tracking down while you're already in maintenance mode.
Yes — for most surface-level and color coat scratches, DIY repair is genuinely effective and produces results a shop would charge hundreds to deliver. The key is correctly diagnosing the scratch depth before reaching for any product. Clear coat scuffs and shallow color scratches respond well to heat, polishing compounds, or touch-up paint. Deep gouges and cracks through the bumper shell are harder and more often produce better results in a professional shop.
It can, but only on very shallow clear coat scuffs — and only with a basic paste, not a gel. Toothpaste contains mild abrasives that work similarly to a low-grade polishing compound. The results are inconsistent, and for anything past a minor surface haze, an actual automotive polishing compound designed for the task will outperform it every time.
Run your fingernail across the scratch perpendicular to its length. If your nail catches in the groove, the damage has gone through the clear coat into the color layer or deeper. If the scratch covers a large area, shows white or gray raw plastic underneath, or the bumper surface is warped or cracked, you're likely better served by a professional repair — attempting it yourself risks making the area harder and more expensive to fix correctly.
A perfect match is unlikely, especially on vehicles where the factory paint has faded from years of sun exposure. Always order touch-up paint using your car's exact color code — found on the sticker inside your driver's door jamb — not a visual guess. Feathering the edges well during application and finishing with clear coat and polish brings the repair much closer to invisible than most people expect.
Expect to pay $150–$600 at a body shop, depending on scratch depth, bumper size, color complexity, and your region. A simple buff-and-polish at a detailing shop can run as low as $75–$100. A full respray with color blending typically falls in the $300–$500 range. Always get two or three quotes — prices vary widely for the same job.
WD-40 temporarily fills the scratch groove and adds gloss, which makes the damage look better for a short time. But once it evaporates or washes off, the scratch is exactly as it was. Use it at most to evaluate how a repaired surface might look — not as a substitute for actual repair. It fixes nothing permanently.
 |
 |
 |
 |

About Diego Ramirez
Diego Ramirez is a maintenance and care specialist who has been wrenching on cars since he was sixteen. He focuses on fluid changes, preventive care routines, paint protection, and the small habits that turn a five-year-old car into a fifteen-year-old car.
Get some FREE car parts & gear.. Or check out the latest free automotive manuals and build guides here.
Disable your ad blocker to unlock all the hidden deals. Hit the button below 🚗
| | | |