by Joshua Thomas
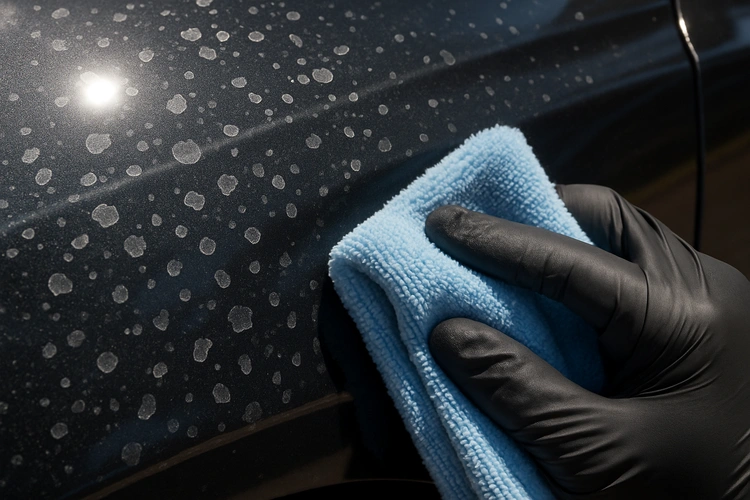
Water spots are one of the most common and frustrating paint problems car owners face. If you've ever parked outside after rain or let your car air-dry after washing, you've likely seen those chalky white rings left behind. Knowing how to remove water spots from car paint correctly — without scratching or damaging your finish — can save you time, money, and a trip to the detailer. This guide covers every method from basic home remedies to professional-grade solutions, so you can tackle the problem with confidence.
Water spots form when mineral-rich water evaporates and leaves behind calcium, magnesium, and silica deposits. The longer they sit, the deeper they etch into your clear coat. Acting quickly is always the best strategy. Before we get into removal, it helps to understand what you're actually dealing with — and if you're also interested in long-term paint protection, check out our comparison of ceramic coating vs paint protection film to find the best preventive solution for your vehicle.
Contents
Not all water spots are the same. Identifying the type you're dealing with determines which removal method will work — and which ones might make things worse.
These are the easiest to remove. They sit on top of the clear coat and haven't yet bonded to the paint. You'll notice a white or hazy film that wipes away with minimal effort. Simple detailing sprays or a diluted vinegar solution typically handle these without any abrasives.
When mineral deposits are left on paint that's exposed to heat — like a hot summer day — the minerals can chemically etch into the clear coat. These spots leave a visible crater or dull patch even after the minerals are removed. They require polishing to fix properly.
These form when water spots repeatedly dry in the same location over time, causing a hard mineral crust that bonds tightly to the paint surface. A clay bar is typically needed before polishing to decontaminate the surface.
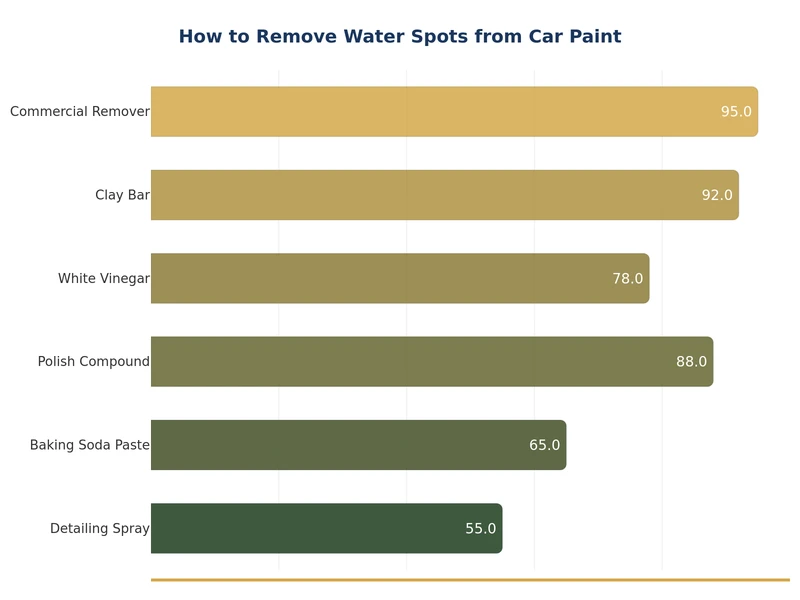
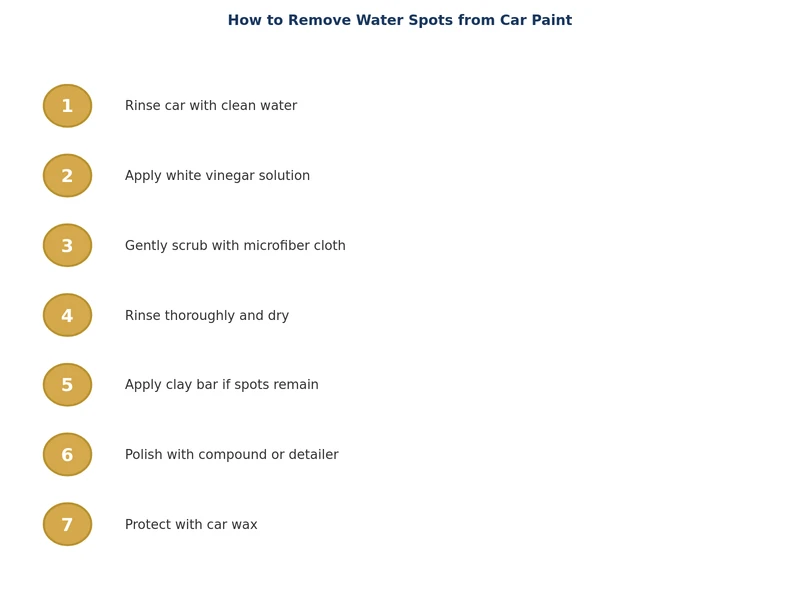
There are several proven approaches to removing water spots, ranging from DIY home remedies to professional detailing techniques. Always start with the least aggressive method and work your way up only if needed.
White distilled vinegar is mildly acidic and dissolves calcium and mineral deposits effectively. Mix equal parts white vinegar and distilled water in a spray bottle. Mist the affected area, let it dwell for 30–60 seconds, then wipe gently with a clean microfiber cloth. Do not let it dry on the paint — rinse with water immediately after wiping. This works best on Type 1 deposits and is safe for all paint types when properly diluted.
A clay bar physically removes bonded surface contaminants that chemical cleaners can't dissolve. Lubricate the paint surface with a dedicated clay lubricant or quick detailer spray, then glide the clay bar back and forth with light pressure. You'll feel it grab and then release as it picks up contaminants. Fold the clay frequently to expose a clean surface. This step is often necessary before polishing etched spots — it ensures the polishing pad doesn't drag debris across the paint. According to Wikipedia's overview of automotive detailing, clay barring is a standard decontamination step in professional paint correction workflows.
For etched water spots that remain after cleaning, a paint polish or light compound is necessary to level the clear coat. Apply a small amount of polish to a foam applicator pad or dual-action polisher. Work in overlapping passes on a cool, shaded surface. Polish removes a microscopic layer of clear coat to eliminate the etch mark. Always follow up with a quality wax or sealant to protect the freshly polished surface. For product recommendations, visit our best car wax reviews guide to find the right protective finish for your paint type.
| Method | Best For | Effort | Risk to Paint | Cost |
|---|---|---|---|---|
| Detailing Spray | Type 1 (fresh spots) | Very Low | None | $8–$15 |
| Vinegar Solution | Type 1 (mineral deposits) | Low | Very Low | $1–$3 |
| Clay Bar | Type 3 (bonded contaminants) | Medium | Low | $10–$25 |
| Paint Polish | Type 2 (etched clear coat) | High | Medium (if overused) | $15–$40 |
| Paint Compound | Severe etching | Very High | Medium-High | $15–$50 |
| Professional Correction | All types | None (outsourced) | Low (expert hands) | $150–$600+ |
Having the right supplies on hand makes the entire process faster and safer for your paint. Here's what to gather before you start:
Always work in a shaded area or indoors when possible. Working on hot paint causes products to flash-dry too quickly, which reduces effectiveness and can cause streaking or damage.
Removal is always more work than prevention. Once you've restored your paint, taking steps to prevent water spots from forming again saves significant effort over the long term.
Always dry your car immediately after washing instead of letting it air-dry. Use a large, plush microfiber drying towel or an air blower to clear water from panel gaps, mirrors, and trim before it drips onto dry paint. A single-pass blotting technique — pressing the towel onto the surface rather than dragging it — reduces micro-scratches while absorbing water fast. If you're preparing your car for extended storage, pairing proper drying with a protective treatment is essential — see our guide on how to store a car for winter for a full checklist of paint and exterior prep steps.
A protective layer on your paint makes a significant difference. Waxes, paint sealants, and ceramic coatings all create a hydrophobic barrier that causes water to bead and roll off rather than sitting flat and evaporating. Ceramic coatings offer the longest-lasting protection — often several years — while traditional carnauba wax provides excellent depth and gloss but needs reapplication every 2–3 months. Using a spray detailer or quick detailer after every wash also tops up hydrophobic protection between full wax applications. For more detail on selecting touch-up products that complement your paint care routine, see our guide on how to apply touch-up paint to your car.
Even experienced car owners make mistakes when dealing with water spots. Here are the most common errors and how to avoid them:
Yes, if left untreated long enough. Type 1 deposits are harmless and easy to remove, but when minerals sit on hot paint for extended periods, they etch into the clear coat and create permanent-looking marks. These require polishing to correct, and in severe cases, professional paint correction or clear coat respray may be necessary.
WD-40 can temporarily displace mineral deposits and improve appearance, but it's not a reliable or safe long-term solution for paint care. It leaves an oily residue that attracts dust and requires thorough degreasing before applying any wax or sealant. Stick to dedicated detailing products for better and safer results.
In normal temperatures, fresh water spots can begin etching clear coat within a few days to a week if left in direct sun. On very hot days — above 90°F — etching can occur within hours. Always remove water spots as soon as you notice them to avoid permanent damage.
No. Undiluted white vinegar has a pH around 2.4, which is acidic enough to damage clear coat with prolonged contact. Always dilute it 1:1 with distilled water, apply briefly, and rinse immediately. For etched spots that don't respond to diluted vinegar, move to a clay bar or paint polish instead.
A ceramic coating significantly reduces water spot formation by making the surface highly hydrophobic — water beads up and rolls off instead of sitting flat. However, it doesn't make paint completely immune. Mineral-rich water that sits long enough on a ceramic-coated surface can still leave deposits, though they're much easier to remove than on uncoated paint.
A dedicated water spot remover is typically a mild acid or chelating agent that chemically dissolves mineral deposits without abrading the clear coat. Paint polish works mechanically — it contains fine abrasives that physically level the clear coat surface to eliminate etching. Use a spot remover first; only move to polish if chemical removal doesn't fully restore the finish.
 |
 |
 |
 |
About Joshua Thomas
Joshua Thomas just simply loves cars and willing to work on them whenever there's chance... sometimes for free.
He started CarCareTotal back in 2017 from the advices of total strangers who witnessed his amazing skills in car repairs here and there.
His goal with this creation is to help car owners better learn how to maintain and repair their cars; as such, the site would cover alot of areas: troubleshooting, product recommendations, tips & tricks.
Joshua received Bachelor of Science in Mechanical Engineering at San Diego State University.
Get some FREE car parts & gear.. Or check out the latest free automotive manuals and build guides here.
Disable your ad blocker to unlock all the hidden deals. Hit the button below 🚗
| | | |