by Diego Ramirez
Replacing a blown car fuse takes under 10 minutes in most cases. Our team walks through every step below — no dealership visit required.
A blown fuse (a small glass or plastic device that breaks a circuit when current gets too high) sits behind many sudden electrical failures. Power windows stop mid-roll. The radio cuts out. Interior lights go dark. Knowing how to replace a car fuse helps most people solve these problems cheaply and fast. Our team has handled dozens of these repairs, and the process is almost always straightforward.
Before pulling anything apart, it helps to understand what fuses actually do. They act as a sacrificial electrical link — they blow on purpose to protect wiring from overheating or catching fire. Replacing the fuse fixes the symptom. Finding out why it blew fixes the real problem.
Our team also covers interior car lights not working in a separate guide — a common issue that often traces back to a single fuse in the interior box.
Contents
Our team has replaced fuses in everything from late-1990s sedans to current-model trucks. Having the right tools cuts the job from 20 minutes to under 5.
Most vehicles on the road today use one of three main fuse styles. Knowing which one is installed saves a wasted trip to the parts store.
| Fuse Type | Size | Typical Circuits | Amp Range |
|---|---|---|---|
| Mini Blade (ATC/ATO) | Standard | Radio, wipers, interior lights | 5–30A |
| Micro2 Blade | Extra small | Newer compact cars | 5–30A |
| Maxi Blade | Large | ABS, cooling fans, alternator | 20–80A |
| Glass Tube (AGC) | Cylindrical | Pre-1980s vehicles | 1–30A |
| JCASE / Low-Profile Maxi | Rectangular | Under-hood power distribution | 20–100A |
Our team always confirms the fuse type before buying replacements. Mixing types is a common mistake that results in a second trip back to the store.
Most people already have most of these on hand or can find them in the fuse box lid:
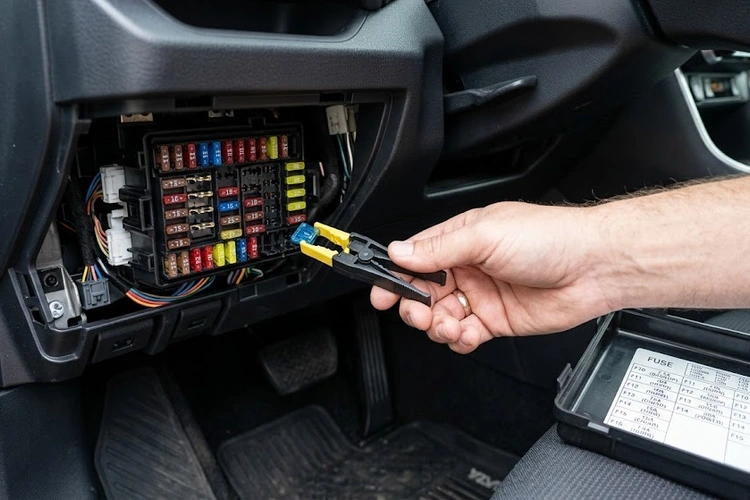
The hardest part of the whole job is usually identifying the correct fuse. Our team always starts with the owner's manual or the diagram on the box lid before touching anything.
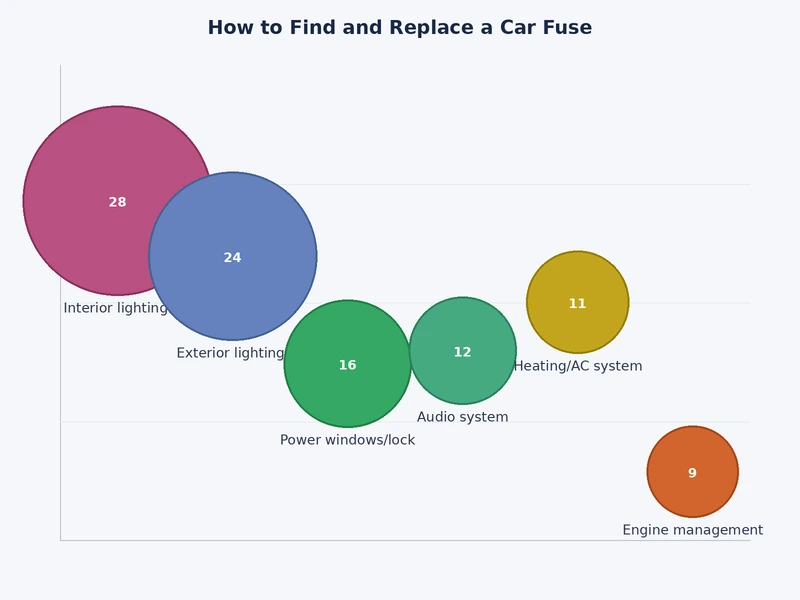
Most passenger vehicles carry two fuse boxes:
Some trucks and full-size SUVs have a third box in the cab or under the rear seat. A two-minute check of the owner's manual eliminates guessing.
Every fuse box ships with a diagram that maps each numbered slot to a specific circuit. The diagram is printed on the inside of the box lid or appears in Section 8 or 9 of most owner's manuals.
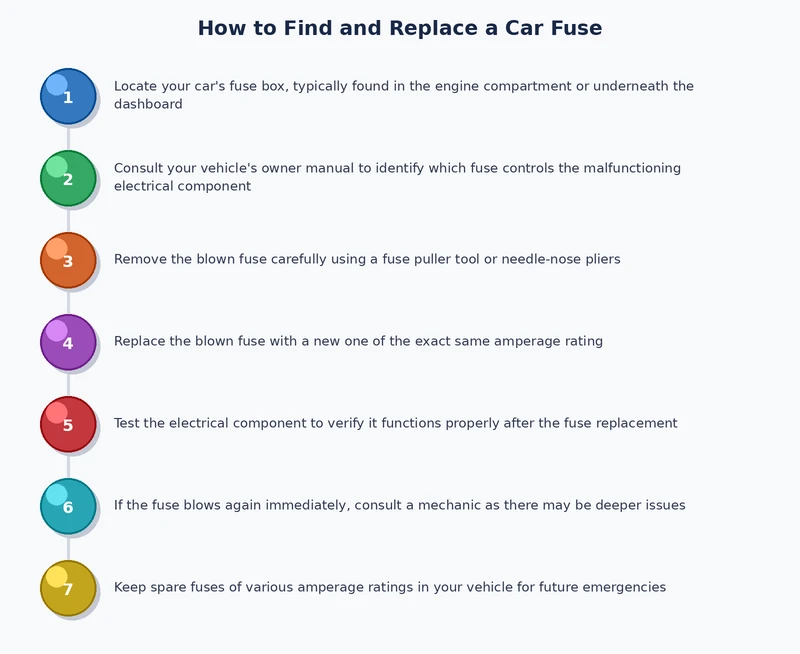
Our team follows this sequence every time:
For anyone dealing with dome lights behaving oddly, the dome light fuse almost always lives in the interior box under the dash — usually a 10A or 15A mini blade fuse.
Our team breaks this into three phases. Following this sequence prevents accidental damage to adjacent fuses or circuits.
Our team always insists on a fully off ignition before touching fuses — working on live circuits risks a short that blows additional fuses or damages the ECU (engine control unit, the vehicle's main computer).
Visual inspection misses roughly 20% of blown fuses — some strips burn and sag but remain connected-looking. Our team treats the multimeter check as the definitive test.
For anyone replacing fuses related to headlights, our guide on how to replace a headlight bulb covers the full lighting circuit and common wiring issues in the same repair session.
Our team gets asked regularly whether fuse replacement is worth doing at home. For a straightforward single-fuse swap, the answer is almost always yes. The calculus changes when the root cause is unclear.
Our team also recommends testing the battery during any electrical investigation. A weakening battery stresses circuits and contributes to premature fuse failures. The process is straightforward and covered in our car battery testing guide.
A handful of persistent misconceptions make fuse replacement riskier and more confusing than it needs to be. Our team encounters these regularly and thinks they're worth addressing directly.
Myth 1: "A higher-amp fuse works fine as a temporary fix."
This is one of the most dangerous electrical shortcuts anyone can take. A 30A fuse installed in a 15A slot permits twice the rated current before blowing — meaning wiring overheats and potentially ignites before the fuse intervenes. There is no safe version of this substitution.
Myth 2: "If the fuse looks intact, it's definitely good."
Visual inspection misses a meaningful share of failed fuses. Our team always recommends a multimeter continuity test when the visual result is questionable. The guide on using a multimeter on a car covers this exact test step by step.
Myth 3: "One fuse controls exactly one thing."
Manufacturers routinely share fuses across multiple accessories on the same circuit. A single fuse might cover interior lights, the cigarette lighter socket, and power mirrors simultaneously. When several seemingly unrelated items fail at once, most people should check for a shared fuse before assuming multiple component failures.
Myth 4: "Fuses blow because they wear out over time."
Fuses blow due to electrical overload — most commonly a short circuit, a failing motor drawing excess current, or an aftermarket accessory installed without proper circuit protection. Age alone is not a cause. A fuse that has blown without a clear trigger deserves investigation, not just replacement.
Myth 5: "All replacement fuse brands are equivalent."
Quality differences exist. Our team prefers OEM (original equipment manufacturer) fuses or established brands like Littelfuse or Eaton Bussmann. Lower-cost unbranded fuses sometimes blow at incorrect amperages — a failure mode that defeats the entire point of a fuse.
A fuse that blows again immediately — or within a short time — is a diagnostic signal, not just a parts problem. Our team treats repeat failures as a starting point for deeper investigation.
For anyone noticing that power mirrors stopped working after a fuse replacement, a sticking mirror motor is a frequent cause of repeat fuse failures on that specific circuit.
Holding a blade fuse up to a flashlight reveals the metal strip inside. A broken or burned strip confirms a blown fuse. Dark discoloration inside the housing is another indicator. Our team recommends a multimeter continuity test for any fuse where the visual result looks uncertain — it takes under 30 seconds and removes all doubt.
Yes — with the ignition fully off and the correct replacement fuse in hand, swapping a blown fuse is one of the safest DIY car repairs available. Our team considers it a basic skill that most vehicle owners benefit from knowing. The main risk comes from using an incorrect amp rating, which is easily avoided by matching the original fuse exactly.
A lower-amp replacement blows too easily under normal operating loads, causing the same accessory failure to repeat. A higher-amp replacement is far more dangerous — it allows excess current to flow through wiring that was not designed for it, creating a fire risk before the fuse ever trips. The amp rating is not a suggestion; it must match the original.
A fuse installed in a healthy, properly loaded circuit can last the entire life of the vehicle — sometimes decades. Fuses are not wear items. They fail only when subjected to current above their rated threshold. Any fuse that blows without an obvious overload event should be treated as a symptom of an underlying electrical problem rather than a component that simply aged out.
Yes, the removal and replacement process is identical. Engine bay boxes typically contain larger maxi blade fuses and sometimes fusible links (wire-based fuses that are part of the wiring harness itself). Standard blade-type maxi fuses pull and insert the same way as interior fuses. Our team recommends professional inspection whenever a large-capacity fuse — 40A or above — fails without an obvious cause.
 |
 |
 |
 |

About Diego Ramirez
Diego Ramirez is a maintenance and care specialist who has been wrenching on cars since he was sixteen. He focuses on fluid changes, preventive care routines, paint protection, and the small habits that turn a five-year-old car into a fifteen-year-old car.
Get some FREE car parts & gear.. Or check out the latest free automotive manuals and build guides here.
Disable your ad blocker to unlock all the hidden deals. Hit the button below 🚗
| | | |