by Diego Ramirez
A clogged or failing fuel filter is one of the most overlooked causes of poor engine performance. Learning how to replace a fuel filter yourself can restore lost power, improve fuel economy, and prevent costly repairs down the road. This guide walks you through the entire process — from identifying symptoms to completing the swap safely at home.
The fuel filter's job is straightforward: trap dirt, rust particles, and debris before they reach your fuel injectors. Over time it becomes restricted, starving the engine of the clean fuel it needs. If you've noticed rough idling, hard starts, or hesitation under acceleration, a dirty filter may be the culprit. Before diving in, it's worth reviewing your car maintenance schedule to see when a fuel filter change is due for your vehicle.
Contents
Your engine relies on a consistent supply of pressurized fuel. When the filter restricts flow, symptoms appear gradually and then worsen:
A severely restricted filter forces the fuel pump to work harder, shortening its life. You may hear a whining noise from the fuel tank — a classic sign the pump is straining. Pair this with the performance issues above and you have strong evidence the filter needs attention. At this stage, pairing a new filter with a quality fuel injector cleaner helps flush any residual debris from the injectors.
Not all fuel filters are installed the same way. According to Wikipedia, fuel filters are broadly categorized by location and connection type. Knowing yours before you start saves time.
| Filter Location | Common Vehicles | Connection Type | DIY Difficulty |
|---|---|---|---|
| Inline (under hood) | Older domestics, trucks | Banjo bolt or threaded | Easy |
| Inline (under chassis) | Many import sedans | Quick-connect clips | Moderate |
| In-tank (with pump) | Most post-2000 vehicles | Integrated assembly | Advanced |
| In-line canister | Diesel trucks | Spin-on or cartridge | Easy |
If your vehicle has an in-tank filter integrated into the fuel pump module, this job is more involved and may be best left to a professional. For inline filters, the DIY process below applies directly.
Fuel is flammable. These precautions are non-negotiable:
These same careful habits apply whenever you're working with fuel-related components. If you've recently done a job like replacing a serpentine belt, you already know how important proper preparation is before opening any engine component.
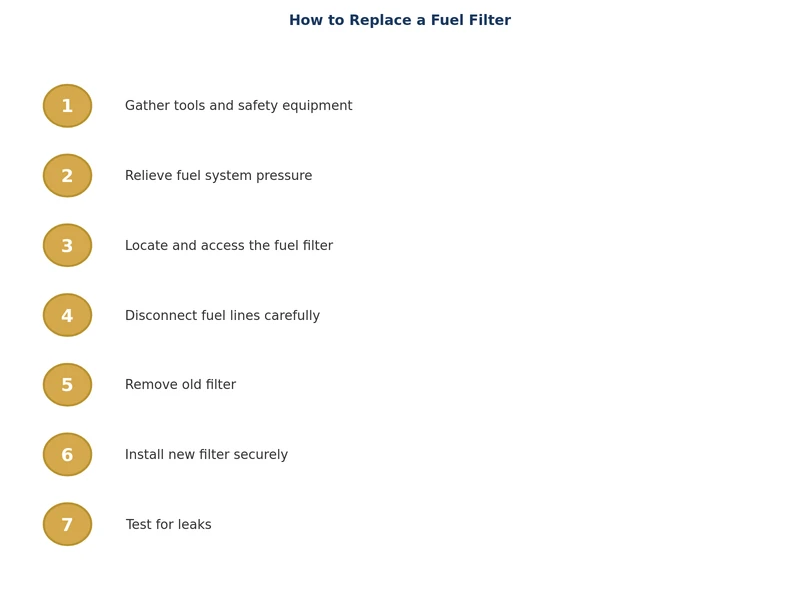
Modern fuel-injected vehicles maintain pressure in the fuel lines even when off. Skipping this step means a face full of fuel when you disconnect the lines.
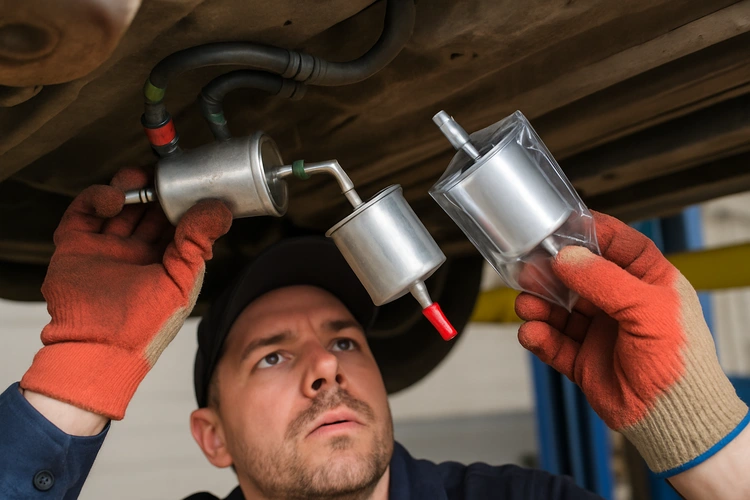
The filter is typically along the fuel line between the tank and engine. On many trucks and older cars it's under the hood near the firewall. On imports it's often under the chassis near the driver's side rear wheel. Consult your vehicle's service manual or a parts store lookup by VIN to confirm the exact location. If the filter is under the car, safely raise and support the vehicle on jack stands — never rely on a floor jack alone.
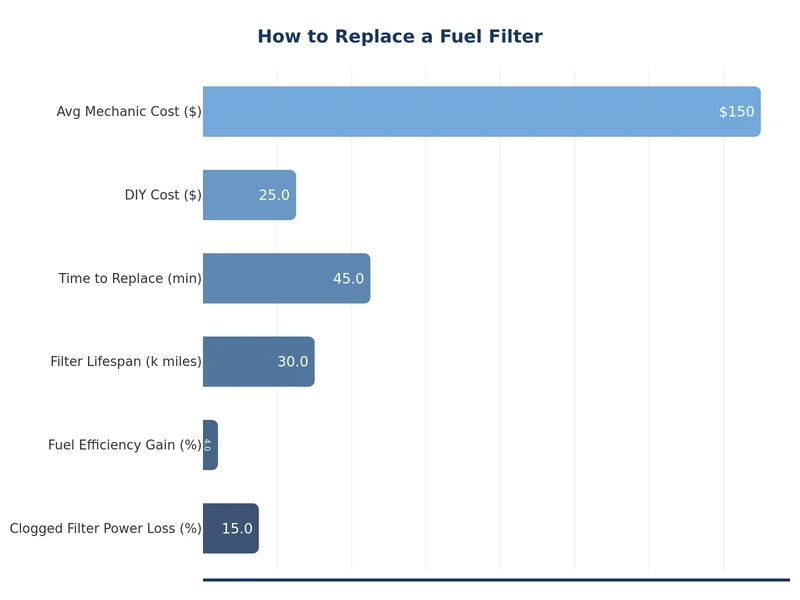
Replacement intervals vary widely by manufacturer. Older carbureted vehicles often specify every 12,000–15,000 miles. Most modern fuel-injected vehicles list 30,000 miles, while some manufacturers claim the filter is "lifetime" — though many technicians disagree given real-world contamination levels.
| Service Option | Parts Cost | Labor Cost | Total Estimate |
|---|---|---|---|
| DIY – inline filter | $15–$40 | $0 | $15–$40 |
| Independent shop | $15–$40 | $60–$90 | $75–$130 |
| Dealership | $20–$60 | $80–$120 | $100–$180 |
| DIY – in-tank (pump module) | $80–$250 | $0 | $80–$250 |
For most inline filter jobs, the DIY savings are substantial. The job takes 30–60 minutes once you have the right tools, making it one of the better return-on-time maintenance tasks you can do at home.
Most manufacturers recommend every 20,000–30,000 miles for inline fuel filters. If your vehicle uses an in-tank filter integrated with the fuel pump, follow the pump replacement interval or replace it when symptoms appear. Always check your owner's manual for the specific interval.
Yes. A severely clogged filter can restrict fuel flow enough that the engine won't start at all, particularly on cold mornings when fuel viscosity is higher. If your car cranks but won't fire and other causes have been ruled out, the fuel filter is worth inspecting.
For vehicles with quick-connect fittings you'll need a fuel line disconnect tool set, which costs $10–$20 at any auto parts store. For threaded fittings, standard combination wrenches work. Banjo bolt fittings require new copper crush washers, sold separately.
Yes, provided you follow proper safety steps: depressurize the system first, disconnect the battery, work in a ventilated area away from ignition sources, and keep a Class B fire extinguisher on hand. The actual mechanical work is straightforward for inline filters.
A backwards filter restricts flow through its bypass valve and won't filter effectively. You may see reduced performance immediately or experience premature filter failure. Always confirm the flow direction arrow points toward the engine before tightening any fittings.
Yes. A restricted filter forces the fuel pump to work harder than it was designed to, generating excess heat and wearing out the motor faster. Replacing the filter on schedule is one of the most cost-effective ways to extend fuel pump life.
 |
 |
 |
 |

About Diego Ramirez
Diego Ramirez is a maintenance and care specialist who has been wrenching on cars since he was sixteen. He focuses on fluid changes, preventive care routines, paint protection, and the small habits that turn a five-year-old car into a fifteen-year-old car.
Get some FREE car parts & gear.. Or check out the latest free automotive manuals and build guides here.
Disable your ad blocker to unlock all the hidden deals. Hit the button below 🚗
| | | |