by Sarah Whitfield
Have you ever sat in traffic watching the temperature gauge climb with no obvious explanation? A radiator fan not working is one of the most common culprits — and one that quietly escalates into head gasket damage or a seized engine if you let it ride.
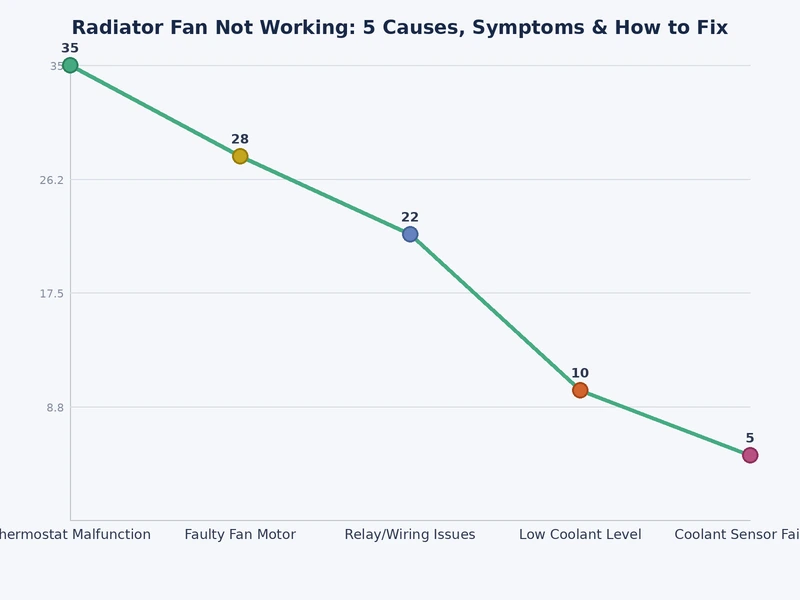
The cooling fan is your engine's last line of defense against heat buildup at low speeds. When it fails, coolant temps spike fast. The five causes covered here account for the vast majority of fan failures, and most are diagnosable with basic tools in your driveway.
If your engine is already running hot, start with our breakdown of car overheating causes to rule out other contributing factors before zeroing in on the fan.

Contents
The radiator transfers heat from circulating coolant into the surrounding air. At highway speeds, ram air through the grille handles this passively. At idle or low speeds, there's no natural airflow — you need a powered fan to push air across the radiator core.
Most modern passenger vehicles use one or two electric fans mounted in a plastic shroud ahead of the radiator and A/C condenser. They run on DC motors controlled by relays, fuses, and the ECM. Older trucks and some performance vehicles use a belt-driven mechanical fan with a viscous clutch on the water pump. Mechanical fans fail differently — slipping clutch, not electrical faults. This guide focuses on electric fan systems, which dominate current-production vehicles.
The ECM monitors coolant temperature via the coolant temperature sensor (CTS). When coolant reaches roughly 195–210°F, the ECM grounds the fan relay coil. That closes the relay, routes battery voltage to the motor, and the fan spins. A/C compressor activation also triggers the fan on most platforms — that's why the fan sometimes runs with a cold engine. The complete circuit involves the fuse, relay, motor, CTS, and ECM. A failure anywhere in that chain stops the fan dead.
The fan circuit is protected by a dedicated 20–40A maxi-fuse in the underhood fuse box. A dead short or momentary current spike blows it cleanly. Don't rely on visual inspection — fuse elements can fracture internally without visible damage. Always test both terminals with a multimeter or circuit tester. If one side reads zero voltage with the ignition on, the fuse is open.
The fan relay is the single most common cause of a radiator fan not working. Relay contacts corrode, carbon over, or weld open after thousands of switching cycles. Replacement costs under $15. Most underhood relay boxes carry identical relays on lower-priority circuits — horn, fog lights, accessory. Swap yours with a matching part number as a quick test. Fan starts running? Replace the relay. That's the whole fix.
A failing CTS sends corrupted data to the ECM. If it reports artificially low coolant temps, the ECM never triggers the fan — even as coolant approaches boiling point. A shorted CTS can have the opposite effect and run the fan continuously. Either condition typically sets a P0115–P0119 DTC. Scan for stored and pending codes before replacing any parts. Note that a degraded CTS also skews fuel trims and affects cold-start idle quality, so it's worth addressing even beyond the fan issue.
If the fuse, relay, and CTS all test clean, the motor is your next suspect. Brushes wear out, windings short, and bearings seize — especially in high-heat underhood environments. Direct-power testing confirms or rules out the motor in under a minute. Disconnect the harness, apply 12V to the motor positive terminal, and ground the negative. No spin or sluggish rotation means the motor is done.
Chafed harness wires, corroded connectors, and broken grounds account for a meaningful share of fan failures on high-mileage vehicles. These faults are often intermittent — the fan operates cold and quits hot as the harness expands and connector resistance climbs. A systematic pin-out check with a DVOM is the only reliable way to find them. ECM output driver faults are less common but do occur after water intrusion or a prior harness short that exceeded the driver's current rating.
Not every fan failure is dramatic. Some develop gradually over weeks before triggering a visible symptom. Here's what to watch for:
A radiator fan problem rarely stands alone. If you also notice low coolant or wet spots under the car, check out our guide on coolant leak symptoms — the two problems together accelerate overheating dramatically and can overwhelm the cooling system even after the fan is repaired.
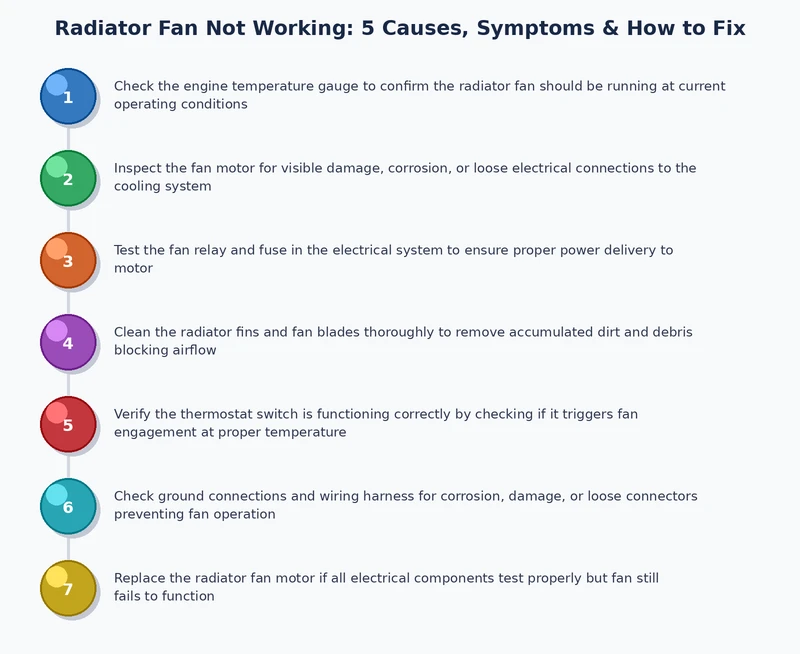
Work from lowest-effort to highest before touching any components:
If the basics check out, move to component-level testing. Follow this order — most failures are caught in the first two steps:
| Component | Test Method | Pass Reading | Fail Indication |
|---|---|---|---|
| Fuse | Multimeter voltage test on both terminals with ignition on | Battery voltage both sides | Zero volts on load side — open circuit |
| Fan relay | Swap with identical relay from non-critical circuit; or energize coil pins (85/86) and test contact pins (30/87) for continuity | Audible click; continuity between pins 30 and 87 | No click; open or welded contacts |
| Fan motor | Apply 12V directly to motor connector pins, chassis ground on negative | Full-speed rotation | No spin or weak/slow rotation |
| CTS signal | Scan tool live data — compare coolant temp to ambient at cold start | Within 5°F of ambient on a fully cold engine | Implausibly low, high, or frozen value |
| ECM fan output | Backprobe relay control wire at ECM connector; look for ground signal when engine is hot | Pulls to ground above ~195°F coolant temp | No ground signal despite confirmed hot engine |
ECM output testing is a last resort. If everything upstream checks out and the fan still won't run, that's your path. Don't start there.
Several cooling fan repairs are well within DIY range with basic hand tools and a multimeter:
Some repairs justify shop time:
If the fan failure coincides with symptoms like no heat output, also check our guide on a car heater not working — the heater core, water pump, and thermostat are all part of the same cooling circuit, and a single underlying fault can affect all of them simultaneously.
These mistakes show up repeatedly both in forum threads and in shop diagnostics after a failed DIY attempt:
The cooling fan doesn't require scheduled maintenance, but a few habits extend its service life significantly:
Short highway trips in cool weather carry lower risk because ram air keeps coolant temps stable without the fan. But any stop-and-go driving, idling, or traffic will push coolant temps into the danger zone quickly. Don't rely on "just a quick trip" logic — repair the fan before driving in any condition that involves low speed or extended idle.
Costs scale with the cause. A blown fuse is under $5. A relay runs $10–$20. A CTS is $20–$60 for the part. A fan motor or complete assembly typically costs $80–$250 in parts, plus labor at a shop. ECM repair or replacement is the expensive outlier, ranging from $300 to over $1,000 depending on whether the module can be reprogrammed or must be replaced.
On many vehicles, a separate relay controls fan activation via the A/C circuit versus the temperature-triggered circuit. If the fan spins when you turn on the A/C but not when the engine gets hot, the most likely culprits are the cooling fan relay for the temperature-triggered circuit, the CTS sending a false low-temp signal, or an ECM output driver fault — not the A/C side of the system.
 |
 |
 |
 |

About Sarah Whitfield
Sarah Whitfield is a diagnostics and troubleshooting specialist who spent ten years as an ASE-certified technician before joining the editorial team. She specializes in OBD-II analysis, electrical gremlins, and the kind of intermittent problems that make most owners give up.
Get some FREE car parts & gear.. Or check out the latest free automotive manuals and build guides here.
Disable your ad blocker to unlock all the hidden deals. Hit the button below 🚗
| | | |