by Sarah Whitfield
Roughly 2 million crashes occur every year in the United States due to turn signal failures or outright neglect — a figure highlighted repeatedly in NHTSA vehicle lighting safety data. A turn signal not working is a genuine road hazard, not a minor nuisance to defer. Our team has worked through hundreds of these faults across all makes and models, and the diagnostic path is consistent: start cheap, work upward, confirm before spending. Seven distinct causes account for the vast majority of cases. Electrical gremlins can sometimes trigger other dashboard warnings alongside a turn signal fault — if a check engine light appeared around the same time, our guide on resetting the check engine light addresses that separately. For now, here's everything our team knows about diagnosing and fixing a dead or malfunctioning turn signal.

Contents
The turn signal system is simple on older vehicles and significantly more complex on modern ones. Current flows from the battery through a fuse, through the flasher relay, through the turn signal stalk switch, and out to the front and rear bulbs on the selected side. The flasher relay interrupts that circuit at a fixed rate — typically 60 to 120 flashes per minute — producing the characteristic blinking cadence.
Modern vehicles have shifted away from standalone thermal or electronic flasher relays. Most current platforms route flashing logic through the Body Control Module (BCM), which handles the timing in software. That architectural change makes diagnosis more nuanced. A BCM-controlled system can exhibit every symptom of a relay failure while the relay itself tests perfectly fine. Our team always confirms whether the vehicle uses a discrete plug-in flasher or BCM-integrated logic before ordering parts.
Flash rate is load-dependent by design. The flasher monitors current draw through the circuit. When a bulb burns out, current drops, and the flasher responds by blinking faster — the familiar hyper-flash symptom. This is intentional. It signals the driver that something needs attention. LED conversions trigger the exact same hyper-flash behavior unless a load resistor or LED-compatible flasher is installed, because LEDs draw a fraction of the current that incandescent bulbs do.
Always check for recent LED upgrades before replacing a flasher relay. Hyper-flash after an LED conversion is almost never a relay failure — it's a load mismatch that a $6 resistor resolves.
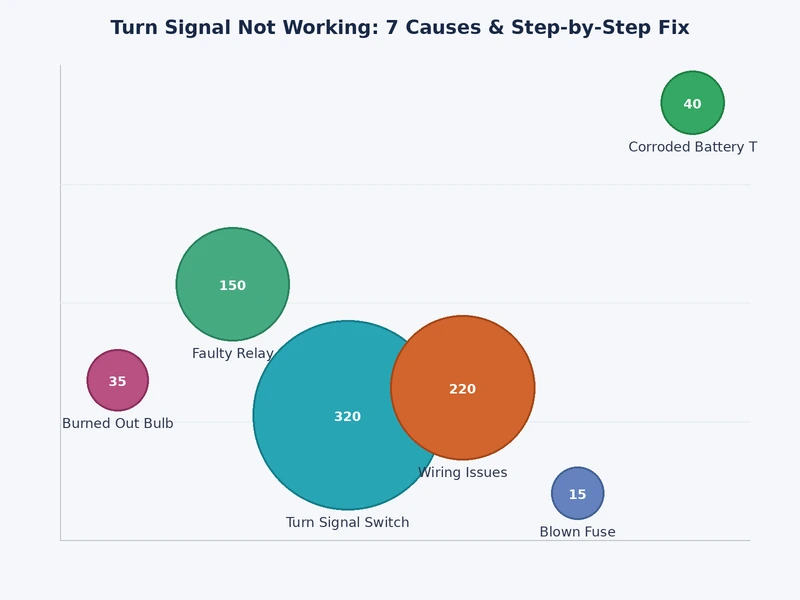
Our team's experience across hundreds of turn signal diagnostics puts these seven causes in a clear priority order. Start from the top — the cheap, fast fixes — before moving to the involved ones.
| # | Cause | Primary Symptom | DIY Difficulty | Parts Cost |
|---|---|---|---|---|
| 1 | Burned-out bulb | One corner dead or hyper-flash | Easy | $3–$10 |
| 2 | Blown fuse | Entire side or all signals dead | Easy | $1–$5 |
| 3 | Faulty flasher relay | No flash, constant on, or erratic flash | Easy–Moderate | $8–$25 |
| 4 | Bad turn signal switch | Loose stalk, intermittent operation | Moderate | $20–$60 |
| 5 | Wiring or ground fault | Intermittent, corrosion-related | Moderate–Hard | $0–$30 |
| 6 | Multifunction switch failure | Multiple stalk functions affected | Hard | $80–$250 |
| 7 | Faulty bulb socket or connector | Bulb tests good but won't light | Moderate | $10–$40 |
This is the most common cause by a wide margin. The front or rear turn signal bulb simply fails. The fix is a $3–$10 replacement. The complication is access. A straightforward bulb swap on a Honda Civic can become a two-hour ordeal on a BMW that requires removing the entire headlight assembly to reach the front turn signal socket. Our team recommends keeping a spare 3157 or 7443 bulb in the glove box — these two part numbers cover the majority of domestic and Japanese vehicles.
A blown fuse kills the entire turn signal circuit on the affected side, or all signals simultaneously depending on fuse box wiring. Fuses blow from momentary shorts — usually from water intrusion or a socket that corroded and briefly grounded against its housing. Pull the fuse, hold it to light, and replace it with the identical amperage. If the replacement fuse blows immediately, there's an active short that needs tracing before any more fuses go in. Swapping fuses repeatedly into an active short is how small electrical problems become large wiring repairs.
On older vehicles with standalone relays, the thermal or electronic flasher module fails over time. Signals might stay constantly illuminated, refuse to flash, or flash erratically. The relay is typically a small plug-in unit in the fuse box or under the dash. Replacement takes under five minutes. On newer BCM-controlled vehicles, a software reflash or BCM replacement is the only path forward — identical symptom, completely different fix. Our team confirms the vehicle architecture first before touching any parts.
The turn signal stalk switch lives inside the steering column. Internal contacts wear out after years of use. A failing switch produces intermittent signals — sometimes working, sometimes not, often depending on exactly how far the stalk is depressed. Our team has encountered switches that operate normally when cold but fail as the column warms up, a classic thermal expansion symptom in worn contacts. Replacement is straightforward on most vehicles but requires steering wheel removal on some, which means dealing with airbag system precautions.
Corroded ground points and chafed wiring are the hardest faults to track down. Ground corrosion is especially prevalent on vehicles exposed to road salt. A poor ground at the taillight assembly causes dim, erratic, or cross-talking lights — where braking on one side illuminates the turn signal on the other. Our team traces the ground wire back to its chassis attachment point and looks for white or greenish corrosion on the terminal. Cleaning the contact with a wire brush and applying dielectric grease resolves most of these without replacing a single active component.
The multifunction switch combines turn signals, high beams, wipers, and sometimes cruise control into one stalk assembly. When it fails, multiple functions usually degrade together. This is a $80–$250 parts repair plus labor. Our team reserves this diagnosis for cases where the turn signal switch contacts test good individually but function remains unreliable, and where wiper or high-beam anomalies also appear. The diagnostic overlap with other lighting faults is real — our article on headlights flickering covers how electrical issues in the column manifest across multiple systems.
A corroded bulb socket passes a visual inspection but fails under load. The center contact can collapse slightly, losing consistent contact with the bulb base. Our preferred field test: insert a known-good bulb firmly and wiggle it under power. If the light flickers or only illuminates partially, the socket is the problem. Pigtail socket replacements are inexpensive and splice in with basic tools. Skipping socket inspection after replacing a bulb is one of the most common reasons turn signal problems repeat within months.
The majority of turn signal repairs fall in the $5–$50 DIY range. The cost jump happens when a fault reaches the multifunction switch, the BCM, or when shop labor is involved on a complex-access vehicle.
A bulb replacement at home runs $3–$10. A shop charges $20–$60 once labor is added. Fuse replacement costs essentially nothing if there's a spare in the fuse box. A standalone flasher relay is $8–$25 at any auto parts counter. Turn signal switch replacement at an independent shop typically lands at $150–$350 all-in. Multifunction switch replacement at a dealership pushes $300–$600. BCM-related repairs — reprogramming or outright replacement — can reach $500–$1,200, though that outcome is uncommon for an isolated turn signal fault.
Our rule: never spend more than $30 on parts without confirming the diagnosis with a test light or multimeter first. Chasing symptoms by swapping expensive components is the fastest way to inflate a repair bill on a $15 problem.
Similar discipline applies across other common electrical faults. The diagnostic process we use for a car horn not working follows the same hierarchy — fuse first, switch second, wiring last — because the underlying electrical architecture is nearly identical.
Our team follows a strict sequence when diagnosing a turn signal not working. Skipping steps wastes money on parts that aren't needed.
Activate the hazard lights and walk all four corners of the vehicle. Note exactly which lights are dead, which are dim, and which are hyper-flashing. This 60-second observation narrows the fault immediately. One dead corner points to a bulb or socket. Hyper-flash on one side points to a missing bulb or load mismatch. No flash at all across all signals points to the relay or fuse. Document the observation before touching anything — the pattern matters more than most people realize.
Pull the fuses labeled "turn signal" and "hazard" from both the interior and underhood fuse boxes. Some vehicles split the circuit across two separate fuses. Use the plastic fuse puller in the fuse box lid. Hold each fuse up to light and inspect the wire element inside. Replace any blown fuse with the exact same amperage. If the new fuse holds and the signals return, inspect the socket that caused the original short before calling the job done — an uncorrected root cause blows the next fuse just as fast.
Locate the flasher relay using the owner's manual or the fuse box lid diagram. On vehicles with a plug-in relay, swap in a known-good unit from another slot if part numbers match — the hazard relay and turn signal relay are often interchangeable. Activate the signals and listen for an audible click from the relay. No click means the relay isn't actuating. A relay that clicks but fails to flash points to a downstream fault — wiring, socket, or bulb — not the relay itself. That distinction saves significant diagnostic time.
Dielectric grease applied to every bulb socket contact after replacement is non-negotiable in our process. It prevents the corrosion that drives most repeat failures. The tube costs $4 and takes 30 seconds to apply per socket. Omitting it means revisiting the same repair in 18 months.
A non-contact circuit tester or basic test light eliminates guesswork on wiring faults. Probing the socket's feed wire with the signal activated gives an instant answer. Power present but no light means the socket or bulb is bad. No power means the fault is upstream — switch, fuse, or relay. That two-point check replaces 20 minutes of speculation with a 30-second confirmation.
For vehicles where the stalk feels notchy or resists snapping back to center after signaling, that mechanical stiffness usually indicates internal wear in the switch housing. Lubricating the column mechanism buys time, but internal contact degradation follows close behind. Our recommendation is to plan for switch replacement within the next service interval rather than waiting for a complete failure that leaves someone stranded mid-lane-change.
Some turn signal faults don't follow the standard hierarchy. These cases require more systematic electrical work.
Intermittent faults that appear and disappear with temperature changes almost always trace to a connector or switch with thermally sensitive contacts. Our team reproduces these by applying a heat gun to the suspected component with the circuit live. When the fault appears on command under heat, the culprit is confirmed without a single parts swap. That method cuts diagnostic time dramatically on elusive intermittent problems.
Cross-talk between circuits — activating the left turn signal causes the right brake light to illuminate, for example — is a ground fault signature. Current is finding an alternate return path through a shared ground point. Tracing and cleaning every ground in the taillight assembly resolves this entire category of fault without replacing any active components. It's tedious but cheap.
On OBD2-equipped vehicles, a scan tool sometimes logs BCM fault codes related to turn signal circuits even when no dashboard warning light appears. Our team runs a quick scan on any modern vehicle as a secondary check. Manufacturer-specific BCM codes can point directly to the failing circuit segment, cutting diagnostic time from an hour to minutes. When all individual components test good but the system still misbehaves, the fault usually lives inside the BCM itself — either a software fault or a hairline PCB trace crack. At that stage, dealer involvement or a remanufactured BCM is the practical path, and our team strongly recommends a second opinion from an independent shop before committing to that expense.
A turn signal not working is almost always a cheap fix — the only expensive outcome is skipping the basics and guessing with costly parts.
 |
 |
 |
 |

About Sarah Whitfield
Sarah Whitfield spent ten years as an ASE-certified automotive technician before transitioning to full-time automotive writing, giving her a diagnostic skillset that goes well beyond what most reviewers bring to the subject. She specializes in OBD-II code analysis, electrical system troubleshooting, and the intermittent failure modes that frustrate owners and confound general mechanics. At CarCareTotal, she covers car troubleshooting guides, diagnostic tools, and repair resources for drivers dealing with warning lights, strange symptoms, and hard-to-diagnose problems.
Get some FREE car parts & gear.. Or check out the latest free automotive manuals and build guides here.
Disable your ad blocker to unlock all the hidden deals. Hit the button below 🚗
| | | |