Audio ›
by Rachel Park
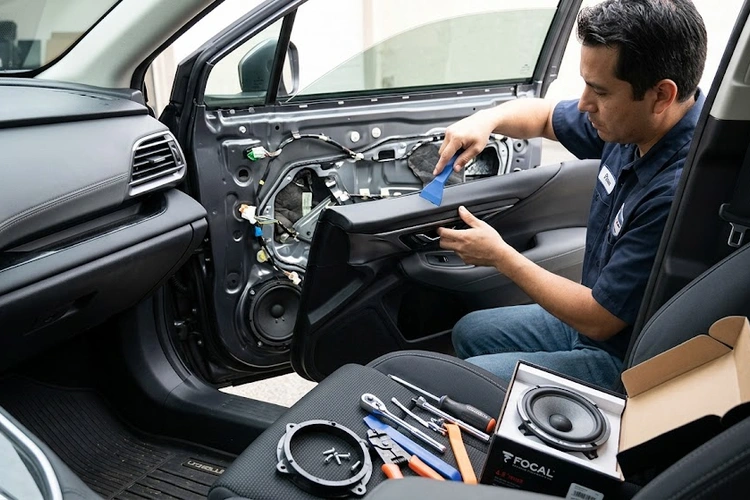
A friend once spent a weekend swapping out a worn head unit in a decade-old compact car, fully expecting the audio to transform overnight. The new deck looked great and sounded decent — for about a week. Then a door speaker blew. Pulling the door panel off revealed just how much those tired factory cones had been dragging the whole system down. Working through how to install car speakers turned out to be the real upgrade all along.
Factory speakers are designed to hit a price point, not a performance target. Aftermarket options — whether coaxial (a self-contained unit with multiple drivers stacked on one axis) or component (separate tweeter, woofer, and crossover network) — almost always deliver a noticeable jump in clarity and depth. Before picking speakers, it's worth reading about component vs. coaxial car speakers to sort out which style fits the setup and goals. The guide to best car speakers is also a practical starting point for narrowing down actual product choices.
Contents
Cost is usually the first question, and the honest answer is: it varies considerably. A bare-bones coaxial swap on a single pair of door speakers can run as little as $30 in parts when going the DIY route. A full four-speaker upgrade with quality components can push past $600 before installation labor is factored in. Knowing roughly what to expect at each tier makes budgeting far less stressful.
Professional installation at a car audio shop typically runs $50–$150 per pair of speakers, depending on the vehicle and speaker type. Some shops bundle installation with the speaker purchase at a flat fee, which can simplify the process. Going DIY saves that money outright — and the process, while fiddly in spots, is well within reach for most people comfortable with basic hand tools.
The main advantage of DIY isn't just cost. Working through the process builds familiarity with the vehicle's wiring layout, speaker placement, and door panel construction — all of which comes in handy for future troubleshooting or upgrades down the road.
| Tier | Price Range (per pair) | What to Expect | Best For |
|---|---|---|---|
| Entry-level coaxial | $25–$60 | Noticeable upgrade over factory sound | Budget builds, older vehicles |
| Mid-range coaxial | $60–$150 | Clearer highs, better bass response | Daily drivers, moderate upgrades |
| High-end coaxial | $150–$300 | Detailed sound, durable build quality | Enthusiasts who want plug-and-play |
| Component sets | $100–$500+ | Superior imaging, wide soundstage | Audiophiles, full custom builds |
As a general rule, spending more on speakers than the head unit (the stereo receiver in the dash) can support rarely pays off. Matching speaker quality to the overall system level tends to produce the best return on investment. A $300 component set hooked to a stock head unit leaves a lot of potential on the table.
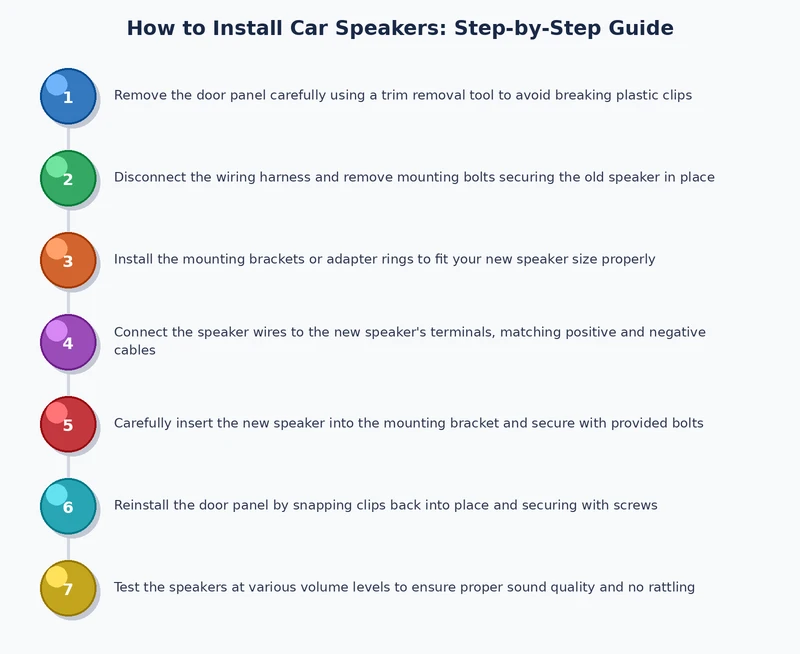
The core process for how to install car speakers follows a predictable sequence: disconnect the battery, remove the door panel, swap the speaker, reconnect everything, and test. Each step has nuances worth knowing before starting.
Having the right tools on hand before starting makes a real difference. Most installs require a Phillips-head and flathead screwdriver, a panel removal tool (a plastic pry tool designed to prevent scratches on door trim), a wire stripper, electrical tape or heat-shrink tubing, and crimp connectors. A multimeter — a device that measures electrical voltage, current, and resistance — is optional but genuinely useful for verifying wiring connections.
Speaker adapters (mounting brackets that allow aftermarket speakers to fit factory speaker openings without modification) are often needed and are usually sold for specific vehicle makes and models. Wiring harness adapters can also eliminate the need to cut into factory wiring, which preserves the vehicle's original wiring integrity and helps with resale value.
The first step is always disconnecting the negative battery terminal. Working around live wiring carries a real risk of short circuits and blown fuses — a simple precaution, but an important one. It's also a good moment to note that neglected electrical connections can cause problems well beyond the audio system. Battery terminal corrosion is a common culprit behind mysterious electrical issues in older vehicles; the guide to battery terminal corrosion is worth reviewing before tackling any car wiring project.
With the battery disconnected, the door panel comes off next. Most panels are held by a combination of visible screws (often hidden under small plastic caps near the door handle and armrest) and plastic clips around the perimeter. Working a trim removal tool around the panel edge, pressing inward rather than yanking outward, pops clips without snapping them. Once the panel is free, the wiring harness connectors for the window and door lock controls need to be carefully unplugged before setting the panel aside.
The factory speaker is typically secured by four screws and plugs into a factory wiring connector. Unscrew it, unplug the harness, and it's out. Taking note of the speaker's diameter — usually 5.25-inch, 6.5-inch, or 6×9-inch — confirms whether the replacement speaker will fit the opening.
If using a wiring harness adapter, connecting the new speaker is nearly as simple as plugging in the original. Without an adapter, the factory wires get connected directly to the new speaker terminals using crimp connectors or properly soldered and heat-shrunk connections. Getting polarity right matters — the positive wire (usually marked with a plus symbol or a colored stripe) connects to the positive terminal on the speaker. Reversed polarity causes the two channels to work against each other, noticeably reducing bass output.
Before screwing the speaker into place permanently, a dry fit — holding the speaker in position and briefly reconnecting the battery to test the sound — saves potential frustration. Once everything sounds correct, the speaker gets mounted, the door panel goes back on, and the job is done.
The mechanical part of swapping speakers is fairly straightforward. The difference between a mediocre install and a great one often comes down to a few details that most tutorials gloss over.
Door panels are mostly hollow metal — not ideal acoustics for a speaker trying to reproduce clean bass. Road noise and panel vibration can muddy the sound and reduce punch at lower frequencies. Applying a layer of sound deadening material (a dense, adhesive-backed mat, such as Dynamat or a budget alternative) to the inner door skin before reinstalling the panel makes a meaningful difference. Even a single layer on the flat metal area directly behind the speaker improves bass response noticeably.
It's also worth checking that the door's weather seal is in good shape before buttoning everything up. Moisture getting into door panels is more common than most people expect, and water is one of the fastest ways to ruin new speakers. If there's any sign of past water intrusion in the door cavity, addressing it first is far smarter than dealing with it after the install. The article on water leaking into the car floor covers several common entry points worth inspecting.
Polarity was already mentioned in the wiring section, but it's worth reinforcing: always double-check positive and negative connections before closing up the door. A polarity tester (a small, inexpensive tool that plays a test tone and identifies which terminal is which) removes all guesswork and costs very little.
Dry-fitting speakers before committing to the final mount also reveals fit issues — like a speaker that's slightly too deep for the door cavity, or a magnet assembly that contacts the window regulator mechanism. Catching those problems before the panel goes back on saves having to pull everything apart a second time. According to the Wikipedia entry on loudspeakers, cone material, surround type, and motor assembly all affect a speaker's frequency response and long-term durability — factors worth understanding when comparing spec sheets before buying.
Even a careful install can produce unexpected results. A few common problems have predictable causes, and most are easy to fix without pulling the whole system apart.
If one speaker sounds distorted or noticeably quieter than the others, the first thing to check is the gain setting on the head unit or amplifier. Pushing too much power to a speaker rated for lower wattage causes clipping (a form of distortion where the audio signal is cut off at its peaks). Reducing the gain usually clears it up immediately.
Loose or corroded connections are another frequent culprit. Electrical issues in cars can cascade in unexpected ways — something as minor as a loose ground wire near the audio system has been known to produce symptoms ranging from speaker hiss to flickering dashboard lights. Tracing the wiring back from the speaker to the head unit and checking each connection point resolves most output problems.
A rattle after an install is almost always a panel clip that didn't fully seat, a loose screw, or a wire that's now vibrating against the door skin. The fix is straightforward: press firmly around the door panel perimeter while playing music with decent bass content. The rattle will typically stop where the panel is flexing, pinpointing exactly which clip needs another push or which screw needs tightening.
If the rattle seems to come from outside the panel rather than inside it, it may not be speaker-related at all. Suspension and body components can produce sounds that travel through the car's structure and seem to originate near the doors. The guide on power window grinding noise is a useful reminder that door-area sounds aren't always audio-system problems — ruling out other sources first saves unnecessary disassembly.
Car speakers don't demand much maintenance, but a few simple habits extend their lifespan considerably. Avoiding sustained high-volume playback at the system's limits prevents overheating of the voice coil (the electromagnetic coil inside the speaker that drives cone movement). Keeping the interior dry matters too — water destroys paper cones and corrodes terminals quickly. In vehicles parked regularly in the sun, UV exposure can degrade foam surrounds (the flexible ring that allows the cone to travel in and out) over time. Using a windshield reflector or parking in shade helps, and the guide to maintaining a car in hot weather covers additional preventive habits worth adopting.
A few persistent myths trip up first-time upgraders. The most common: bigger speakers always sound better. Speaker size influences which frequencies a driver can reproduce effectively, but a well-designed 6.5-inch speaker regularly outperforms a cheaply built 6×9-inch unit. Matching the speaker to the application matters far more than maximizing cone area.
Another widespread belief: more power equals better sound. Clean power at a moderate level sounds significantly better than distorted power at maximum volume. A modest 18-watt RMS (root mean square — the continuous power rating that actually matters for speaker matching) head unit paired with efficient speakers often sounds cleaner than a 50-watt system driven hard.
Finally, many people assume factory wiring is always inadequate and must be replaced. For most passenger vehicles and moderate upgrades, the factory speaker wiring is perfectly fine. Running dedicated new wire only becomes necessary when adding an external amplifier or when the factory wire gauge is genuinely too small for the power being delivered.
A straightforward coaxial swap on a single pair of door speakers typically takes 1–2 hours for a first-time installer. With some experience, the same job can be done in under an hour. Component installs with separate tweeters and crossovers can take longer, especially if new tweeter locations need to be fabricated in the A-pillar or dash.
Most aftermarket speakers work fine powered directly by a factory or aftermarket head unit. However, an external amplifier (a dedicated power unit separate from the head unit) allows speakers to perform closer to their full potential and generally produces cleaner sound at higher volumes. It's not required for a basic upgrade but is worth considering for serious audio builds.
Not necessarily. Speakers come in standard diameter sizes, but mounting depth, magnet clearance, and exact opening dimensions vary between vehicles. Checking a speaker compatibility guide for the specific make, model, and year before purchasing is an important step — it saves a frustrating return trip to the store after discovering a fitment issue.
It's not recommended. Working with live wiring increases the risk of short circuits that can blow fuses or damage the head unit. Disconnecting the negative battery terminal takes about 30 seconds and eliminates that risk entirely — a small step that's well worth taking.
RMS (root mean square) represents the continuous power a speaker can handle reliably over time. Peak power is the maximum burst the speaker can survive briefly. When matching speakers to a head unit or amplifier, RMS ratings are the meaningful number — peak figures are often inflated in marketing materials and don't reflect real-world performance.
The most common causes are sustained over-powering (sending more wattage than the speaker is rated for), clipping from a poorly set amplifier gain, physical damage from an object striking the cone, and moisture damage. Running speakers at appropriate power levels and keeping the interior dry dramatically extends their lifespan.
Yes, in most cases. Coaxial speakers fit the same mounting locations as factory speakers and are significantly easier to install. The trade-off is that component setups generally offer better sound imaging — the sense of where sounds are positioned in the stereo field — because the tweeter can be mounted at ear level independently of the woofer.
 |
 |
 |
 |

About Rachel Park
Rachel Park specializes in the interior and exterior upgrades that meaningfully change how a car looks, sounds, and feels on a daily basis. She has hands-on experience with head unit installations and audio system builds, LED and HID lighting conversions, interior refresh projects, and cosmetic exterior work — evaluated from both a DIY accessibility and quality-of-result perspective. At CarCareTotal, she covers car audio and electronics, lighting upgrades, and interior and exterior styling accessories.
Get some FREE car parts & gear.. Or check out the latest free automotive manuals and build guides here.
Disable your ad blocker to unlock all the hidden deals. Hit the button below 🚗
| | | |