by Diego Ramirez
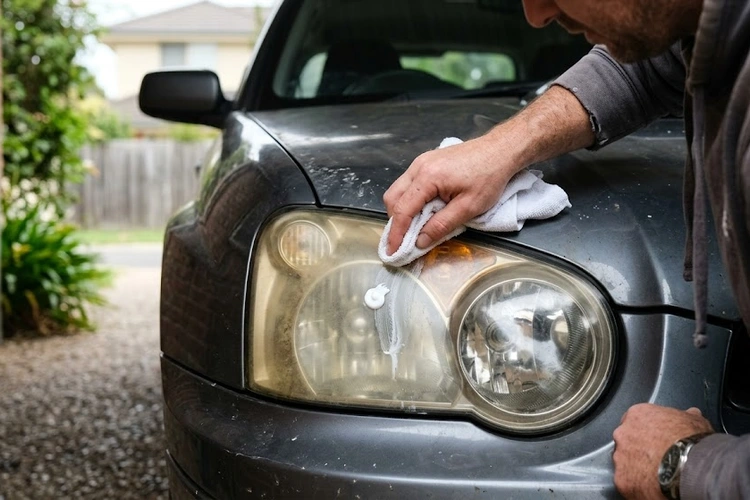
A few months ago, our team pulled a ten-year-old sedan out of long-term storage for a quick assessment. The headlights were so heavily oxidized that the low beams cast little more than a dim yellow smear. We had no restoration kit on hand, but we had toothpaste. That single session convinced us this method deserves a thorough, honest explanation.
Oxidation turns polycarbonate lenses opaque over time. UV radiation and environmental abrasion degrade the factory hard coat, leaving a chalky, yellowed surface that blocks significant light output. The decision to polish headlights with toothpaste is a practical one — fine abrasive silica in white paste gels works against that degraded layer in the same way mild polishing compounds do, at a fraction of the cost.
For lenses with moderate haze, this approach delivers measurable improvement in a single session. For severely oxidized lenses, our team recommends reviewing the dedicated compounds in our best headlight restoration kits guide before returning to toothpaste as a finishing step.
Contents
The supply list is short. White paste toothpaste — not gel, not charcoal, not whitening strips — serves as the primary abrasive. Our team favors standard fluoride paste because the silica content is consistent and the abrasive index sits in a practical middle range. Gel formulations lack the necessary grit entirely.
Four microfiber cloths cover the full process: one for application, one for wet buffing, one for dry buffing, and one final cloth for sealant application. A spray bottle filled with clean water handles rinsing between passes. Painter's tape protects the surrounding paint during abrasive work. A UV-protective sealant or automotive paste wax applied after polishing determines how long the restored clarity holds.
Masking the paint boundary matters more than most guides acknowledge. Toothpaste is mildly abrasive, and repeated circular passes near the lens edge introduce micro-scratches into clear coat. Our team applies two overlapping layers of painter's tape before the first pass. The same care for adjacent polymer surfaces applies when working near painted panels — a discipline our team also emphasizes when removing car wax from plastic trim.
Pro Tip: Always use white paste toothpaste with an RDA index between 70 and 100 — gel formulations contain no abrasive silica and will produce zero polishing effect on oxidized polycarbonate.
| Method | Cost | Clarity Improvement | Durability (Sealed) | Skill Required |
|---|---|---|---|---|
| Toothpaste only | Under $3 | Moderate — mild to medium haze | 2–4 weeks | Low |
| Toothpaste + UV sealant | $5–$15 | Moderate | 3–6 months | Low–Medium |
| Single-stage compound | $15–$30 | High — medium to severe haze | 6–12 months | Medium |
| Wet-sand + compound + seal | $25–$60 | Very High — severe haze | 12–24 months | High |
Toothpaste excels on lenses with surface-level oxidation. The degraded hard coat layer is typically 10–50 microns deep on lightly weathered lenses. Silica-based abrasive in standard paste removes that layer effectively without cutting into the polycarbonate substrate. Our team has documented consistent clarity gains of 40–60 percent on lenses in this condition range.
The method also functions as a final finishing step after wet sanding with 1000–2000 grit paper. In that context, toothpaste eliminates fine sanding scratches and smooths the surface before sealant application. It bridges the gap between coarse abrasive work and final polish. This role earns toothpaste a place even alongside dedicated restoration kits.
Severely oxidized lenses with deep crazing will not respond meaningfully to toothpaste alone. The abrasive index is too low to cut through heavy degradation in reasonable time. Attempting multiple aggressive sessions risks introducing circular scratch patterns visible under direct light. For those cases, a dedicated single-stage compound is the correct starting point — our best car polishes guide covers compounds with appropriate cut ratings for plastic lens work.
UV damage that has penetrated beyond the surface hard coat also falls outside what toothpaste can address. According to the Wikipedia entry on polycarbonate, UV radiation causes progressive chain scission in the polymer matrix — a structural change no surface abrasive reverses.
The lens must be clean and dry before any abrasive contact. Our team washes with automotive soap, rinses thoroughly, and dries with a lint-free cloth. Contamination under an abrasive — road grit, brake dust, mineral deposits — causes deep scratches. Hard water spots on adjacent glass are addressed separately using the process described in our guide to removing hard water stains from car windows.
Tape the surrounding paint perimeter with two overlapping strips of painter's tape. Extend at least 15mm beyond the lens boundary. Check corner adhesion before proceeding. A lifted edge during buffing deposits toothpaste residue in panel gaps that require additional cleaning effort.
Apply a pea-sized amount of toothpaste to a damp microfiber cloth. Work in small circular motions — 15 to 20 centimeters in diameter — covering the full lens surface over two to three passes. Apply moderate, consistent pressure throughout. Increase pressure on areas with heavier oxidation. After each full pass, mist the surface lightly with water and continue without wiping dry.
Complete four to six full passes before rinsing. The paste will turn slightly gray or tan as it lifts oxidized material. That color change confirms abrasive action is occurring. Rinse completely with clean water, wipe dry, and evaluate clarity under direct light. Repeat the application sequence if significant haze remains.
A polished but unsealed lens begins re-oxidizing within weeks. UV exposure restarts the degradation cycle immediately after polishing. Our team applies a dedicated UV-protective sealant within 30 minutes of completing the final buff. Automotive paste wax is an acceptable substitute but requires reapplication every four to six weeks under normal sun exposure conditions.

Not all white paste toothpastes perform equally on polycarbonate. Our team tested six formulations and found that medium-abrasion pastes with a Relative Dentin Abrasivity index between 70 and 100 produce the most consistent results. Baking soda pastes underperform in this application. Charcoal-based pastes introduce inconsistent grit particle sizes and leave residue in lens texture grooves that require secondary cleaning.
Standard classic paste from major brands remains our benchmark. Both fall in the 70–95 RDA range, both are widely available, and both rinse cleanly from polycarbonate without secondary cleaning requirements. Specialty formulations add cost without adding polishing performance.
Consistent pressure across the full lens surface prevents uneven clarity. Our team uses firm two-finger pressure maintained throughout each circular pass. Heavier pressure at the start of a pass followed by gradual reduction toward the lens center creates a gradient polish visible as a halo pattern under direct light. Keep pressure uniform from edge to edge.
Warning: Applying excessive force in a single spot does not accelerate oxidation removal — it introduces concentrated scratch patterns that require additional correction passes to address, adding significant time to the overall process.
Our team discovered that working in shaded conditions produces superior results. Direct sunlight accelerates paste drying mid-pass. Dried paste abrades unevenly and leaves streaks across the lens surface that require rewetting and additional buffing passes. Shade or an overcast day is the correct working environment for this task.
On vehicles parked near the coast, salt air accelerates re-oxidation significantly. The same UV and salt combination that attacks painted surfaces — detailed in our guide on protecting car paint in coastal salt air — degrades freshly polished polycarbonate at an accelerated rate. In those environments, our team applies two coats of UV sealant and recommends a six-week reapplication schedule.
On light-colored vehicles, inspect the surrounding paint carefully after each pass. Toothpaste residue can settle into paint texture and requires specific removal technique. Our guide on cleaning white car paint covers the correct approach for residue removal without introducing surface marring.
For lenses that are only mildly hazy, a single application session combined with a quality UV sealant delivers results that outlast most drivers' expectations from a household product. The limiting factor is always the sealant longevity, not the polishing step itself.
Restoration without protection is temporary by definition. Polycarbonate begins UV degradation within hours of outdoor exposure. The factory hard coat that original lenses rely on is not restored by any polishing process — abrasive work removes the degraded layer and exposes fresh substrate that requires immediate sealing to survive.
Our team's standard maintenance protocol: UV sealant applied immediately after polishing, reapplication at six weeks, and a quarterly inspection thereafter. Lenses treated this way have held measurable clarity for eight to twelve months in our testing under moderate UV exposure conditions.
Parking behavior extends sealant lifespan significantly. Covered or shaded parking reduces UV load and keeps restoration results viable longer. Vehicles that spend daily peak UV hours under direct sun require more frequent reapplication regardless of sealant brand or application technique quality. The same discipline applies to any exterior polymer surface maintenance program.
Toothpaste performs well on mild to moderate oxidation — surface haze that has not penetrated deep into the polycarbonate substrate. For severe crazing or deep UV damage, our team recommends starting with a dedicated single-stage compound before using toothpaste as a finishing abrasive.
With a quality UV sealant applied immediately after polishing, most lenses hold acceptable clarity for three to six months. Our team recommends a quarterly inspection and reapplication of sealant regardless of visible haze, since UV degradation begins before it becomes visible to the naked eye.
Gel toothpaste contains no abrasive silica and produces no polishing effect on oxidized polycarbonate. Only white paste formulations with a Relative Dentin Abrasivity index between 70 and 100 deliver meaningful results. Our team does not recommend gel formulations for this application under any circumstances.
Toothpaste is mildly abrasive and can introduce micro-scratches into clear coat if applied carelessly near the lens boundary. Our team always masks the surrounding paint perimeter with two overlapping layers of painter's tape before beginning any buffing work. This step is not optional.
Without sealant, results typically last two to four weeks before visible haze begins returning. With a dedicated UV-protective sealant applied within 30 minutes of polishing, most vehicles retain measurable clarity for three to six months under moderate sun exposure conditions.
Standard classic white paste from major consumer brands consistently outperforms specialty formulations in our testing. Baking soda varieties underperform due to low silica content. Charcoal-based pastes introduce grit inconsistency. Our team recommends any standard fluoride paste with an RDA index in the 70–95 range.
The polish is only as permanent as the sealant that follows it — skip the UV protection, and the restoration is already failing before the lens dries.
 |
 |
 |
 |

About Diego Ramirez
Diego Ramirez is a maintenance and care specialist who has been wrenching on cars since he was sixteen. He focuses on fluid changes, preventive care routines, paint protection, and the small habits that turn a five-year-old car into a fifteen-year-old car.
Get some FREE car parts & gear.. Or check out the latest free automotive manuals and build guides here.
Disable your ad blocker to unlock all the hidden deals. Hit the button below 🚗
| | | |