Car Care ›
by Diego Ramirez
Studies show that vinyl adhesive penetrates clear coat up to 40% deeper after three years of continuous UV exposure, making removal significantly more difficult — and significantly more expensive — over time. Knowing how to remove car decals before that window closes is the difference between a clean finish and a costly paint correction job. Rushed removal techniques, razor blades on dry vinyl, and the wrong solvents cause more damage than the decals themselves. This guide covers every proven method, from heat guns to eraser wheels, with realistic cost estimates and honest trade-off assessments. For context on how vinyl bonds to painted surfaces, the comparison of Paint Protection Film vs Vinyl Wrap is worth reviewing first.
Modern paint systems — base coat, clear coat, optional PPF layer — each respond differently to adhesive and removal chemistry. Factory dealer stickers use low-tack formulations. Aftermarket full-color graphics and racing stripes use aggressive, high-bond adhesives engineered to survive highway speeds and weather cycles. Removal strategy changes based on adhesive age, UV exposure, and paint condition underneath.
Contents
Vinyl graphics are not permanent by design, but UV radiation and heat cycling make them behave that way. The pressure-sensitive adhesives used in automotive vinyl become more aggressive over time. Plasticizers migrate into clear coat. UV degradation causes the vinyl face stock to become brittle and fragment during removal attempts.
Three compounding problems develop the longer decals remain on the vehicle:
UV shadowing is particularly stubborn. The decal-covered area retains original color depth while surrounding paint oxidizes at a faster rate. This difference becomes visible at raking light angles and cannot always be corrected with polish alone — sometimes requiring a full panel respray.
Post-removal protection prevents further oxidation differences from developing across the panel. Applying a quality coating seals the newly exposed paint and equalizes surface reflectivity. The guide on applying graphene coating covers the full application process for freshly corrected paint. For a broader comparison of protective options, the roundup of best ceramic coatings covers the field thoroughly.
Paint condition directly determines removal difficulty. Oxidized or single-stage paint — common on older vehicles — lacks a separate clear coat layer. On these surfaces, aggressive solvents can dissolve the color layer itself, not just the adhesive. Visual inspection before removal determines whether professional consultation is necessary.
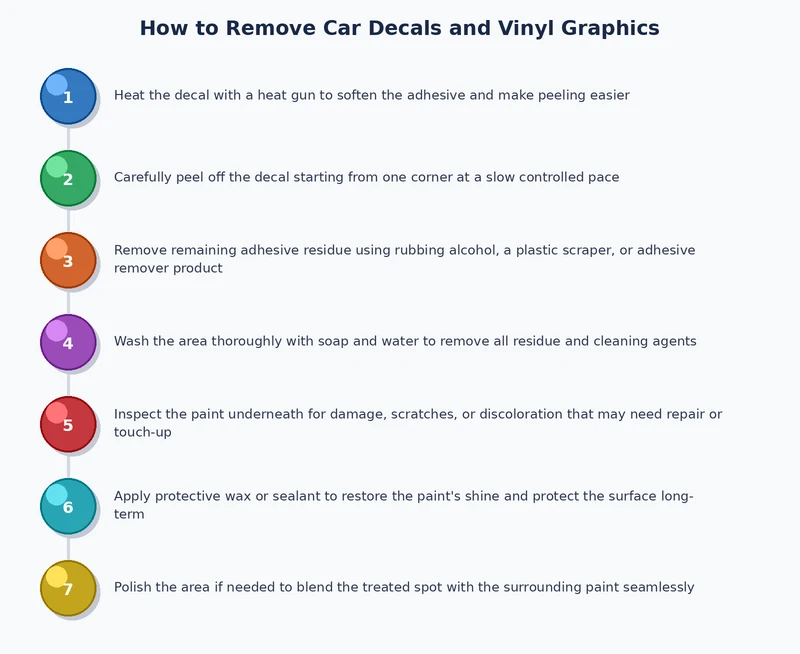
Successful decal removal depends on three core principles: controlled heat, patient lifting technique, and appropriate adhesive dissolvers. Skipping any one of these steps increases risk of paint damage. Most detailing professionals treat how to remove car decals as a multi-stage process, not a single action.
Essential tools to have staged before starting:
A complete car detailing kit includes most of these items. Improvised substitutes — flathead screwdrivers, acetone nail polish remover, rough towels — consistently cause avoidable scratches and chemical hazing that turn a simple decal job into a paint correction project.
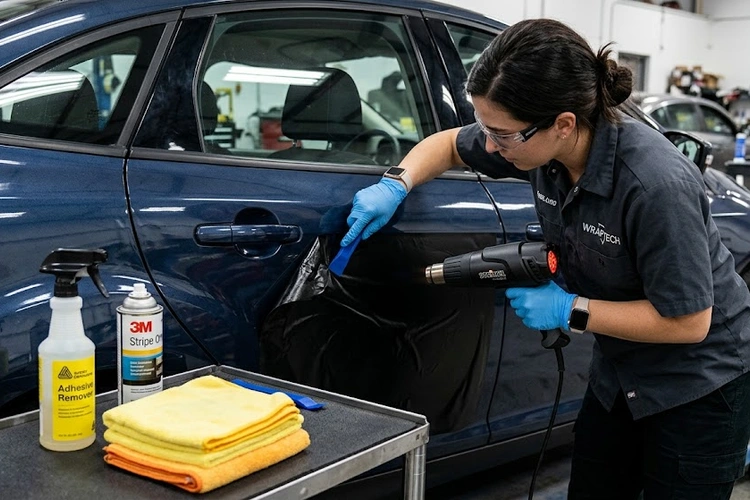
This is the most universally applicable approach. Heat softens adhesive, allowing vinyl to stretch and lift cleanly rather than tear and fragment.
Solvent-based removal works well on smaller decals and as the primary cleanup step after mechanical removal. Apply solvent to the edge of the decal, allow 60–90 seconds of dwell time, then lift with a plastic scraper. IPA is safe on clear coat at any concentration. Petroleum-based solvents like mineral spirits require spot-testing on an inconspicuous area — they can cloud matte and satin finishes permanently.
Rubber eraser wheels mount to a standard power drill and abrade vinyl off the surface through friction — no chemicals needed during the removal phase. The wheel's rubber compound is formulated harder than adhesive but softer than clear coat. Recommended operating speed: 3,000–4,000 RPM. Excessive speed generates friction heat that hazes clear coat rapidly. This method covers flat body panels fastest; curved surfaces require reduced speed and lighter pressure to maintain consistent edge contact.
Advantages:
Disadvantages:
Advantages:
Disadvantages:
For vehicles with existing paint defects — chips, micro-scratches, oxidation — the guide on applying touch-up paint provides a clear next step after removal and adhesive cleanup are complete.
First-time removers should stick to two tools: a hair dryer and a plastic scraper. Hair dryers max out around 70°C (160°F) — safe for paint but adequate for softening most decals under three years old. Older decals may resist this temperature, requiring an upgrade to a proper heat gun.
Beginner-safe removal sequence:
Common beginner errors:
Experienced detailers add two tools to the process: an eraser wheel for mechanical removal speed and a dual-action polisher for post-removal correction. The DA polisher with a light cutting compound corrects surface marring and hazing left after adhesive removal. Commercial-grade steam cleaners outperform heat guns on curved panels and deeply recessed body lines where the gun's airflow dissipates before reaching the adhesive layer.
Wet razor blade technique carries the highest risk. A razor blade held at 10–15 degrees on a wet surface can undercut vinyl without scratching if executed precisely. Even experienced detailers limit this to flat glass surfaces, not body panels. A one-degree angle change can create a gouge straight through clear coat.
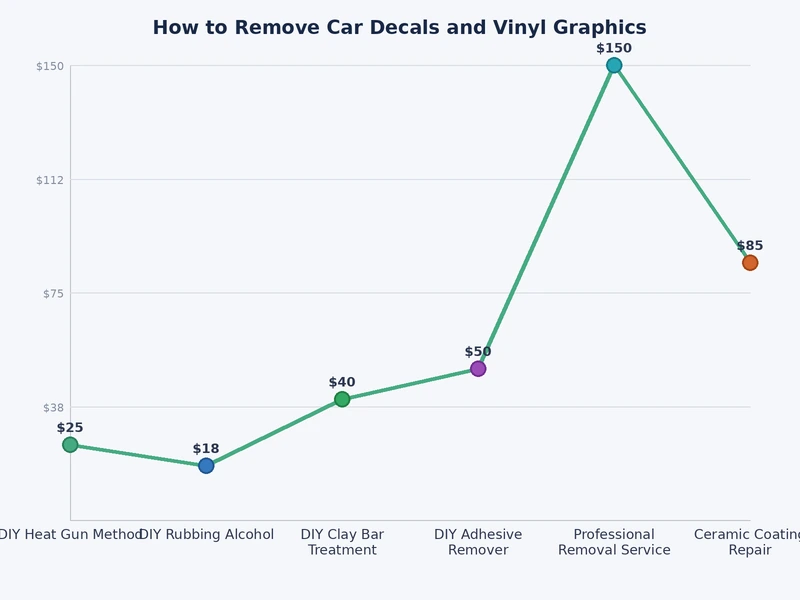
| Method | Materials Cost | Time Required | Skill Level | Paint Risk |
|---|---|---|---|---|
| Heat gun + plastic scraper | $20–$50 | 1–3 hours | Beginner | Low–Medium |
| Adhesive remover spray only | $10–$25 | 30–90 min | Beginner | Low |
| Steam cleaner | $50–$200 | 1–2 hours | Intermediate | Low |
| Eraser wheel + drill | $15–$30 | 45–90 min | Intermediate | Low–Medium |
| Razor blade (wet, flat surfaces only) | $5–$10 | 30–60 min | Advanced | High |
| Professional shop | $100–$400+ | N/A (drop-off) | N/A | Very Low |
For vehicles with structural paint damage underneath the decal — including surface rust — resolving those issues first is essential. The guide on repairing rust holes in car body panels covers that process before any aesthetic restoration work proceeds.
Temperature is the single most overlooked variable in decal removal. Vinyl adhesive is most pliable between 20–35°C (68–95°F). Working in direct sunlight on a warm day provides natural pliability. Working in an unheated garage in winter forces complete reliance on the heat gun and dramatically extends working time per section.
Dealer badges and stickers are typically low-tack vinyl or polypropylene film. These respond well to heat plus a plastic scraper. Most lift cleanly within a few minutes per sticker. IPA cleanup afterward is usually sufficient. Occasionally dealerships use 3M VHB tape-backed badges rather than traditional pressure-sensitive adhesive — these require longer solvent dwell time and a more aggressive adhesive remover to fully release.
These represent the most challenging DIY removal scenario. Cast vinyl with seven or more years of adhesive dwell time often requires a heat gun and eraser wheel in combination. The vinyl itself may be brittle enough to fragment during peeling — requiring methodical, inch-by-inch heating and scraping rather than long peel runs. Post-removal paint correction is almost certain. UV shadowing is nearly guaranteed on vehicles regularly parked outdoors throughout the decal's lifespan.
Fleet graphics are frequently applied over vinyl wraps rather than directly onto painted surfaces. Removing lettering from a base wrap requires the same general approach but at lower heat to avoid damaging the underlying wrap film. Solvents must be wrap-safe — standard IPA and Goo Gone Automotive are generally acceptable, but acetone-based products will damage most calendered and cast wrap films. After fleet retirement and full wrap removal, paint underneath is often in excellent condition due to complete UV isolation throughout the wrap's service life.
Removal does not inherently damage paint when proper technique is used. The main risks are clear coat lifting from overly aggressive scraping, adhesive residue left to re-cure on the surface, and chemical hazing from incorrect solvents. A heat gun combined with a plastic scraper and IPA cleanup is the lowest-risk combination for modern clear coat finishes.
IPA at 70–99% concentration handles fresh adhesive residue reliably. For older, cured adhesive, dedicated automotive products like 3M Adhesive Remover or Goo Gone Automotive penetrate more effectively with less scrubbing effort. Both are safe on clear coat when used as directed. A clay bar pass after solvent cleanup removes any embedded adhesive micro-particles that solvent alone cannot lift.
Yes, if misused. Holding a heat gun stationary on one spot or working above 150°C on standard clear coat causes hazing, bubbling, or paint delamination in severe cases. Keeping the gun moving in overlapping passes and maintaining a 5–8 cm standoff distance prevents thermal damage. Hair dryers are safer for beginners but generate insufficient heat for adhesive older than three years.
Professional detailers use commercial steam cleaners rather than heat guns. Steam penetrates adhesive more effectively and reaches curved panel edges and body lines where a heat gun's airflow disperses. Large-format wrap removal at a professional shop is typically followed by machine paint correction to address UV shadowing and any adhesive ghosting. Full-vehicle wrap removal takes 4–8 hours depending on vehicle size and wrap age.
IPA removes fresh adhesive residue effectively in most cases. Adhesive that has been bonded to clear coat for more than two to three years may resist IPA alone and requires a dedicated adhesive remover with a 3–5 minute dwell period before wiping. After solvent treatment, a clay bar pass is necessary to remove micro-particles embedded in the clear coat texture that chemical treatment alone cannot fully address.
The correct post-removal sequence is: adhesive cleanup with IPA or dedicated remover, clay bar decontamination, machine polish with a light cutting compound to correct surface marring and UV shadowing, and finally a sealant or protective coating application. Any paint chips or defects exposed during removal should be addressed with touch-up paint before the protective coating step to prevent moisture intrusion.
The decal comes off in minutes — the adhesive damage it leaves behind can take hours to correct and years of differential fade to fully reveal.
 |
 |
 |
 |

About Diego Ramirez
Diego Ramirez has been wrenching on cars since his teenage years and has built a deep practical knowledge of automotive maintenance and paint protection through years of hands-on work. He specializes in fluid service intervals, preventive care routines, exterior protection products, and the consistent habits that extend a vehicle's lifespan well beyond average. At CarCareTotal, he covers car care guides, cleaning and detailing products, and exterior maintenance and protection reviews.
Get some FREE car parts & gear.. Or check out the latest free automotive manuals and build guides here.
Disable your ad blocker to unlock all the hidden deals. Hit the button below 🚗
| | | |