Interior ›
by Rachel Park
Ever wrestled a set of seat covers out of the box, spent 45 minutes fighting with them, and ended up with something that looks like a wrinkled pillowcase? You're not alone — and the fix is simpler than you think. Learning how to install car seat covers the right way takes the guesswork out of the process and gets you a tight, professional-looking fit in under 30 minutes per seat. Whether you're just starting to upgrade your cabin or you've been browsing our car interior guides for a while, this walkthrough covers everything from choosing the right cover type to a step-by-step install and long-term care.
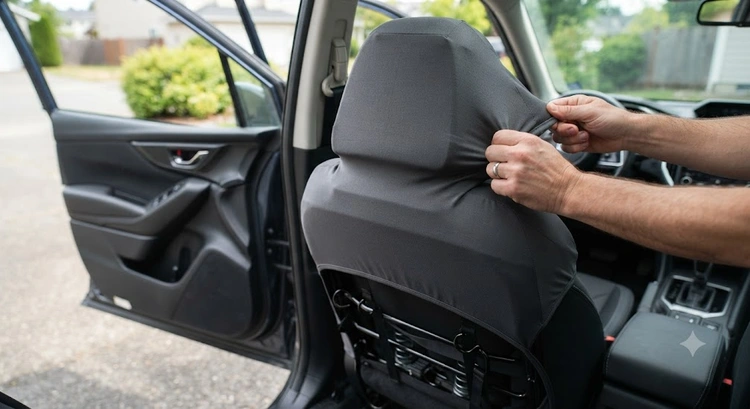
Seat covers protect your upholstery from spills, pet hair, UV fading, and everyday wear. But a sloppy install can leave you with bunching fabric, exposed gaps, and covers that slide forward every time you get in. The difference between a good result and a frustrating one usually comes down to a few key steps most people skip.
Whether you drive a compact sedan, a family SUV, or a work truck, the fundamentals are the same. Let's get into it.
Contents
Before you learn how to install car seat covers, you need to know which type you're working with. The installation process — and the difficulty — varies considerably depending on whether your cover is universal, semi-custom, or custom-fit. Here's a side-by-side comparison:
| Cover Type | Fit Quality | Install Difficulty | Price Range | Best For |
|---|---|---|---|---|
| Universal | Basic | Easy | $20–$80 | Budget buyers, temporary protection |
| Semi-Custom | Good | Moderate | $80–$200 | Most daily drivers, commuters |
| Custom-Fit | Excellent | Moderate–Hard | $150–$600+ | Long-term use, resale value preservation |
| Bench / Split-Bench | Variable | Moderate | $50–$250 | Trucks, vans, older vehicles |
One critical thing to check before you buy: if your vehicle has side-mounted seat airbags, make sure the covers you choose are labeled as airbag-compatible. Airbags (supplemental restraint systems that inflate on impact) must be able to burst through the cover's seam without obstruction. Non-compatible covers can block deployment, turning a safety feature into a hazard.
You don't need a mechanic's toolbox for this. But having the right supplies on hand before you begin saves a lot of frustration mid-install. Here's what to gather:
This step gets skipped constantly, and it always causes problems. Installing covers over crumbs, spills, or debris traps grime underneath — and over time that leads to odors, mold, and premature seat damage. Vacuum thoroughly and wipe the seat surface before you start. If your seats have existing stains, deal with them now rather than covering them up. Our guide on how to remove stains from car seats walks you through the right products and technique for fabric, leather, and vinyl.
Pro tip: Leave your seat covers in a warm car or direct sunlight for 10–15 minutes before installing. Warmer fabric stretches more easily, which makes tucking into tight corners much cleaner and reduces wrinkling.
The process is similar for most cover types, but the steps do differ slightly between front bucket seats and rear bench seats. Here's exactly how to do each one.
Warning: Don't leave even a small gap in the seat crevice. A half-tucked edge will creep forward within days of regular use, and within a week your entire install will look sloppy. Take the extra 5 minutes to tuck it all the way.
Seat covers aren't just for cars with damaged upholstery. In a lot of situations, they're one of the smartest investments you can make in your vehicle.
Families with young kids will also find a car seat toy useful to keep little ones occupied on longer drives — and the seat cover makes cleanup after those drives much faster.
Original upholstery in pristine condition is a real selling point when it's time to trade in or sell privately. Covers keep the factory seats untouched underneath. Pair them with all-weather floor mats and your interior stays like new from top to bottom — which shows up directly in trade-in value.
For high-use work vehicles — trucks, vans, and fleet vehicles — covers are far cheaper to replace than the seats themselves. If your vehicle doubles as a work vehicle, this is a no-brainer.
To round out your interior protection, consider pairing seat covers with a steering wheel cover. It protects the wheel from UV fading and cracking, and keeps your grip comfortable in extreme temperatures.
There's a lot of bad advice floating around about seat covers. Let's clear up the most common misconceptions so you can make a confident decision.
Only if you buy the wrong ones. Airbag-compatible covers have specially designed split seams on the side bolsters that allow the airbag to deploy normally. Look for "airbag compatible" or "SRS-approved" in the product specs before buying. If the listing doesn't mention it, assume it's not compatible and keep shopping.
Not quite. Universal covers work well on standard bucket seats, but they can be too short for tall seatbacks, too wide for narrow sport seats, or completely incompatible with built-in lumbar systems and integrated armrests. Measure your seat height and width before ordering — most product listings include a size guide.
Many drivers install seat covers on brand-new vehicles specifically to prevent damage from day one. Keeping factory upholstery in mint condition preserves your warranty coverage and maximizes resale value. Prevention is cheaper than repair.
Covers shift over time, especially on frequently used seats. The straps stretch, the tucks loosen, and before long the whole thing looks messy again. Plan to do a quick re-tuck and re-tighten check every couple of months.
Quick note: Seat covers don't have to look budget. High-end options in genuine leather, neoprene, or heavy-duty canvas can actually make your interior look more premium than the original factory upholstery.
Installation is half the job. Keeping your covers in good shape long-term takes regular but simple maintenance. Here's what that looks like by material type.
If spills make it past the cover and reach the actual seat, pull the cover off and treat the upholstery directly. Our roundup of the best car carpet stain removers includes several products that work just as well on seat fabric as they do on carpet — worth bookmarking for your cleaning kit.
A front bucket seat takes about 15–25 minutes your first time. The rear bench takes a bit longer — budget 30–40 minutes. Once you've done it once, you'll cut that time roughly in half on subsequent installs or when you switch covers out for washing.
You can, but it's much harder to get a smooth fit without gaps around the headrest base. Removing it takes about 30 seconds and gives you a clean starting point. It's worth the small extra effort.
It depends on the material. Thin polyester or fabric covers allow enough heat transfer for heated seats to work effectively. Thick neoprene, padded foam, or quilted covers can noticeably reduce the heating effect. Check the manufacturer's specs for your specific cover.
Universal covers often struggle with these. Semi-custom and custom-fit covers account for lumbar knobs, side bolsters, and integrated armrests in their patterns. Always cross-reference your seat features with the product compatibility list before ordering.
You can definitely do it solo. The rear bench is wider than a bucket seat, but the install method is the same. The trickiest part is tucking the full-width crevice — a long trim tool or even a wooden dowel helps push the fabric all the way in from one side to the other.
 |
 |
 |
 |

About Rachel Park
Rachel Park specializes in the interior and exterior upgrades that meaningfully change how a car looks, sounds, and feels on a daily basis. She has hands-on experience with head unit installations and audio system builds, LED and HID lighting conversions, interior refresh projects, and cosmetic exterior work — evaluated from both a DIY accessibility and quality-of-result perspective. At CarCareTotal, she covers car audio and electronics, lighting upgrades, and interior and exterior styling accessories.
Get some FREE car parts & gear.. Or check out the latest free automotive manuals and build guides here.
Disable your ad blocker to unlock all the hidden deals. Hit the button below 🚗
| | | |
